Panasonic AW-HE130 Operating Instructions - Page 68
<NOTE>, For Windows, For Mac OS X, When operation is transferred to the POWER ON mode
 |
View all Panasonic AW-HE130 manuals
Add to My Manuals
Save this manual to your list of manuals |
Page 68 highlights
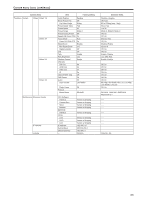
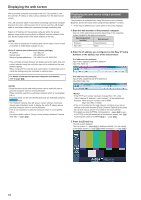
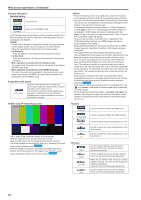
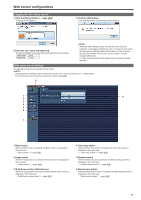
Web screen operations (continued) 8. Power ON button / Standby button (Power ON) Turn the unit on. (Standby) Set the unit to STANDBY mode. In the standby mode, all the buttons on the Live screen except for the [Multi-screen] list box, [Power ON] button, [Standby] button and [Op. Lock] button are disabled. • If Power ON or Standby is selected too quickly, the status selected and the display shown may not correspond. In a case like this, follow the steps below to restore the correct status display: For Windows: Press the [F5] key on the keyboard of the personal computer. For Mac OS X: Press the [Command] + [R] keys on the keyboard of the personal computer. • When operation is transferred to the Standby mode: The current zoom, focus and iris positions are stored in the memory (POWER ON preset). • When operation is transferred to the POWER ON mode: The zoom, focus and iris are adjusted to the positions which were stored in the memory (POWER ON preset) when operation was transferred to the STANDBY mode. 9. Operation lock button (Op. Lock) Use this to lock the operation of the pan, tilt, zoom, focus, brightness, speed, preset and scene operations on the control screen. Use this also to lock the on-screen display menu operations, CAM/BAR and Power ON button/ Standby button to prevent operations from being performed by accident. 10.Main area (IP video display area) The IP video of the connected camera will be displayed. While the tally lamp is on, the area frame will turn red. When the tally lamp is off, the display area will return to normal. The camera image can be zoomed in and out by operating the mouse wheel inside the display area. When the image is zoomed in, click within the display area at the desired new center position for the angle of view, then the camera image will appear centered around that position. • When the shooting scenes vary significantly, restrictions imposed by the graphics processing (GDI) of the operating system installed may give rise to a phenomenon called "screen tearing" (where parts of the picture are not displayed in synchronization) although this will depend on the personal computer used. • On a personal computer running Windows, if "H.264 transmission" (→page @@) is set to "On", H.264 images and JPEG images can be displayed. H.264 images will appear immediately after they appear on the Live screen (in single display mode). When it is set to [Off], only JPEG images will appear. • On a personal computer running Mac OS X, regardless of the "H.264 transmission" settings, only JPEG images will appear. (H.264 images will not appear.) • When [H.264 transmission] is set to [On], the frame rate for JPEG images may drop, regardless of whether H.264 images are being transmitted. • The speed at which the JPEG images are refreshed may be reduced depending on the network environment, performance of the personal computer used, subjects and number of access users. • Up to 14 users (consisting of users receiving H.264 images and users receiving JPEG images) can access the unit at the same time. (The maximum number of Android terminals which can be connected to the unit at the same time is one.) However, depending on the settings for the "Bandwidth control(bit rate)" and "Max bit rate (per client)*", the number of users who can access the unit may be limited to 14. • If the maximum number of users who can access the unit has exceeded the upper limit, a message advising that the unit is being accessed by more users than the maximum number allowed is displayed. • In the case of a personal computer which is running Mac OS X, the " " icon appears in the center of the main area which is displayed on a black screen. • When [Disable] is selected for [Tally] (→page @@, page @@), the camera's tally lamp will not light even when the tally signal is input. However, the area frame of the main area (IP video display area) will turn red. 11.Zoom (D-Zoom) Use this to enable or disable the digital zoom. (D-Extender) Use this to enable or disable the digital extender. (×1.0) (-) (+) Use this to adjust the zoom (magnification) to 1.0x. Use this to adjust the zoom (magnification) in the Wide direction. Use this to adjust the zoom (magnification) in the Tele direction. 12.Focus (Auto) (Near) (O.T.AF) (Far) Use this to switch between auto and manual focusing. When Auto is selected, the focus is adjusted automatically. Use this to adjust the focus in the Near direction. It does not work during automatic adjustments. When this is pressed while the focus is being adjusted manually, the focus will be temporarily adjusted automatically. It does not work during automatic adjustments. Use this to adjust the focus in the Far direction. It does not work during automatic adjustments. 68
-
 1
1 -
2
-
3
-
4
-
5
-
6
-
7
-
8
-
9
-
10
-
11
-
12
-
13
-
14
-
15
-
16
-
17
-
18
-
19
-
20
-
21
-
22
-
23
-
24
-
25
-
26
-
27
-
28
-
29
-
30
-
31
-
32
-
33
-
34
-
35
-
36
-
37
-
38
-
39
-
40
-
41
-
42
-
43
-
44
-
45
-
46
-
47
-
48
-
49
-
50
-
51
-
52
-
53
-
54
-
55
-
56
-
57
-
58
-
59
-
60
-
61
-
62
-
 63
63 -
 64
64 -
 65
65 -
 66
66 -
 67
67 -
 68
68 -
 69
69 -
 70
70 -
 71
71 -
 72
72 -
 73
73 -
74
-
75
-
76
-
77
-
78
-
79
-
80
-
81
-
82
-
83
-
84
-
85
-
86
-
87
-
88
-
89
-
90
-
91
-
92
-
93
-
94
-
95
-
96
-
97
-
98
-
99
-
100
-
101
-
102
-
103
-
104
-
105
-
106
-
107
-
108
-
109
-
110
-
111
-
112
-
113
-
114
-
115
-
116
-
117
-
118
-
119
-
120
-
121
-
122
-
123
-
124
-
125
-
126
 |
 |
