Panasonic AW-HE130 Operating Instructions - Page 93
Summer timedaylight saving [In, Out, Auto], Self-signed Certificate - Information
 |
View all Panasonic AW-HE130 manuals
Add to My Manuals
Save this manual to your list of manuals |
Page 93 highlights
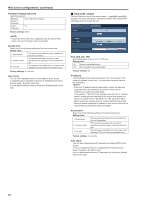
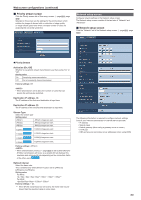
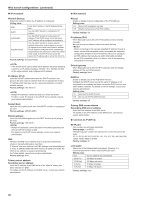
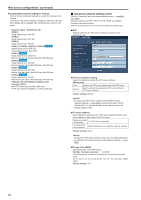
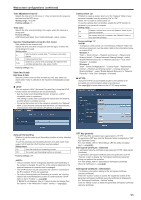
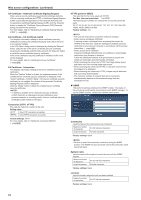
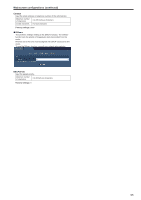
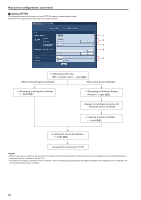
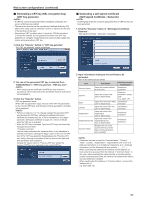
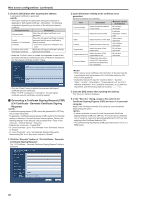
Web screen configurations (continued) Time adjustment interval Selects the interval (1 to 24 hours in 1-hour increments) for acquiring the time from the NTP server. Setting range: 1h to 24h Factory settings: 1h Time zone Selects the time zone according to the region where the camera is being used. Factory settings: (GMT)Greenwich Mean Time: Dubin,Edinburgh, Lisbon, London Summer time(daylight saving) [In, Out, Auto] Sets whether to use summer time. Selects the time zone that corresponds with the region in which the unit is going to be used. Setting value: In Sets the time to summer time. "*" is shown in the clock display. Out Cancels summer time. Auto Switches to summer time according to the start/end time and date settings (time, day, week, month). Factory settings: Out Start time & date End time & date Sets the summer time end time and date by time, day, week and month when "Auto" is selected in the "Summer time(daylight saving)" setting. zzUPnP This unit supports UPnP (Universal Plug and Play). Using the UPnP function allows the following to be set automatically. • Sets the router's port forwarding function. (However, a UPnPcompatible router is necessary). This setting is useful when accessing the camera from the Internet, a mobile phone or portable terminal. • It is set so that a short cut to the camera is created in the "Network" folder of your personal computer and that short cut is automatically renewed even when the camera's IP address is changed. Camera short cut Whether to create a camera short cut in the "Network" folder of your personal computer is set by selecting "On" or "Off". Select "On" to create a camera short cut. To use the camera short cut function, enable the UPnP function in advance in your personal computer. Setting value: On Creates a camera short cut in the "Network" folder of your personal computer. Off No camera short cut is created in the "Network" folder of your personal computer. Factory settings: Off • To display a camera short cut in the Windows "Network" folder, the Windows component must be added. Refer to the information below to enable UPnP. Windows 7 "Start"→"Control Panel"→"Network and Internet"→"Network and Sharing Center"→"Change Advanced Sharing Settings"→select "Enable Network Discovery" in "Network Discovery"→click "Save Changes"→Complete Windows 8 "Start"→Select "All Applications"→"Control Panel"→"Network and Internet"→"Network and Sharing Center"→"Change Advanced Sharing Settings"→select "Enable Network Discovery" in "Network Discovery"→click "Save Changes"→Complete zzHTTPS Using the HTTPS function enables access to the camera to be encrypted and communication safety to be improved. See page @@ for more details on the HTTPS setup method. Auto port forwarding Whether to use the router's port forwarding function is set by selecting "On" or "Off". To use the automatic port forwarding function, the used router must support UPnP and the UPnP function must be enabled. Setting value: On Uses the router's port forwarding function. Off The router's port forwarding function is not used. Factory settings: Off • The port number may be changed by automatic port forwarding. If the number is changed, the port No. of the camera registered to the personal computer or recorder must be changed. • The UPnP function may be used when the camera is connected to the IPv4 network. IPv6 is not supported. • To confirm that automatic port forwarding is correctly set, click the "Status" tab in the Maintenance screen to confirm that the "UPnP" status is set to "Enable". (→page@@) If "Enable"is not displayed, refer to "Cannot access the Internet from the Camera" in the "What's the Trouble?" section. (→page @@) CRT key generate A CRT key (SSL encryption key) is generated by HTTPS. To generate a CRT key, click the "Execute" button to display the "CRT Key Generate Dialog". For more details, refer to "Generating a CRT key (SSL encryption key)" (→page@@) Self-signed Certificate - Generate A self-signed security certificate is generated by HTTPS. (Self-signed Certificate) To generate a self-signed certificate (security certificate), click the "Execute" button to display the "Self-signed Certificate Generate" dialog and perform the operation. For more details, refer to "Generating a Self-signed Certificate (Security Certificate)" (→page@@). Self-signed Certificate - Information This displays information relating to the self-signed certificate (security certificate). When the "Confirm" button is clicked, the registered content of the generated self-signed certificate (security certificate) is displayed in the "Self-signed Certificate - Confirm" dialog. Click the "Delete" button to delete the generated self-signed certificate (security certificate). 93
-
 1
1 -
2
-
3
-
4
-
5
-
6
-
7
-
8
-
9
-
10
-
11
-
12
-
13
-
14
-
15
-
16
-
17
-
18
-
19
-
20
-
21
-
22
-
23
-
24
-
25
-
26
-
27
-
28
-
29
-
30
-
31
-
32
-
33
-
34
-
35
-
36
-
37
-
38
-
39
-
40
-
41
-
42
-
43
-
44
-
45
-
46
-
47
-
48
-
49
-
50
-
51
-
52
-
53
-
54
-
55
-
56
-
57
-
58
-
59
-
60
-
61
-
62
-
63
-
64
-
65
-
66
-
67
-
68
-
69
-
70
-
71
-
72
-
73
-
74
-
75
-
76
-
77
-
78
-
79
-
80
-
81
-
82
-
83
-
84
-
85
-
86
-
87
-
 88
88 -
 89
89 -
 90
90 -
 91
91 -
 92
92 -
 93
93 -
 94
94 -
 95
95 -
 96
96 -
 97
97 -
 98
98 -
99
-
100
-
101
-
102
-
103
-
104
-
105
-
106
-
107
-
108
-
109
-
110
-
111
-
112
-
113
-
114
-
115
-
116
-
117
-
118
-
119
-
120
-
121
-
122
-
123
-
124
-
125
-
126
 |
 |
