Panasonic AW-HE130 Operating Instructions - Page 97
Self-signed Certificate - Generate, Generating a CRT key SSL encryption key
 |
View all Panasonic AW-HE130 manuals
Add to My Manuals
Save this manual to your list of manuals |
Page 97 highlights
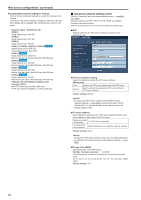
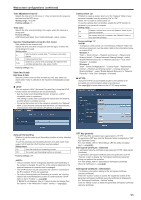
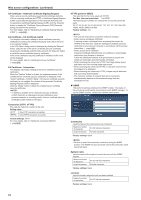
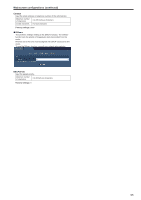
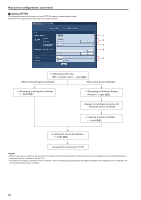
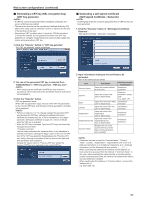
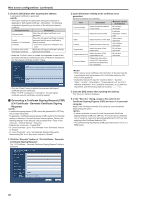
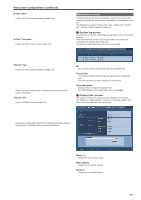
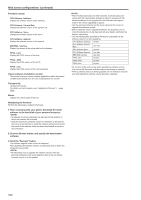
Web screen configurations (continued) „„Generating a CRT key (SSL encryption key) (CRT key generate) • A CRT key cannot be generated when self-signed certificates and server certificates are enabled. • The size of the key that can be used by the Certificate Authority (CA) differs when using a server certificate. Confirm in advance the the size of the key that can be used. • Generating a CRT key takes about 1 minute for 1024 bit and about 2 minutes for 2048 bit. Do not operate the browser until CRT key generation is complete. Image display and communication speed may reduce while generating a CRT key. 1. Click the "Execute" button in "CRT key generate". The "CRT key generate" dialog is displayed. „„Generating a self-signed certificate (Self-signed Certificate - Generate) • A self-signed certificate cannot be generated when a CRT key has not been generated. 1. Click the "Execute" button in "Self-signed Certificate Generate". "Self-signed Certificate - Generate" is displayed. 2. The size of the generated CRT key is selected from 1024bit/2048bit in "CRT key generate - RSA key size". • When using a server certificate, the RSA key size must be in accordance with the demands of the Certificate Authority (CA) which will be applied to. 3. Click the "Execute" button. CRT key generation starts. When CRT key generation stops, the size of the CRT key generated by the "Current CRT key" and the date and time generation concluded will be displayed. • Perform procedures 1 to 3 to change (update) the generated CRT key. Because the CRT key, self-signed certificate and server certificate are enabled as a set, it will be necessary to once again generate a self-signed certificate or apply for a server certificate when the CRT key is changed. • When the CRT key is changed, ?previous CRT keys are historically managed one at a time?. *Translator comment I did not really understand the Japanese here, so my translation is probably over-direct. Clicking the "Apply" button in the "Current CRT key" of the "CRT key generate" dialog displays the "Previous CRT key" dialog, allowing confirmation of the key size and the date and time generation was completed. Clicking the "Apply" button in "Previous CRT key" allows the previous CRT key to be switched to the current CRT key. 2. Input information relating to the certificate to be generated. Items to be entered are as follows. Item Description Maximum number of characters Common Name Inputs the camera address or host name. 64 half-size characters Country Inputs the country code. (can be abbreviated) 2 half-size characters: country code (e.g. Japan: JP) State Inputs the name of the state. 128 half-size (can be abbreviated) characters Locality Inputs the name of the city. 128 half-size (can be abbreviated) characters Organization Inputs the name of the organization. (can be abbreviated) 64 half-size characters Inputs the name of the Organizational Unit organizational unit. (can be abbreviated) 64 half-size characters Common Name Displays the size of the current CRT key and the date and time generation was completed. • Characters that can be input for "Common Name", "Country", "State", "Locality", "Organization", "Organizational Unit" are 0 to 9 (half-size characters), A to Z (half-size characters), a to z (half-size characters), and the following half-size symbols When connecting the camera to the Internet, set the address or host name to be accessed from the Internet in "Common Name". In this case, when accessing the camera locally, a security warning screen is displayed every time the camera is accessed even when a security certificate is installed. • When inputting the IPv6 address in "Common Name", surround the address with [ ]. e.g. [2001:db8::10] 97
-
 1
1 -
2
-
3
-
4
-
5
-
6
-
7
-
8
-
9
-
10
-
11
-
12
-
13
-
14
-
15
-
16
-
17
-
18
-
19
-
20
-
21
-
22
-
23
-
24
-
25
-
26
-
27
-
28
-
29
-
30
-
31
-
32
-
33
-
34
-
35
-
36
-
37
-
38
-
39
-
40
-
41
-
42
-
43
-
44
-
45
-
46
-
47
-
48
-
49
-
50
-
51
-
52
-
53
-
54
-
55
-
56
-
57
-
58
-
59
-
60
-
61
-
62
-
63
-
64
-
65
-
66
-
67
-
68
-
69
-
70
-
71
-
72
-
73
-
74
-
75
-
76
-
77
-
78
-
79
-
80
-
81
-
82
-
83
-
84
-
85
-
86
-
87
-
88
-
89
-
90
-
91
-
 92
92 -
 93
93 -
 94
94 -
 95
95 -
 96
96 -
 97
97 -
 98
98 -
 99
99 -
 100
100 -
 101
101 -
 102
102 -
103
-
104
-
105
-
106
-
107
-
108
-
109
-
110
-
111
-
112
-
113
-
114
-
115
-
116
-
117
-
118
-
119
-
120
-
121
-
122
-
123
-
124
-
125
-
126
 |
 |
