Ricoh Aficio SP C730DN Manuals - Page 44
Printing on Envelopes with Windows (PCL 6/PostScript 3), Panel, Operating Instructions.
 |
View all Ricoh Aficio SP C730DN manuals
Add to My Manuals
Save this manual to your list of manuals |
Page 44 highlights
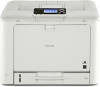
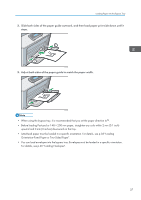
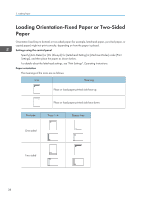
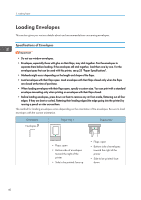
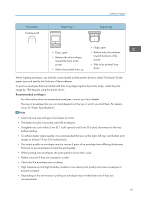
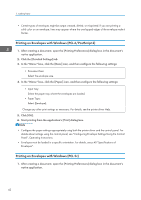
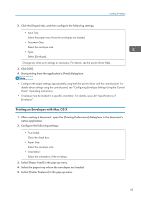
2. Loading Paper • Certain types of envelopes might be output creased, dirtied, or misprinted. If you are printing a solid color on an envelope, lines may appear where the overlapped edges of the envelope make it thicker. Printing on Envelopes with Windows (PCL 6/PostScript 3) 1. After creating a document, open the [Printing Preferences] dialog box in the document's native application. 2. Click the [Detailed Settings] tab. 3. In the "Menu:" box, click the [Basic] icon, and then configure the following settings: • Document Size: Select the envelope size. 4. In the "Menu:" box, click the [Paper] icon, and then configure the following settings: • Input Tray: Select the paper tray where the envelopes are loaded. • Paper Type: Select [Envelope]. Change any other print settings as necessary. For details, see the printer driver Help. 5. Click [OK]. 6. Start printing from the application's [Print] dialog box. • Configure the paper settings appropriately using both the printer driver and the control panel. For details about settings using the control panel, see "Configuring Envelope Settings Using the Control Panel", Operating Instructions. • Envelopes must be loaded in a specific orientation. For details, see p.40 "Specifications of Envelopes". Printing on Envelopes with Windows (PCL 5c) 1. After creating a document, open the [Printing Preferences] dialog box in the document's native application. 42
-
 1
1 -
2
-
3
-
4
-
5
-
6
-
7
-
8
-
9
-
10
-
11
-
12
-
13
-
14
-
15
-
16
-
17
-
18
-
19
-
20
-
21
-
22
-
23
-
24
-
25
-
26
-
27
-
28
-
29
-
30
-
31
-
32
-
33
-
34
-
35
-
36
-
37
-
38
-
 39
39 -
 40
40 -
 41
41 -
 42
42 -
 43
43 -
 44
44 -
 45
45 -
 46
46 -
 47
47 -
 48
48 -
 49
49 -
50
-
51
-
52
-
53
-
54
-
55
-
56
-
57
-
58
-
59
-
60
-
61
-
62
-
63
-
64
-
65
-
66
-
67
-
68
-
69
-
70
-
71
-
72
-
73
-
74
-
75
-
76
-
77
-
78
-
79
-
80
-
81
-
82
-
83
-
84
-
85
-
86
-
87
-
88
-
89
-
90
-
91
-
92
-
93
-
94
-
95
-
96
-
97
-
98
-
99
-
100
 |
 |