Ricoh Aficio SP C730DN Manuals - Page 52
Gradation Correction Sheet, Select [Print Test Pattern 2]
 |
View all Ricoh Aficio SP C730DN manuals
Add to My Manuals
Save this manual to your list of manuals |
Page 52 highlights
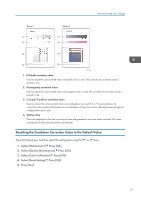
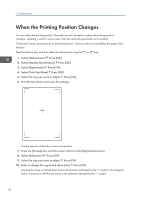
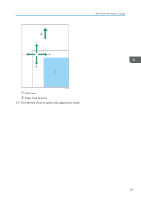
3. Troubleshooting 3. Select [Color Calibration] Press [OK] 4. Select [Adjust Auto Density] Press [OK] A confirmation message appears. Press [OK] to adjust Auto Density. A confirmation message appears when complete. Press [Exit]. The display returns to the [Color Calibration] screen. 5. Select [Print Test Pattern 1] Press [OK] 6. Press [Print] 7. Compare the colors printed on gradation correction sheet 1 with the colors you want to reproduce. When the selected sheet is printed, a confirmation message will appear. 8. Press [Continue] 9. Select the color you want to adjust. Press [OK] 10. Adjust the correction value. Press [OK] 11. Press [Result] 12. Check the result by printing the calibration sheet. 13. Press [Yes] 14. Select [Print Test Pattern 2] Press [OK] Adjust the midtones on gradation correction sheet 2 by repeating the procedure you used to adjust the color values on gradation correction sheet 1. Gradation Correction Sheet Reading the gradation correction sheet The printed gradation correction sheet is read as shown below: While comparing the gradation correction sheet and correction value of each color, K (black), M (magenta), and C (cyan)/Y (yellow) determine the required gradation correction and configure the settings using the control panel. 50
-
 1
1 -
2
-
3
-
4
-
5
-
6
-
7
-
8
-
9
-
10
-
11
-
12
-
13
-
14
-
15
-
16
-
17
-
18
-
19
-
20
-
21
-
22
-
23
-
24
-
25
-
26
-
27
-
28
-
29
-
30
-
31
-
32
-
33
-
34
-
35
-
36
-
37
-
38
-
39
-
40
-
41
-
42
-
43
-
44
-
45
-
46
-
 47
47 -
 48
48 -
 49
49 -
 50
50 -
 51
51 -
 52
52 -
 53
53 -
 54
54 -
 55
55 -
 56
56 -
 57
57 -
58
-
59
-
60
-
61
-
62
-
63
-
64
-
65
-
66
-
67
-
68
-
69
-
70
-
71
-
72
-
73
-
74
-
75
-
76
-
77
-
78
-
79
-
80
-
81
-
82
-
83
-
84
-
85
-
86
-
87
-
88
-
89
-
90
-
91
-
92
-
93
-
94
-
95
-
96
-
97
-
98
-
99
-
100
 |
 |