Ricoh Aficio SP C730DN Manuals - Page 54
When the Printing Position Changes
 |
View all Ricoh Aficio SP C730DN manuals
Add to My Manuals
Save this manual to your list of manuals |
Page 54 highlights
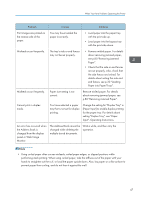
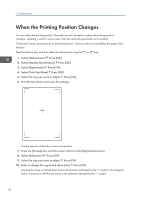
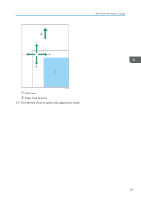
3. Troubleshooting When the Printing Position Changes You can adjust the printing position. Normally you do not need to update the printing position. However, updating is useful in some cases when the optional paper feed unit is installed. "Horizontal" means perpendicular to the feed direction. "Vertical" means it's parallel to the paper feed direction. Press the [Menu] key, and then select the setting items using the [ ] or [ ] key. 1. Select [Maintenance] Press [OK] 2. Select [Quality Maintenance] Press [OK] 3. Select [Registration] Press [OK] 4. Select [Print Test Sheet] Press [OK] 5. Select the tray you want to adjust. Press [OK] 6. Print the test sheet to preview the settings. Use this sheet to confirm the current print position. 7. Press the [Escape] key until the screen returns to the [Registration] menu. 8. Select [Adjustment] Press [OK] 9. Select the tray you want to adjust. Press [OK] 10. Enter to change the registered value (mm). Press [OK] Increase the value to shift the print area in the direction indicated by the "+" symbol in the diagram below. Decrease to shift the print area in the direction indicated by the "-" symbol. 52
-
 1
1 -
2
-
3
-
4
-
5
-
6
-
7
-
8
-
9
-
10
-
11
-
12
-
13
-
14
-
15
-
16
-
17
-
18
-
19
-
20
-
21
-
22
-
23
-
24
-
25
-
26
-
27
-
28
-
29
-
30
-
31
-
32
-
33
-
34
-
35
-
36
-
37
-
38
-
39
-
40
-
41
-
42
-
43
-
44
-
45
-
46
-
47
-
48
-
 49
49 -
 50
50 -
 51
51 -
 52
52 -
 53
53 -
 54
54 -
 55
55 -
 56
56 -
 57
57 -
 58
58 -
 59
59 -
60
-
61
-
62
-
63
-
64
-
65
-
66
-
67
-
68
-
69
-
70
-
71
-
72
-
73
-
74
-
75
-
76
-
77
-
78
-
79
-
80
-
81
-
82
-
83
-
84
-
85
-
86
-
87
-
88
-
89
-
90
-
91
-
92
-
93
-
94
-
95
-
96
-
97
-
98
-
99
-
100
 |
 |