Ricoh Aficio SP C730DN Manuals - Page 70
When the Data In Indicator Does Not Light Up or Flash, When the printer is connected to the computer using the interface cable, Network connection
 |
View all Ricoh Aficio SP C730DN manuals
Add to My Manuals
Save this manual to your list of manuals |
Page 70 highlights
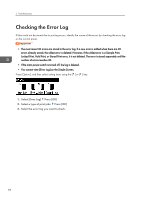
3. Troubleshooting Check the signal status in the [Wireless LAN] menu on the control panel. If the signal is poor, either move to a location where it is good, or remove obstructions. Is the printer installed in a location where radio waves might interfere? If the printer is using wireless LAN (IEEE802.11g/b/n), when there is a microwave oven, mobile phone, industrial machine, scientific instrument, or medical instrument which uses the same frequency range near the device, radio waves may be interfering with the wireless LAN's communication. Turn off the microwave oven, mobile phone, industrial machine, scientific instrument, or medical instrument which uses the same frequency range and then try printing again. If printing is successful, move the device to a location where it does not interfere. When the Data In Indicator Does Not Light Up or Flash When the Data In indicator does not light up or flash after starting a print job, data is not being sent to the printer. When the printer is connected to the computer using the interface cable This section describes how to check the print port when the Data In indicator does not light up or flash. Check if the print port setting is correct. When connecting using a parallel interface, connect it to LPT1 or LPT2. 1. Click the Start button, and then click [Control Panel]. 2. Click [Hardware and Sound]. 3. Click [Devices and Printers]. 4. Right-click the icon of the printer. On the context menu, click [Printer properties]. 5. Click the [Ports] tab. 6. In the [Print to the following port(s)] list, check that the correct port is selected. Network connection For details about network connection, contact your administrator. 68
-
 1
1 -
2
-
3
-
4
-
5
-
6
-
7
-
8
-
9
-
10
-
11
-
12
-
13
-
14
-
15
-
16
-
17
-
18
-
19
-
20
-
21
-
22
-
23
-
24
-
25
-
26
-
27
-
28
-
29
-
30
-
31
-
32
-
33
-
34
-
35
-
36
-
37
-
38
-
39
-
40
-
41
-
42
-
43
-
44
-
45
-
46
-
47
-
48
-
49
-
50
-
51
-
52
-
53
-
54
-
55
-
56
-
57
-
58
-
59
-
60
-
61
-
62
-
63
-
64
-
 65
65 -
 66
66 -
 67
67 -
 68
68 -
 69
69 -
 70
70 -
 71
71 -
 72
72 -
 73
73 -
 74
74 -
 75
75 -
76
-
77
-
78
-
79
-
80
-
81
-
82
-
83
-
84
-
85
-
86
-
87
-
88
-
89
-
90
-
91
-
92
-
93
-
94
-
95
-
96
-
97
-
98
-
99
-
100
 |
 |