Ricoh C232SF User Guide - Page 369
Configuring Telephone Network Settings, Selecting the telephone line type
 |
UPC - 026649064432
View all Ricoh C232SF manuals
Add to My Manuals
Save this manual to your list of manuals |
Page 369 highlights
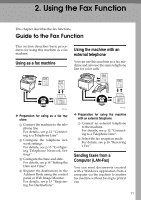
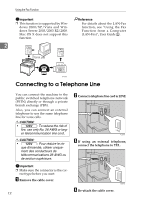
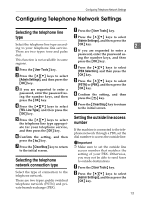
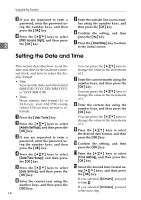
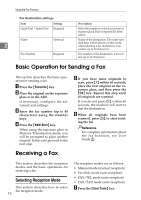
Configuring Telephone Network Settings Configuring Telephone Network Settings Selecting the telephone line type Select the telephone line type according to your telephone line service. There are two types: tone and pulse dial. This function is not available in some regions. A Press the {User Tools} key. B Press the {U}{T} keys to select [Admin Settings], and then press the {OK} key. C If you are requested to enter a password, enter the password using the number keys, and then press the {OK} key. D Press the {U}{T} keys to select [TEL Line Type], and then press the {OK} key. E Press the {U}{T} keys to select the telephone line type appropriate for your telephone service, and then press the {OK} key. F Confirm the setting, and then press the { } key. G Press the {Clear/Stop} key to return to the initial screen. Selecting the telephone network connection type Select the type of connection to the telephone network. There are two types: public switched telephone network (PSTN) and private branch exchange (PBX). A Press the {User Tools} key. B Press the {U}{T} keys to select [Admin Settings], and then press the {OK} key. 2 C If you are requested to enter a password, enter the password us- ing the number keys, and then press the {OK} key. D Press the {U}{T} keys to select [PBX Selection], and then press the {OK} key. E Press the {U}{T} keys to select [PSTN] or [PBX], and then press the {OK} key. F Confirm the setting, and then press the { } key. G Press the {Clear/Stop} key to return to the initial screen. Setting the outside line access number If the machine is connected to the telephone network through a PBX, set the dial number to access the outside line. Important ❒ Make sure to set the outside line access number that matches the setting of your PBX. Otherwise, you may not be able to send faxes to outside destinations. A Press the {User Tools} key. B Press the {U}{T} keys to select [Admin Settings], and then press the {OK} key. 13
-
 1
1 -
2
-
3
-
4
-
5
-
6
-
7
-
8
-
9
-
10
-
11
-
12
-
13
-
14
-
15
-
16
-
17
-
18
-
19
-
20
-
21
-
22
-
23
-
24
-
25
-
26
-
27
-
28
-
29
-
30
-
31
-
32
-
33
-
34
-
35
-
36
-
37
-
38
-
39
-
40
-
41
-
42
-
43
-
44
-
45
-
46
-
47
-
48
-
49
-
50
-
51
-
52
-
53
-
54
-
55
-
56
-
57
-
58
-
59
-
60
-
61
-
62
-
63
-
64
-
65
-
66
-
67
-
68
-
69
-
70
-
71
-
72
-
73
-
74
-
75
-
76
-
77
-
78
-
79
-
80
-
81
-
82
-
83
-
84
-
85
-
86
-
87
-
88
-
89
-
90
-
91
-
92
-
93
-
94
-
95
-
96
-
97
-
98
-
99
-
100
-
101
-
102
-
103
-
104
-
105
-
106
-
107
-
108
-
109
-
110
-
111
-
112
-
113
-
114
-
115
-
116
-
117
-
118
-
119
-
120
-
121
-
122
-
123
-
124
-
125
-
126
-
127
-
128
-
129
-
130
-
131
-
132
-
133
-
134
-
135
-
136
-
137
-
138
-
139
-
140
-
141
-
142
-
143
-
144
-
145
-
146
-
147
-
148
-
149
-
150
-
151
-
152
-
153
-
154
-
155
-
156
-
157
-
158
-
159
-
160
-
161
-
162
-
163
-
164
-
165
-
166
-
167
-
168
-
169
-
170
-
171
-
172
-
173
-
174
-
175
-
176
-
177
-
178
-
179
-
180
-
181
-
182
-
183
-
184
-
185
-
186
-
187
-
188
-
189
-
190
-
191
-
192
-
193
-
194
-
195
-
196
-
197
-
198
-
199
-
200
-
201
-
202
-
203
-
204
-
205
-
206
-
207
-
208
-
209
-
210
-
211
-
212
-
213
-
214
-
215
-
216
-
217
-
218
-
219
-
220
-
221
-
222
-
223
-
224
-
225
-
226
-
227
-
228
-
229
-
230
-
231
-
232
-
233
-
234
-
235
-
236
-
237
-
238
-
239
-
240
-
241
-
242
-
243
-
244
-
245
-
246
-
247
-
248
-
249
-
250
-
251
-
252
-
253
-
254
-
255
-
256
-
257
-
258
-
259
-
260
-
261
-
262
-
263
-
264
-
265
-
266
-
267
-
268
-
269
-
270
-
271
-
272
-
273
-
274
-
275
-
276
-
277
-
278
-
279
-
280
-
281
-
282
-
283
-
284
-
285
-
286
-
287
-
288
-
289
-
290
-
291
-
292
-
293
-
294
-
295
-
296
-
297
-
298
-
299
-
300
-
301
-
302
-
303
-
304
-
305
-
306
-
307
-
308
-
309
-
310
-
311
-
312
-
313
-
314
-
315
-
316
-
317
-
318
-
319
-
320
-
321
-
322
-
323
-
324
-
325
-
326
-
327
-
328
-
329
-
330
-
331
-
332
-
333
-
334
-
335
-
336
-
337
-
338
-
339
-
340
-
341
-
342
-
343
-
344
-
345
-
346
-
347
-
348
-
349
-
350
-
351
-
352
-
353
-
354
-
355
-
356
-
357
-
358
-
359
-
360
-
361
-
362
-
363
-
 364
364 -
 365
365 -
 366
366 -
 367
367 -
 368
368 -
 369
369 -
 370
370 -
 371
371 -
 372
372 -
 373
373 -
 374
374 -
375
-
376
-
377
-
378
-
379
-
380
-
381
-
382
-
383
-
384
-
385
-
386
-
387
-
388
-
389
-
390
-
391
-
392
-
393
-
394
-
395
-
396
-
397
-
398
-
399
-
400
-
401
-
402
-
403
-
404
-
405
-
406
-
407
-
408
-
409
-
410
-
411
-
412
-
413
-
414
-
415
-
416
 |
 |
