Ricoh C232SF User Guide - Page 370
PBX Access Digit, Clear/Stop, User Tools, Admin Settings, Date/Time Setup, Date Setting, hours
 |
UPC - 026649064432
View all Ricoh C232SF manuals
Add to My Manuals
Save this manual to your list of manuals |
Page 370 highlights
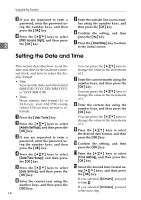
Using the Fax Function C E If you are requested to enter a Enter the outside line access num- password, enter the password us- ber using the number keys, and ing the number keys, and then then press the {OK} key. press the {OK} key. D Press the {U}{T} keys to select F Confirm the setting, and then press the { } key. 2 [PBX Access Digit], and then press the {OK} key. G Press the {Clear/Stop} key to return to the initial screen. Setting the Date and Time This section describes how to set the time and date for the machine's internal clock, and how to select the display format. • Date Year, month, date, and date format (MM/DD/YYYY, DD/MM YYYY, or YYYY MM/DD) • Time Hour, minute, time format (12- or 24-hour), and AM/PM stamp (when 12-hour time format is selected) A Press the {User Tools} key. B Press the {U}{T} keys to select [Admin Settings], and then press the {OK} key. C If you are requested to enter a password, enter the password using the number keys, and then press the {OK} key. D Press the {U}{T} keys to select [Date/Time Setup], and then press the {OK} key. E Press the {U}{T} keys to select [Date Setting], and then press the {OK} key. F Enter the current year using the number keys, and then press the {OK} key. 14 You can press the {U}{T} keys to change the value in the increments of 1. G Enter the current month using the number keys, and then press the {OK} key. You can press the {U}{T} keys to change the value in the increments of 1. H Enter the current day using the number keys, and then press the {OK} key. You can press the {U}{T} keys to change the value in the increments of 1. I Press the {U}{T} keys to select the desired date format, and then press the {OK} key. J Confirm the setting, and then press the {OK} key. K Press the {U}{T} keys to select [Time Setting], and then press the {OK} key. L Select the desired time format us- ing {U}{T} keys, and then press the {OK} key. If you selected [24 hours], proceed to step N. If you selected [12 hours], proceed to the next step.
-
 1
1 -
2
-
3
-
4
-
5
-
6
-
7
-
8
-
9
-
10
-
11
-
12
-
13
-
14
-
15
-
16
-
17
-
18
-
19
-
20
-
21
-
22
-
23
-
24
-
25
-
26
-
27
-
28
-
29
-
30
-
31
-
32
-
33
-
34
-
35
-
36
-
37
-
38
-
39
-
40
-
41
-
42
-
43
-
44
-
45
-
46
-
47
-
48
-
49
-
50
-
51
-
52
-
53
-
54
-
55
-
56
-
57
-
58
-
59
-
60
-
61
-
62
-
63
-
64
-
65
-
66
-
67
-
68
-
69
-
70
-
71
-
72
-
73
-
74
-
75
-
76
-
77
-
78
-
79
-
80
-
81
-
82
-
83
-
84
-
85
-
86
-
87
-
88
-
89
-
90
-
91
-
92
-
93
-
94
-
95
-
96
-
97
-
98
-
99
-
100
-
101
-
102
-
103
-
104
-
105
-
106
-
107
-
108
-
109
-
110
-
111
-
112
-
113
-
114
-
115
-
116
-
117
-
118
-
119
-
120
-
121
-
122
-
123
-
124
-
125
-
126
-
127
-
128
-
129
-
130
-
131
-
132
-
133
-
134
-
135
-
136
-
137
-
138
-
139
-
140
-
141
-
142
-
143
-
144
-
145
-
146
-
147
-
148
-
149
-
150
-
151
-
152
-
153
-
154
-
155
-
156
-
157
-
158
-
159
-
160
-
161
-
162
-
163
-
164
-
165
-
166
-
167
-
168
-
169
-
170
-
171
-
172
-
173
-
174
-
175
-
176
-
177
-
178
-
179
-
180
-
181
-
182
-
183
-
184
-
185
-
186
-
187
-
188
-
189
-
190
-
191
-
192
-
193
-
194
-
195
-
196
-
197
-
198
-
199
-
200
-
201
-
202
-
203
-
204
-
205
-
206
-
207
-
208
-
209
-
210
-
211
-
212
-
213
-
214
-
215
-
216
-
217
-
218
-
219
-
220
-
221
-
222
-
223
-
224
-
225
-
226
-
227
-
228
-
229
-
230
-
231
-
232
-
233
-
234
-
235
-
236
-
237
-
238
-
239
-
240
-
241
-
242
-
243
-
244
-
245
-
246
-
247
-
248
-
249
-
250
-
251
-
252
-
253
-
254
-
255
-
256
-
257
-
258
-
259
-
260
-
261
-
262
-
263
-
264
-
265
-
266
-
267
-
268
-
269
-
270
-
271
-
272
-
273
-
274
-
275
-
276
-
277
-
278
-
279
-
280
-
281
-
282
-
283
-
284
-
285
-
286
-
287
-
288
-
289
-
290
-
291
-
292
-
293
-
294
-
295
-
296
-
297
-
298
-
299
-
300
-
301
-
302
-
303
-
304
-
305
-
306
-
307
-
308
-
309
-
310
-
311
-
312
-
313
-
314
-
315
-
316
-
317
-
318
-
319
-
320
-
321
-
322
-
323
-
324
-
325
-
326
-
327
-
328
-
329
-
330
-
331
-
332
-
333
-
334
-
335
-
336
-
337
-
338
-
339
-
340
-
341
-
342
-
343
-
344
-
345
-
346
-
347
-
348
-
349
-
350
-
351
-
352
-
353
-
354
-
355
-
356
-
357
-
358
-
359
-
360
-
361
-
362
-
363
-
364
-
 365
365 -
 366
366 -
 367
367 -
 368
368 -
 369
369 -
 370
370 -
 371
371 -
 372
372 -
 373
373 -
 374
374 -
 375
375 -
376
-
377
-
378
-
379
-
380
-
381
-
382
-
383
-
384
-
385
-
386
-
387
-
388
-
389
-
390
-
391
-
392
-
393
-
394
-
395
-
396
-
397
-
398
-
399
-
400
-
401
-
402
-
403
-
404
-
405
-
406
-
407
-
408
-
409
-
410
-
411
-
412
-
413
-
414
-
415
-
416
 |
 |
