Sharp VL-WD450U VLWD450U|VLWD650U Operation Manual - Page 109
Before Requesting Service
 |
View all Sharp VL-WD450U manuals
Add to My Manuals
Save this manual to your list of manuals |
Page 109 highlights
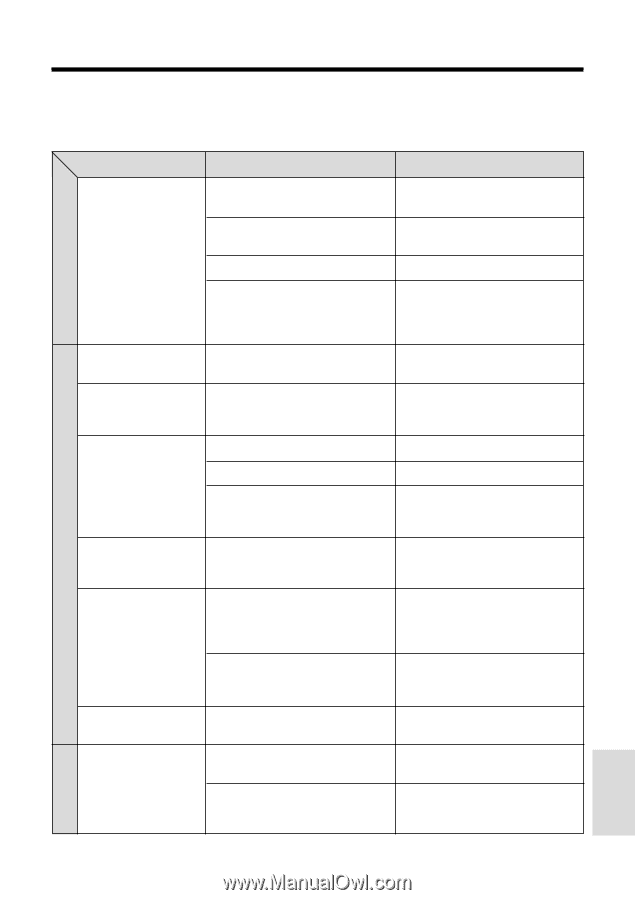
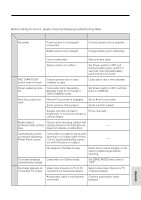
Before Requesting Service Before calling for service, please check the following troubleshooting table. Power Symptom Possible cause Suggested solution No power. Power source is not properly connected. Connect power source properly (pp. 10, 11). Battery pack is not charged. Charge battery pack sufficiently (p. 9). Dew in camcorder. Wait until dew dries (p. 91). Safety function is in effect. Set Power switch to OFF and remove battery pack; wait for 2 seconds, then reinstall battery pack and turn on power (p. 10). REC START/STOP Erasure protect tab on video button does not work. cassette is open. Close tab or use a new cassette (p. 88). Power suddenly turns off. Camcorder left in Recording Standby mode for 5 minutes in TAPE-CAMERA mode. Set Power switch to OFF and then back to CAMERA. Auto focus does not work. Manual Focus mode is engaged. Zoom used on close subject. Set to Auto Focus mode (p. 48). Zoom out from subject (p. 21). Subject has little contrast in Focus manually (p. 47). brightness, or is full of horizontal or vertical stripes. Bright subject Occurs when shooting subject with produces wide vertical strong contrast to the background. lines. Does not indicate a malfunction. -- Automatically zooms out without operating Power Zoom control. Camcorder is unable to focus when zooming in on subject within 6 feet (1.8 m), and automatically zooms out until it focuses on subject. -- No subject in the field of view. Direct lens to some subject, or set zoom to widest angle before shooting (p. 21). On-screen displays Camcorder is in Demo mode. automatically change. Set DEMO MODE menu item to "OFF" (p. 93). No image appears on Video input channel on TV or TV connected TV screen. channel is not selected properly. Select video input channel or TV channel properly (p. 24). Audio/video cable is not properly Connect audio/video cable connected. properly (p. 24). Recording mode Playback mode Appendix 94
-
 1
1 -
2
-
3
-
4
-
5
-
6
-
7
-
8
-
9
-
10
-
11
-
12
-
13
-
14
-
15
-
16
-
17
-
18
-
19
-
20
-
21
-
22
-
23
-
24
-
25
-
26
-
27
-
28
-
29
-
30
-
31
-
32
-
33
-
34
-
35
-
36
-
37
-
38
-
39
-
40
-
41
-
42
-
43
-
44
-
45
-
46
-
47
-
48
-
49
-
50
-
51
-
52
-
53
-
54
-
55
-
56
-
57
-
58
-
59
-
60
-
61
-
62
-
63
-
64
-
65
-
66
-
67
-
68
-
69
-
70
-
71
-
72
-
73
-
74
-
75
-
76
-
77
-
78
-
79
-
80
-
81
-
82
-
83
-
84
-
85
-
86
-
87
-
88
-
89
-
90
-
91
-
92
-
93
-
94
-
95
-
96
-
97
-
98
-
99
-
100
-
101
-
102
-
103
-
 104
104 -
 105
105 -
 106
106 -
 107
107 -
 108
108 -
 109
109 -
 110
110 -
 111
111 -
 112
112 -
 113
113 -
 114
114 -
115
-
116
-
117
-
118
-
119
-
120
 |
 |