Sharp VL-WD450U VLWD450U|VLWD650U Operation Manual - Page 6
Quick Operation Guide - camcorder manual
 |
View all Sharp VL-WD450U manuals
Add to My Manuals
Save this manual to your list of manuals |
Page 6 highlights
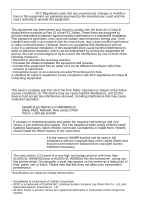
Quick Operation Guide Please consult this operation manual further for details on these and other functions of your camcorder. Charging the Battery Pack 1 Connect the supplied power cord to the AC power socket on the AC adapter/ battery charger, and insert the AC plug into a power outlet. 2 Align the s mark on the battery pack with the a mark on the charger (1) and guide the battery into the groove. Pressing the battery (2), slide it in the direction of the arrow (3) until it locks into place. Turning the Power on Media Selection switch Power switch To use the camera recording functions, hold down the Lock button and set the Power switch to CAMERA. Lock button To use the playback and editing functions, hold down the Lock button and set the Power switch to VCR. Lock button Attaching the Battery Pack 1 Make sure that the Power switch is set to OFF. 2 Lift up the viewfinder. 3 Align the - mark on the side of the battery pack with the q mark on the camcorder (1), and slide the battery pack down completely until it locks into place (2). Switching the Media To use a mini DV cassette for recording and playing back images, set the Media Selection switch to TAPE. To use a SmartMedia card for recording and playing back still images, set the Media Selection switch to CARD. Turning the Power off Set the Power switch to OFF without pressing the Lock button. v
-
 1
1 -
 2
2 -
 3
3 -
 4
4 -
 5
5 -
 6
6 -
 7
7 -
 8
8 -
 9
9 -
 10
10 -
 11
11 -
 12
12 -
13
-
14
-
15
-
16
-
17
-
18
-
19
-
20
-
21
-
22
-
23
-
24
-
25
-
26
-
27
-
28
-
29
-
30
-
31
-
32
-
33
-
34
-
35
-
36
-
37
-
38
-
39
-
40
-
41
-
42
-
43
-
44
-
45
-
46
-
47
-
48
-
49
-
50
-
51
-
52
-
53
-
54
-
55
-
56
-
57
-
58
-
59
-
60
-
61
-
62
-
63
-
64
-
65
-
66
-
67
-
68
-
69
-
70
-
71
-
72
-
73
-
74
-
75
-
76
-
77
-
78
-
79
-
80
-
81
-
82
-
83
-
84
-
85
-
86
-
87
-
88
-
89
-
90
-
91
-
92
-
93
-
94
-
95
-
96
-
97
-
98
-
99
-
100
-
101
-
102
-
103
-
104
-
105
-
106
-
107
-
108
-
109
-
110
-
111
-
112
-
113
-
114
-
115
-
116
-
117
-
118
-
119
-
120
 |
 |
