Sharp VL-WD450U VLWD450U|VLWD650U Operation Manual - Page 66
Manual Exposure
 |
View all Sharp VL-WD450U manuals
Add to My Manuals
Save this manual to your list of manuals |
Page 66 highlights
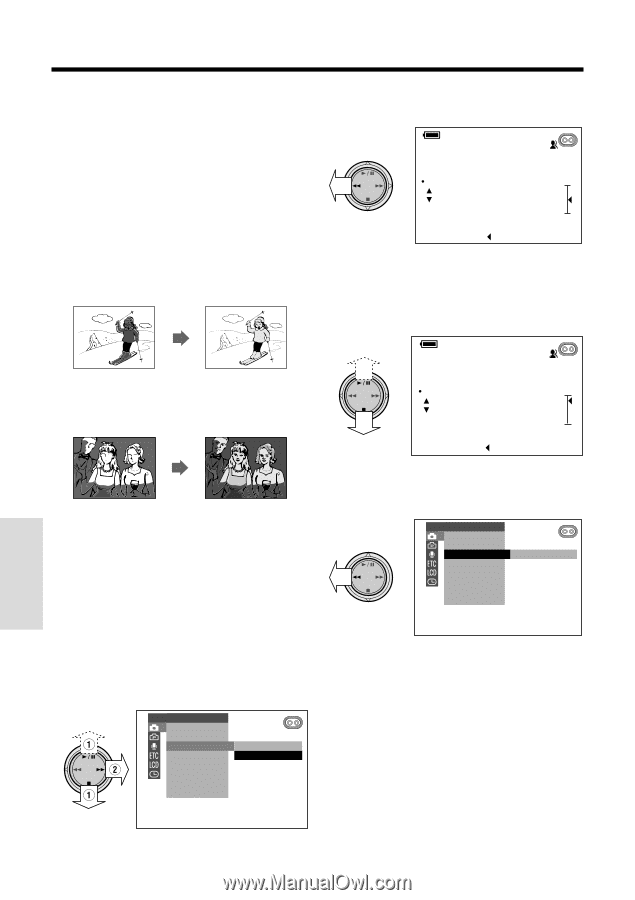
Advanced Features Camera Recording Manual Exposure 5 Press e to display the exposure setting screen. The camcorder is preset to Auto Exposure mode, which automatically chooses the optimal aperture. When there is too much contrast in brightness between the subject and background, however, you may not be able to record a clear image. In this case, use the manual exposure function to correct the exposure level. MAN U A L 12 bit E X P O SURE +5 + - 0 -5 SP SE T [ BUT TON] Background is too bright and subject too dark (backlit subject). • Increase the exposure level to allow more light through the lens. 6 Press d or y to select the desired exposure level. • The number shown is the selected exposure level. The adjustment range is from +5 (least light) to L5 (most light). MAN U A L 12 bit Subject is too bright against background. • Decrease the exposure level to allow less light through the lens. 1 Set the camcorder to TAPE-CAMERA or CARD-CAMERA mode. 2 Press the AUTO ON/OFF button to select Manual mode. 3 Press the MENU/DISPLAY button until the menu screen appears. 4 Select T, then press r on the Operation button. Select "EXPOSURE" (1), then press r (2). MANUAL SE T MAN. FOCUS SHUT. SPE ED EXPOSURE AUTO P I C. E F FECT MANUAL SCE NE MENU FADE QK. RE TURN DIS 51 E X P O SURE +5 + - +3 -5 SP SE T [ BUT TON] 7 Press e. • The selected exposure level is displayed on the menu screen. MANUAL SE T MAN. FOCUS SHUT. SPE ED EXPOSURE + 3 P I C. EFFECT SCE NE MENU FADE QK. RE TURN DIS 8 Press the MENU/DISPLAY button to turn off the menu screen. To cancel Manual Exposure mode After performing step 4 above, select "AUTO", then press e. Notes: • Manual Exposure mode will be canceled if a scene setting is selected thereafter. • Manual Exposure cannot be used with Night Recording. • When you want to cancel all manual settings and return to Auto mode, press the AUTO ON/OFF button. Advanced Features
-
 1
1 -
2
-
3
-
4
-
5
-
6
-
7
-
8
-
9
-
10
-
11
-
12
-
13
-
14
-
15
-
16
-
17
-
18
-
19
-
20
-
21
-
22
-
23
-
24
-
25
-
26
-
27
-
28
-
29
-
30
-
31
-
32
-
33
-
34
-
35
-
36
-
37
-
38
-
39
-
40
-
41
-
42
-
43
-
44
-
45
-
46
-
47
-
48
-
49
-
50
-
51
-
52
-
53
-
54
-
55
-
56
-
57
-
58
-
59
-
60
-
 61
61 -
 62
62 -
 63
63 -
 64
64 -
 65
65 -
 66
66 -
 67
67 -
 68
68 -
 69
69 -
 70
70 -
 71
71 -
72
-
73
-
74
-
75
-
76
-
77
-
78
-
79
-
80
-
81
-
82
-
83
-
84
-
85
-
86
-
87
-
88
-
89
-
90
-
91
-
92
-
93
-
94
-
95
-
96
-
97
-
98
-
99
-
100
-
101
-
102
-
103
-
104
-
105
-
106
-
107
-
108
-
109
-
110
-
111
-
112
-
113
-
114
-
115
-
116
-
117
-
118
-
119
-
120
 |
 |