Sharp VL-WD450U VLWD450U|VLWD650U Operation Manual - Page 32
Adjusting the Hand Strap, Attaching the Shoulder Strap, Using the Lens Cap
 |
View all Sharp VL-WD450U manuals
Add to My Manuals
Save this manual to your list of manuals |
Page 32 highlights
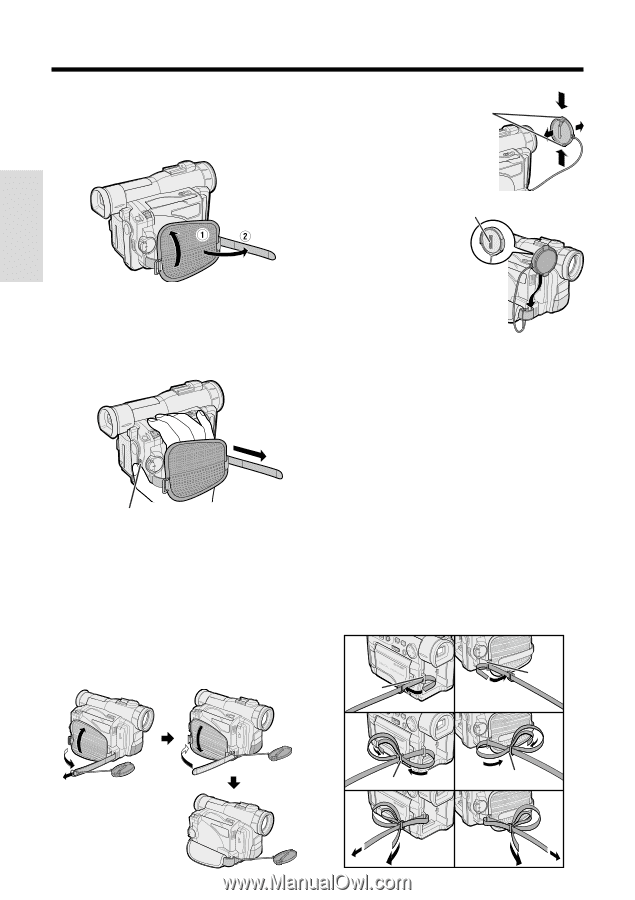
Preparation Preparation Adjusting the Hand Strap 1 Open the hand strap flap (1) and the grip strap (2). When attaching or removing the lens cap, press both tabs on the top and bottom of the cap. Tabs 2 Loosen the grip strap, pass your right hand through the loop, and put your thumb on the REC START/STOP button. Then, pull the grip strap tight until it fits snugly. REC START/STOP button 3 Seal the velcro fasteners of the grip strap and the hand strap flap. Caution: • Do not swing the camcorder by the hand strap. Using the Lens Cap Attach the strap of the lens cap to the hand strap as shown below. Hook When recording, hang the hook of the lens cap on the hand strap so that the cap will not get in the way. Note: • Always replace the lens cap on the lens when the camcorder is not in use. Attaching the Shoulder Strap 1 Remove the battery pack. 2 Hold one end of the strap and thread it through the loop on the left side of the power source mounting surface. 3 Loosen the strap in the buckle, then feed the end of the strap through the buckle, as shown. 4 Draw the strap in the direction of the arrow to secure. 5-7 To attach the other end of the strap to the loop on the left side of the hand strap, open the hand strap flap, perform the same procedure, and then attach the battery pack. 2 5 Loop Loop 3 6 Buckle 4 Buckle 7 17
-
 1
1 -
2
-
3
-
4
-
5
-
6
-
7
-
8
-
9
-
10
-
11
-
12
-
13
-
14
-
15
-
16
-
17
-
18
-
19
-
20
-
21
-
22
-
23
-
24
-
25
-
26
-
 27
27 -
 28
28 -
 29
29 -
 30
30 -
 31
31 -
 32
32 -
 33
33 -
 34
34 -
 35
35 -
 36
36 -
 37
37 -
38
-
39
-
40
-
41
-
42
-
43
-
44
-
45
-
46
-
47
-
48
-
49
-
50
-
51
-
52
-
53
-
54
-
55
-
56
-
57
-
58
-
59
-
60
-
61
-
62
-
63
-
64
-
65
-
66
-
67
-
68
-
69
-
70
-
71
-
72
-
73
-
74
-
75
-
76
-
77
-
78
-
79
-
80
-
81
-
82
-
83
-
84
-
85
-
86
-
87
-
88
-
89
-
90
-
91
-
92
-
93
-
94
-
95
-
96
-
97
-
98
-
99
-
100
-
101
-
102
-
103
-
104
-
105
-
106
-
107
-
108
-
109
-
110
-
111
-
112
-
113
-
114
-
115
-
116
-
117
-
118
-
119
-
120
 |
 |