Sharp VL-WD450U VLWD450U|VLWD650U Operation Manual - Page 24
Preparation - camcorder model
 |
View all Sharp VL-WD450U manuals
Add to My Manuals
Save this manual to your list of manuals |
Page 24 highlights
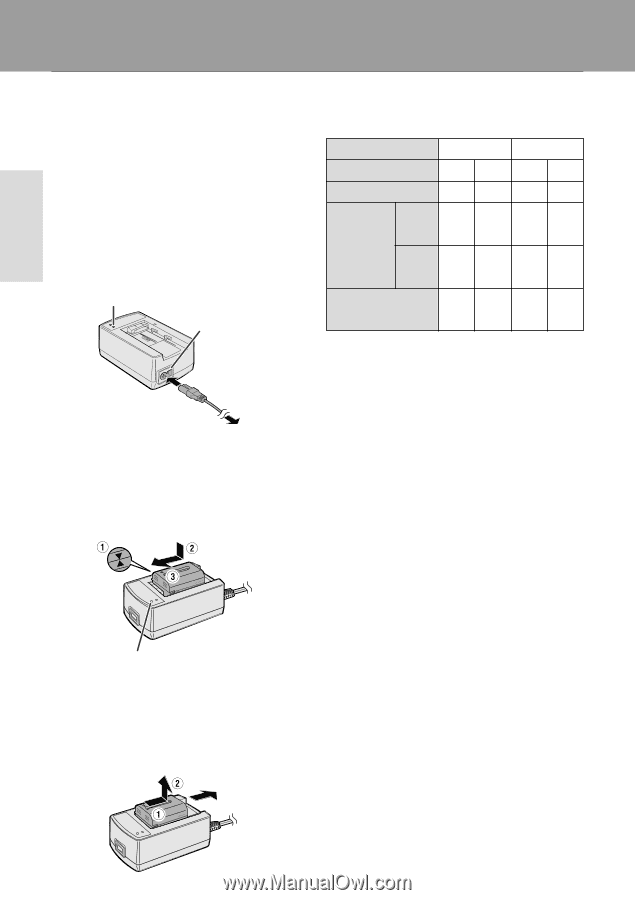
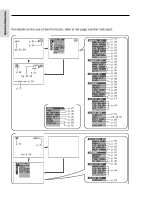
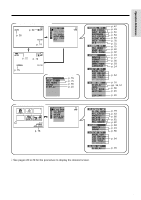
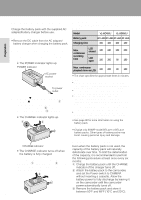
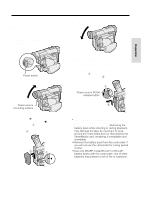
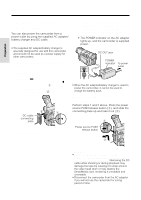
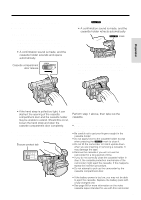
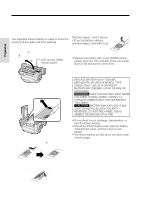
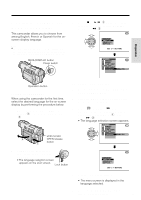
PPrerpearpataionration Preparation Charging the Battery Pack Charge the battery pack with the supplied AC adapter/battery charger before use. Note: • Remove the DC cable from the AC adapter/ battery charger when charging the battery pack. 1 Connect the supplied power cord to the AC power socket on the AC adapter/ battery charger, and insert the AC plug into a power outlet. • The POWER indicator lights up. POWER indicator AC power socket To power outlet 2 Align the s mark on the battery pack with the a mark on the charger (1) and guide the battery into the groove. Pressing the battery (2), slide it in the direction of the arrow (3) until it locks into place. • The CHARGE indicator lights up. Charging time and maximum continuous recording and playback times in TAPE modes Model Battery pack Charging time VL-WD450U VL-WD650U BT-L221 BT-L441 BT-L221 BT-L441 100 160 100 160 Max. LCD closed 120 240 120 240 continuous recording time LCD open 100 200 90 180 Max. continuous playback time on LCD 100 200 90 180 • The chart specifies the approximate times in minutes. Notes: • Charge the battery pack between 50°F and 86°F (10°C and 30°C). The battery pack may not charge properly at temperatures too low or too high. • The battery pack and charger become warm during charging. This is not a malfunction. • Using the zoom (see page 21) and other functions or turning the power on and off frequently will increase power consumption. This may result in a decrease of more than 50% in the actual recording time compared to the maximum continuous recording time listed above. • The charging time and recording time may vary depending on the ambient temperature and the condition of the battery pack. • See page 90 for more information on using the battery pack. Caution: • Charge only SHARP model BT-L221 or BT-L441 battery packs. Other types of battery packs may burst, causing personal injury and damage. CHARGE indicator • The CHARGE indicator turns off when the battery is fully charged. 3 Slide the battery pack in the direction of the arrow (1), and remove it (2). Then, remove the AC plug of the power cord from the power outlet. 9 Extending battery pack life Even when the battery pack is not used, the capacity of the battery pack will naturally deteriorate over time. To limit the deterioration of the capacity, it is recommended to perform the following procedure at least once every six months: 1 Charge the battery pack until the CHARGE indicator of the charger turns off. 2 Attach the battery pack to the camcorder, and set the Power switch to CAMERA without inserting a cassette. Allow the battery power to fully discharge by leaving it on the camcorder until the camcorder power automatically turns off. 3 Remove the battery pack and store it between 50°F and 68°F (10°C and 20°C).
-
 1
1 -
2
-
3
-
4
-
5
-
6
-
7
-
8
-
9
-
10
-
11
-
12
-
13
-
14
-
15
-
16
-
17
-
18
-
 19
19 -
 20
20 -
 21
21 -
 22
22 -
 23
23 -
 24
24 -
 25
25 -
 26
26 -
 27
27 -
 28
28 -
 29
29 -
30
-
31
-
32
-
33
-
34
-
35
-
36
-
37
-
38
-
39
-
40
-
41
-
42
-
43
-
44
-
45
-
46
-
47
-
48
-
49
-
50
-
51
-
52
-
53
-
54
-
55
-
56
-
57
-
58
-
59
-
60
-
61
-
62
-
63
-
64
-
65
-
66
-
67
-
68
-
69
-
70
-
71
-
72
-
73
-
74
-
75
-
76
-
77
-
78
-
79
-
80
-
81
-
82
-
83
-
84
-
85
-
86
-
87
-
88
-
89
-
90
-
91
-
92
-
93
-
94
-
95
-
96
-
97
-
98
-
99
-
100
-
101
-
102
-
103
-
104
-
105
-
106
-
107
-
108
-
109
-
110
-
111
-
112
-
113
-
114
-
115
-
116
-
117
-
118
-
119
-
120
 |
 |