Sharp VL-WD450U VLWD450U|VLWD650U Operation Manual - Page 81
Recording from an External, Source
 |
View all Sharp VL-WD450U manuals
Add to My Manuals
Save this manual to your list of manuals |
Page 81 highlights
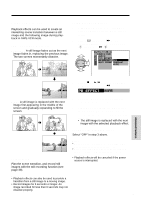
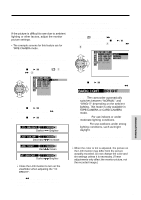
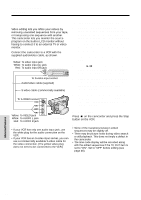
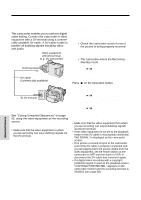
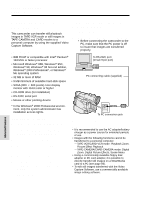
Recording from an External Source To Record from an External Source 1 Set the camcorder to TAPE-VCR mode. You can use this camcorder to record or edit 2 Begin playback on the source equipment videos from another source, such as a VCR, TV, connected to the camcorder. or video disc player. • Check the camcorder screen to see if Connect the camcorder to the source equip- the picture is being properly received. ment with the supplied audio/video cable, as shown. Recording 3 Press the REC START/STOP button on the camcorder. To S-VIDEO socket • The camcorder enters the Recording Standby mode. 4 Press y on the Operation button to begin recording. Yellow: To VIDEO jack White: To AUDIO L jack Red: To AUDIO R jack S-video cable (commercially available) Audio/video cable (supplied) Notes: • To pause recording, press y. Press y again to resume recording. • To operate by remote control, perform steps 1 and 2 above, and press the TAPE REC START/ STOP button, then press the PAUSE/STILL button (g). • If "NO SIGNAL" is displayed on the camcorder screen, check that the S-video cable or audio/ video cable is properly connected. To stop recording To S-video output socket Press d on the Operation button. Yellow: To video output jack White: To audio output (L) jack Red: To audio output (R) jack Playback TV with monitor output VCR Video disc player Advanced Features Notes: • If the source equipment has only one audio output jack, use the white plug for the audio connection on the source equipment. (The input audio will only be recorded on the left channel of the tape.) • If the source equipment has an S-video input socket, you can use a commercially available Svideo cable for the video connection. (The yellow video plug does not need to be connected to the VCR.) 66
-
 1
1 -
2
-
3
-
4
-
5
-
6
-
7
-
8
-
9
-
10
-
11
-
12
-
13
-
14
-
15
-
16
-
17
-
18
-
19
-
20
-
21
-
22
-
23
-
24
-
25
-
26
-
27
-
28
-
29
-
30
-
31
-
32
-
33
-
34
-
35
-
36
-
37
-
38
-
39
-
40
-
41
-
42
-
43
-
44
-
45
-
46
-
47
-
48
-
49
-
50
-
51
-
52
-
53
-
54
-
55
-
56
-
57
-
58
-
59
-
60
-
61
-
62
-
63
-
64
-
65
-
66
-
67
-
68
-
69
-
70
-
71
-
72
-
73
-
74
-
75
-
 76
76 -
 77
77 -
 78
78 -
 79
79 -
 80
80 -
 81
81 -
 82
82 -
 83
83 -
 84
84 -
 85
85 -
 86
86 -
87
-
88
-
89
-
90
-
91
-
92
-
93
-
94
-
95
-
96
-
97
-
98
-
99
-
100
-
101
-
102
-
103
-
104
-
105
-
106
-
107
-
108
-
109
-
110
-
111
-
112
-
113
-
114
-
115
-
116
-
117
-
118
-
119
-
120
 |
 |
