Sony DSLR A700H User's Guide - Page 117
Date imprint, Index print
 |
UPC - 027242736122
View all Sony DSLR A700H manuals
Add to My Manuals
Save this manual to your list of manuals |
Page 117 highlights
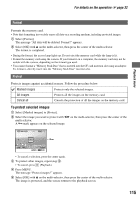
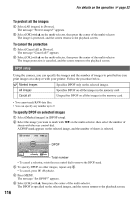
Playback menu For details on the operation 1 page 32 To specify DPOF on all the images 1 Select [All images] in [DPOF setup]. The message "Number of copies?" appears. 2 Select a number of sheets with v/V on the multi-selector, then press the center of the multiselector. The message "Set DPOF?" appears. 3 Select [OK] with v, then press the center of the multi-selector. The DPOF is specified on all the images, and the screen returns to the playback screen. • If you insert a memory card that contains DPOF-marked images specified with other cameras into this camera, then specify images to which to attach a DPOF-mark, the DPOF specifications made with other cameras are canceled. To unspecify DPOF on all the images When you do so, the index print is also canceled. Since the DPOF marks are left on after printing, it is recommended that you just clear the marks. 1 Select [Cancel all] in [DPOF setup]. The message "Cancel all?" appears. 2 Select [OK] with v on the multi-selector, then press the center of the multi-selector. The DPOF is unspecified on all the images, and the screen returning to the playback screen. Date imprint You can impose the date onto images when printing images. The position of the date (inside or outside the image, character size, etc.) depends on your printer. On Imposes the date. Off Does not impose the date. • Normally, only the date is inserted, however, imposed items may be different depending on the printer. This function may not be provided, depending on the printer. Index print You can create an index print of all the images in the memory card. Create index Specifies an index print. Delete index Does not specify an index print. • The number of images to print on a sheet and the format depend on the printer. RAW images do not print in index print. • The images you shot after setting the index print are not included in the index print. It is recommended that you create the index print just before printing it. 117
-
 1
1 -
2
-
3
-
4
-
5
-
6
-
7
-
8
-
9
-
10
-
11
-
12
-
13
-
14
-
15
-
16
-
17
-
18
-
19
-
20
-
21
-
22
-
23
-
24
-
25
-
26
-
27
-
28
-
29
-
30
-
31
-
32
-
33
-
34
-
35
-
36
-
37
-
38
-
39
-
40
-
41
-
42
-
43
-
44
-
45
-
46
-
47
-
48
-
49
-
50
-
51
-
52
-
53
-
54
-
55
-
56
-
57
-
58
-
59
-
60
-
61
-
62
-
63
-
64
-
65
-
66
-
67
-
68
-
69
-
70
-
71
-
72
-
73
-
74
-
75
-
76
-
77
-
78
-
79
-
80
-
81
-
82
-
83
-
84
-
85
-
86
-
87
-
88
-
89
-
90
-
91
-
92
-
93
-
94
-
95
-
96
-
97
-
98
-
99
-
100
-
101
-
102
-
103
-
104
-
105
-
106
-
107
-
108
-
109
-
110
-
111
-
 112
112 -
 113
113 -
 114
114 -
 115
115 -
 116
116 -
 117
117 -
 118
118 -
 119
119 -
 120
120 -
 121
121 -
 122
122 -
123
-
124
-
125
-
126
-
127
-
128
-
129
-
130
-
131
-
132
-
133
-
134
-
135
-
136
-
137
-
138
-
139
-
140
-
141
-
142
-
143
-
144
-
145
-
146
-
147
-
148
-
149
-
150
-
151
-
152
-
153
-
154
-
155
-
156
-
157
-
158
-
159
-
160
-
161
-
162
-
163
-
164
-
165
-
166
-
167
-
168
-
169
-
170
-
171
-
172
-
173
-
174
-
175
-
176
-
177
-
178
-
179
 |
 |
