Sony DSLR A700H User's Guide - Page 76
Select the desired value with the front or rear control dial.
 |
UPC - 027242736122
View all Sony DSLR A700H manuals
Add to My Manuals
Save this manual to your list of manuals |
Page 76 highlights
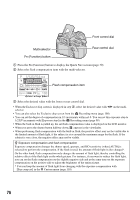
Front control dial Multi-selector Fn (Function) button Rear control dial 1 Press the Fn (Function) button to display the Quick Navi screen (page 30). 2 Select the flash compensation item with the multi-selector. Flash compensation item 3 Select the desired value with the front or rear control dial. • When the Exclusive disp screen is displayed in step 2, select the desired value with b/B on the multiselector. • You can also select the Exclusive disp screen from the Recording menu (page 100). • You can set the degree of compensation in 1/3 increments within ±3.0. You can set this exposure step to 1/2 EV increments with [Exposure step] in the Recording menu (page 98). • When the built-in flash is pulled up, the set flash compensation value is displayed on the LCD monitor. • When you press the shutter button halfway down, appears in the viewfinder. • When performing flash compensation with the built-in flash, the positive effect may not be visible due to the limited amount of flash light, if the subject is at or around the maximum range for the flash. If the subject is very close, the negative effect may not be visible. z Exposure compensation and flash compensation Exposure compensation changes the shutter speed, aperture, and ISO sensitivity (when [AUTO] is selected) to perform the compensation. If the flash is used, the amount of flash light is also changed*. On the other hand, flash compensation only changes the amount of flash light, thereby controlling the relative effect of the flash light on the whole picture. For instance, if you want to reduce the flash light, you can set the flash compensation on the slightly negative side and at the same time set the exposure compensation on the positive side to adjust the brightness of the entire picture. * You can keep the amount of flash light from changing with the exposure compensation with [Exp.comp.set] in the Custom menu (page 110). 76
-
 1
1 -
2
-
3
-
4
-
5
-
6
-
7
-
8
-
9
-
10
-
11
-
12
-
13
-
14
-
15
-
16
-
17
-
18
-
19
-
20
-
21
-
22
-
23
-
24
-
25
-
26
-
27
-
28
-
29
-
30
-
31
-
32
-
33
-
34
-
35
-
36
-
37
-
38
-
39
-
40
-
41
-
42
-
43
-
44
-
45
-
46
-
47
-
48
-
49
-
50
-
51
-
52
-
53
-
54
-
55
-
56
-
57
-
58
-
59
-
60
-
61
-
62
-
63
-
64
-
65
-
66
-
67
-
68
-
69
-
70
-
 71
71 -
 72
72 -
 73
73 -
 74
74 -
 75
75 -
 76
76 -
 77
77 -
 78
78 -
 79
79 -
 80
80 -
 81
81 -
82
-
83
-
84
-
85
-
86
-
87
-
88
-
89
-
90
-
91
-
92
-
93
-
94
-
95
-
96
-
97
-
98
-
99
-
100
-
101
-
102
-
103
-
104
-
105
-
106
-
107
-
108
-
109
-
110
-
111
-
112
-
113
-
114
-
115
-
116
-
117
-
118
-
119
-
120
-
121
-
122
-
123
-
124
-
125
-
126
-
127
-
128
-
129
-
130
-
131
-
132
-
133
-
134
-
135
-
136
-
137
-
138
-
139
-
140
-
141
-
142
-
143
-
144
-
145
-
146
-
147
-
148
-
149
-
150
-
151
-
152
-
153
-
154
-
155
-
156
-
157
-
158
-
159
-
160
-
161
-
162
-
163
-
164
-
165
-
166
-
167
-
168
-
169
-
170
-
171
-
172
-
173
-
174
-
175
-
176
-
177
-
178
-
179
 |
 |
