Sony DSLR A700H User's Guide - Page 148
Printing with the Remote, Commander supplied
 |
UPC - 027242736122
View all Sony DSLR A700H manuals
Add to My Manuals
Save this manual to your list of manuals |
Page 148 highlights
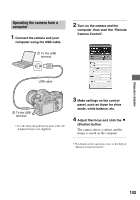
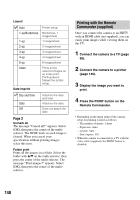
Layout Auto 1-up/Borderless 1-up 2-up 3-up 4-up 8-up Index Date imprint Printer setup Borderless, 1 image/sheet 1 image/sheet 2 images/sheet 3 images/sheet 4 images/sheet 8 images/sheet Prints all the selected images as an index print. Printing layout follows the printer setup. Day and time Date Off Attaches the date and time. Attaches the date. Does not attach the date. Page 2 Unmark all The message "Cancel all?" appears. Select [OK], then press the center of the multiselector. The DPOF mark on each image is cleared. When you cancel your specification without printing images, select this item. Folder print Prints all the images in a folder. Select the folder with v/V on the multi-selector, then press the center of the multi-selector. The message "Print images?" appears. Select [OK], then press the center of the multiselector. Printing with the Remote Commander (supplied) Once you connect the camera to an HDTV with an HDMI cable (not supplied), you can easily print images while viewing them on the TV. 1 Connect the camera to a TV (page 90). 2 Connect the camera to a printer (page 146). 3 Display the image you want to print. 4 Press the PRINT button on the Remote Commander. • Depending on the menu setup of the camera, setup for printing is fixed as follows: - The number of sheets: 1 sheet - Paper size: Auto - Layout: Auto - Date imprint: Off • When the camera is connected to a TV with the video cable (supplied), the PRINT button is disabled. 148
-
 1
1 -
2
-
3
-
4
-
5
-
6
-
7
-
8
-
9
-
10
-
11
-
12
-
13
-
14
-
15
-
16
-
17
-
18
-
19
-
20
-
21
-
22
-
23
-
24
-
25
-
26
-
27
-
28
-
29
-
30
-
31
-
32
-
33
-
34
-
35
-
36
-
37
-
38
-
39
-
40
-
41
-
42
-
43
-
44
-
45
-
46
-
47
-
48
-
49
-
50
-
51
-
52
-
53
-
54
-
55
-
56
-
57
-
58
-
59
-
60
-
61
-
62
-
63
-
64
-
65
-
66
-
67
-
68
-
69
-
70
-
71
-
72
-
73
-
74
-
75
-
76
-
77
-
78
-
79
-
80
-
81
-
82
-
83
-
84
-
85
-
86
-
87
-
88
-
89
-
90
-
91
-
92
-
93
-
94
-
95
-
96
-
97
-
98
-
99
-
100
-
101
-
102
-
103
-
104
-
105
-
106
-
107
-
108
-
109
-
110
-
111
-
112
-
113
-
114
-
115
-
116
-
117
-
118
-
119
-
120
-
121
-
122
-
123
-
124
-
125
-
126
-
127
-
128
-
129
-
130
-
131
-
132
-
133
-
134
-
135
-
136
-
137
-
138
-
139
-
140
-
141
-
142
-
 143
143 -
 144
144 -
 145
145 -
 146
146 -
 147
147 -
 148
148 -
 149
149 -
 150
150 -
 151
151 -
 152
152 -
 153
153 -
154
-
155
-
156
-
157
-
158
-
159
-
160
-
161
-
162
-
163
-
164
-
165
-
166
-
167
-
168
-
169
-
170
-
171
-
172
-
173
-
174
-
175
-
176
-
177
-
178
-
179
 |
 |
