Sony DSLR A700H User's Guide - Page 71
To switch image styles for the stylebox, Zone Matching
 |
UPC - 027242736122
View all Sony DSLR A700H manuals
Add to My Manuals
Save this manual to your list of manuals |
Page 71 highlights
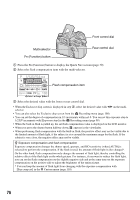
To switch image styles for the stylebox 1 Display the Creative Style screen (steps 1 to 3 on page 69). Using the shooting functions 2 Select a switchable stylebox with v/V on the multi-selector. 3 Move the cursor to the right side with B, and select an image style with v/V. 4 To adjust (Contrast), (Saturation), (Sharpness), (Brightness), and Matching), select an item with b/B and make adjustments with v/V. 5 Press the center of the multi-selector after the setting is completed. (Zone Zone Matching Image styles in the switchable style boxes can adjust the Zone Matching. You can keep the image from becoming overexposed or underexposed. This function is also available for a RAW file. -1 0 +1 to +2 This keeps the image from becoming underexposed with shooting a high-keyed subject. Use in low-key (predominantly dark) scenes is recommended, as the image tends to become whitish. Zone Matching is not performed. This keeps the image from becoming overexposed with shooting a low-keyed subject. Use in high-key (predominantly light) scenes is recommended, as the image tends to have heightened noise level. • When Zone Matching is not set to 0, the contrast cannot be adjusted. • Refer to the following table to determine the flash range. 71
-
 1
1 -
2
-
3
-
4
-
5
-
6
-
7
-
8
-
9
-
10
-
11
-
12
-
13
-
14
-
15
-
16
-
17
-
18
-
19
-
20
-
21
-
22
-
23
-
24
-
25
-
26
-
27
-
28
-
29
-
30
-
31
-
32
-
33
-
34
-
35
-
36
-
37
-
38
-
39
-
40
-
41
-
42
-
43
-
44
-
45
-
46
-
47
-
48
-
49
-
50
-
51
-
52
-
53
-
54
-
55
-
56
-
57
-
58
-
59
-
60
-
61
-
62
-
63
-
64
-
65
-
 66
66 -
 67
67 -
 68
68 -
 69
69 -
 70
70 -
 71
71 -
 72
72 -
 73
73 -
 74
74 -
 75
75 -
 76
76 -
77
-
78
-
79
-
80
-
81
-
82
-
83
-
84
-
85
-
86
-
87
-
88
-
89
-
90
-
91
-
92
-
93
-
94
-
95
-
96
-
97
-
98
-
99
-
100
-
101
-
102
-
103
-
104
-
105
-
106
-
107
-
108
-
109
-
110
-
111
-
112
-
113
-
114
-
115
-
116
-
117
-
118
-
119
-
120
-
121
-
122
-
123
-
124
-
125
-
126
-
127
-
128
-
129
-
130
-
131
-
132
-
133
-
134
-
135
-
136
-
137
-
138
-
139
-
140
-
141
-
142
-
143
-
144
-
145
-
146
-
147
-
148
-
149
-
150
-
151
-
152
-
153
-
154
-
155
-
156
-
157
-
158
-
159
-
160
-
161
-
162
-
163
-
164
-
165
-
166
-
167
-
168
-
169
-
170
-
171
-
172
-
173
-
174
-
175
-
176
-
177
-
178
-
179
 |
 |
