Sony DSLR A700H User's Guide - Page 139
Using the “Image Data Converter SR”, Overview of Image Data
 |
UPC - 027242736122
View all Sony DSLR A700H manuals
Add to My Manuals
Save this manual to your list of manuals |
Page 139 highlights
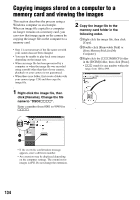
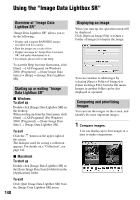
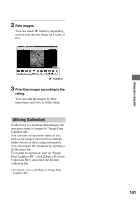
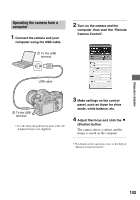
Using the "Image Data Converter SR" Overview of "Image Data Converter SR Ver.2.0" Using "Image Data Converter SR Ver.2.0" you can edit images recorded in RAW mode with various corrections, such as tone curve, and sharpness. Also, you can save the images in a general-purpose file format. • If you save an image as RAW data, the image is saved in the ARW2.0 format. • For details, refer to the Help. To start the Help from the Start menu, click [Start] t [All Programs] (in Windows 2000, [Programs]) t [Sony Image Data Suite] t [Help] t [Image Data Converter SR Ver.2]. Starting up or exiting "Image Data Converter SR Ver.2.0" x Windows To start up Click the shortcut of "Image Data Converter SR Ver.2.0" on the desktop. When starting up from the Start menu, click [Start] t [All Programs] (For Windows 2000: [Programs]) t [Sony Image Data Suite] t [Image Data Converter SR Ver.2.0]. To exit Click the button on the upper-right of the screen. x Macintosh To start up Double-click [Image Data Converter SR Ver.2] in the [Sony Image Data Suite] folder from the [Application] folder. To exit Click [Quit Image Data Converter SR] from the [IDC SR] menu. Adjusting the image You can adjust the white balance, exposure, and Creative Style of the image using the buttons on the tool bar. Saving the image You can save the still images displayed and edited on a PC. You can either save the image as RAW data or save it in the general file format. • For details, refer to the Help of "Image Data Converter SR". Technical Support Additional information on this product and answers to frequently asked questions can be found at the Sony Customer Support Website. http://www.sony.net/ 139 Using your computer
-
 1
1 -
2
-
3
-
4
-
5
-
6
-
7
-
8
-
9
-
10
-
11
-
12
-
13
-
14
-
15
-
16
-
17
-
18
-
19
-
20
-
21
-
22
-
23
-
24
-
25
-
26
-
27
-
28
-
29
-
30
-
31
-
32
-
33
-
34
-
35
-
36
-
37
-
38
-
39
-
40
-
41
-
42
-
43
-
44
-
45
-
46
-
47
-
48
-
49
-
50
-
51
-
52
-
53
-
54
-
55
-
56
-
57
-
58
-
59
-
60
-
61
-
62
-
63
-
64
-
65
-
66
-
67
-
68
-
69
-
70
-
71
-
72
-
73
-
74
-
75
-
76
-
77
-
78
-
79
-
80
-
81
-
82
-
83
-
84
-
85
-
86
-
87
-
88
-
89
-
90
-
91
-
92
-
93
-
94
-
95
-
96
-
97
-
98
-
99
-
100
-
101
-
102
-
103
-
104
-
105
-
106
-
107
-
108
-
109
-
110
-
111
-
112
-
113
-
114
-
115
-
116
-
117
-
118
-
119
-
120
-
121
-
122
-
123
-
124
-
125
-
126
-
127
-
128
-
129
-
130
-
131
-
132
-
133
-
 134
134 -
 135
135 -
 136
136 -
 137
137 -
 138
138 -
 139
139 -
 140
140 -
 141
141 -
 142
142 -
 143
143 -
 144
144 -
145
-
146
-
147
-
148
-
149
-
150
-
151
-
152
-
153
-
154
-
155
-
156
-
157
-
158
-
159
-
160
-
161
-
162
-
163
-
164
-
165
-
166
-
167
-
168
-
169
-
170
-
171
-
172
-
173
-
174
-
175
-
176
-
177
-
178
-
179
 |
 |