Canon MF3240 imageCLASS MF3200 Series Software Guide - Page 180
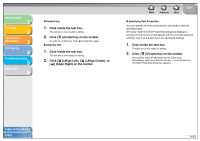
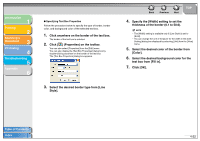
Specify the [Width] setting to set the, Select the desired border type from [Line
 |
UPC - 013803059915
View all Canon MF3240 manuals
Add to My Manuals
Save this manual to your list of manuals |
Page 180 highlights
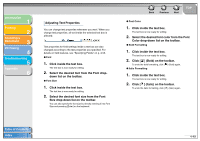
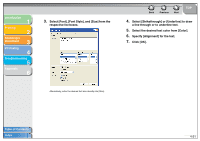
Introduction 1 Printing 2 Scanning a Document 3 PC Faxing 4 Troubleshooting 5 Appendix 6 ● Specifying Text Box Properties Follow the procedure below to specify the type of border, border color, and background color of the selected text box. 1. Click anywhere on the border of the text box. The border of the text box is selected. 2. Click [ ] (Properties) on the toolbar. You can also select [Properties] from the [Edit] menu. You can also display the [Text Box Properties] dialog box by double-clicking anywhere on the border of the text box. The [Text Box Properties] dialog box appears. 3. Select the desired border type from [Line Style]. Back Previous Next TOP 4. Specify the [Width] setting to set the thickness of the border (0.1 to 50.0). NOTE - The [Width] setting is available only if [Line Style] is set to [Solid]. - You can change the unit of measure for the width in the [Unit Setting] dialog box displayed by selecting [Unit] from the [View] menu. 5. Select the desired color of the border from [Color]. 6. Select the desired background color for the text box from [Fill in]. 7. Click [OK]. Table of Contents Index 4-52
-
 1
1 -
2
-
3
-
4
-
5
-
6
-
7
-
8
-
9
-
10
-
11
-
12
-
13
-
14
-
15
-
16
-
17
-
18
-
19
-
20
-
21
-
22
-
23
-
24
-
25
-
26
-
27
-
28
-
29
-
30
-
31
-
32
-
33
-
34
-
35
-
36
-
37
-
38
-
39
-
40
-
41
-
42
-
43
-
44
-
45
-
46
-
47
-
48
-
49
-
50
-
51
-
52
-
53
-
54
-
55
-
56
-
57
-
58
-
59
-
60
-
61
-
62
-
63
-
64
-
65
-
66
-
67
-
68
-
69
-
70
-
71
-
72
-
73
-
74
-
75
-
76
-
77
-
78
-
79
-
80
-
81
-
82
-
83
-
84
-
85
-
86
-
87
-
88
-
89
-
90
-
91
-
92
-
93
-
94
-
95
-
96
-
97
-
98
-
99
-
100
-
101
-
102
-
103
-
104
-
105
-
106
-
107
-
108
-
109
-
110
-
111
-
112
-
113
-
114
-
115
-
116
-
117
-
118
-
119
-
120
-
121
-
122
-
123
-
124
-
125
-
126
-
127
-
128
-
129
-
130
-
131
-
132
-
133
-
134
-
135
-
136
-
137
-
138
-
139
-
140
-
141
-
142
-
143
-
144
-
145
-
146
-
147
-
148
-
149
-
150
-
151
-
152
-
153
-
154
-
155
-
156
-
157
-
158
-
159
-
160
-
161
-
162
-
163
-
164
-
165
-
166
-
167
-
168
-
169
-
170
-
171
-
172
-
173
-
174
-
 175
175 -
 176
176 -
 177
177 -
 178
178 -
 179
179 -
 180
180 -
 181
181 -
 182
182 -
 183
183 -
 184
184 -
 185
185 -
186
-
187
-
188
-
189
-
190
-
191
-
192
-
193
-
194
-
195
-
196
-
197
-
198
-
199
-
200
-
201
-
202
-
203
-
204
-
205
-
206
-
207
-
208
-
209
-
210
-
211
-
212
-
213
-
214
-
215
-
216
-
217
-
218
-
219
-
220
-
221
-
222
-
223
-
224
-
225
-
226
 |
 |
