Canon MF3240 imageCLASS MF3200 Series Software Guide - Page 185
Remark] or [Comment]., Creating Objects
 |
UPC - 013803059915
View all Canon MF3240 manuals
Add to My Manuals
Save this manual to your list of manuals |
Page 185 highlights
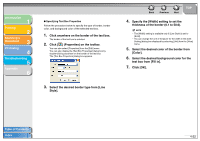
Introduction 1 Printing 2 Scanning a Document 3 PC Faxing 4 Troubleshooting 5 Appendix 6 ● Inserting Remark and Comment Fields When Editing Text 1. Inside the text box, place the cursor to where you want to insert the field. 2. From the [Insert] menu, select either [Remark] or [Comment]. The [Remark] field or the [Comment] field is inserted depending on your selection. ● Inserting Remark and Comment Fields When Not Editing Text 1. From the [Insert] menu, select either [Remark] or [Comment]. 2. Drag the pointer on the area of the cover sheet to insert the field. A square or rectangular text box containing the selected field appears. Back Previous Next TOP Creating Objects You can draw lines, rectangles, rounded rectangles, or ovals on the cover sheet. You can also change their properties once they are drawn. ● Lines 1. Click [ ] (Line) on the toolbar. You can also select [Line] from the [Drawing] menu. 2. Drag the pointer on the area of the cover sheet to draw the line. To draw horizontal or vertical lines, or to draw lines angled at 45 degrees and 45/2 degrees, hold down [SHIFT] on the keyboard while dragging. ● Rectangles 1. Click [ ] (Rectangle) on the toolbar. You can also select [Rectangle] from the [Drawing] menu. 2. Drag the pointer on the area of the cover sheet to draw the rectangle. To draw a square, hold down [SHIFT] on the keyboard while dragging. Table of Contents Index 4-57
-
 1
1 -
2
-
3
-
4
-
5
-
6
-
7
-
8
-
9
-
10
-
11
-
12
-
13
-
14
-
15
-
16
-
17
-
18
-
19
-
20
-
21
-
22
-
23
-
24
-
25
-
26
-
27
-
28
-
29
-
30
-
31
-
32
-
33
-
34
-
35
-
36
-
37
-
38
-
39
-
40
-
41
-
42
-
43
-
44
-
45
-
46
-
47
-
48
-
49
-
50
-
51
-
52
-
53
-
54
-
55
-
56
-
57
-
58
-
59
-
60
-
61
-
62
-
63
-
64
-
65
-
66
-
67
-
68
-
69
-
70
-
71
-
72
-
73
-
74
-
75
-
76
-
77
-
78
-
79
-
80
-
81
-
82
-
83
-
84
-
85
-
86
-
87
-
88
-
89
-
90
-
91
-
92
-
93
-
94
-
95
-
96
-
97
-
98
-
99
-
100
-
101
-
102
-
103
-
104
-
105
-
106
-
107
-
108
-
109
-
110
-
111
-
112
-
113
-
114
-
115
-
116
-
117
-
118
-
119
-
120
-
121
-
122
-
123
-
124
-
125
-
126
-
127
-
128
-
129
-
130
-
131
-
132
-
133
-
134
-
135
-
136
-
137
-
138
-
139
-
140
-
141
-
142
-
143
-
144
-
145
-
146
-
147
-
148
-
149
-
150
-
151
-
152
-
153
-
154
-
155
-
156
-
157
-
158
-
159
-
160
-
161
-
162
-
163
-
164
-
165
-
166
-
167
-
168
-
169
-
170
-
171
-
172
-
173
-
174
-
175
-
176
-
177
-
178
-
179
-
 180
180 -
 181
181 -
 182
182 -
 183
183 -
 184
184 -
 185
185 -
 186
186 -
 187
187 -
 188
188 -
 189
189 -
 190
190 -
191
-
192
-
193
-
194
-
195
-
196
-
197
-
198
-
199
-
200
-
201
-
202
-
203
-
204
-
205
-
206
-
207
-
208
-
209
-
210
-
211
-
212
-
213
-
214
-
215
-
216
-
217
-
218
-
219
-
220
-
221
-
222
-
223
-
224
-
225
-
226
 |
 |
