Canon imageCLASS D1150 imageCLASS D1180/D1170/D1150/D1120 Basic Operation Guid - Page 104
Printing Documents from a Computer - service manual
 |
View all Canon imageCLASS D1150 manuals
Add to My Manuals
Save this manual to your list of manuals |
Page 104 highlights
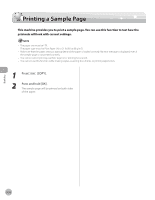
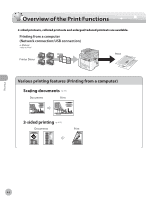
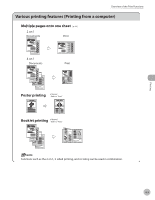
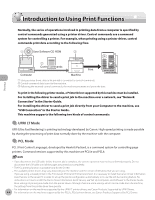
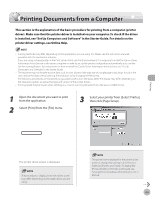
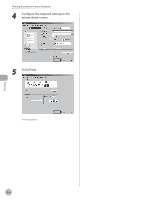
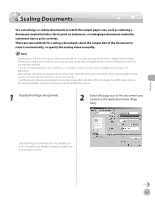
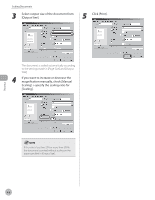
Printing Documents from a Computer Printing Documents from a Computer This section is the explanation of the basic procedure for printing from a computer (printer driver). Make sure that the printer driver is installed on your computer. To check if the driver is installed, see "Set Up Computers and Software" in the Starter Guide. For details on the printer driver settings, see Online Help. - Printing methods may differ depending on the applications you are using. For details, see the instruction manuals provided with the application software. - If you are using a shared printer in the Print Server (Point and Print) environment, it is necessary to install the Canon Driver Information Assist Service in the server computer in order to set up the printer configuration automatically or to use the Job Accounting feature. For instructions on how to install the Canon Driver Information Assist Service, see "Set Up Computers and Software," in the Starter Guide. - The machine may not be able to print data such as color photos if the data size of a single page is too large. If such is the case, reduce the data size by lowering the resolution or by changing the file format. - The following procedures are explained using sample screens from Windows 2000. The display may differ depending on the operating system, as well as the type and version of the printer drivers. - Printing speed may be slower when sending an e-mail or scanning documents to a file server in B&W format. 1 Open the document you want to print from the application. 2 Select [Print] from the [File] menu. 3 Select your printer from [Select Printer], then click [Page Setup]. Printing The printer driver screen is displayed. The procedure to display the printer driver screen may differ depending on the applications you are using. The printer name displayed in the printer driver screen is changed by setting in the [Printers] folder (or [Printers and Faxes]). To display the [Printers] folder (or [Printers and Faxes]), see "Setting Printer Conditions Beforehand," in the eManual. 4-5
-
 1
1 -
2
-
3
-
4
-
5
-
6
-
7
-
8
-
9
-
10
-
11
-
12
-
13
-
14
-
15
-
16
-
17
-
18
-
19
-
20
-
21
-
22
-
23
-
24
-
25
-
26
-
27
-
28
-
29
-
30
-
31
-
32
-
33
-
34
-
35
-
36
-
37
-
38
-
39
-
40
-
41
-
42
-
43
-
44
-
45
-
46
-
47
-
48
-
49
-
50
-
51
-
52
-
53
-
54
-
55
-
56
-
57
-
58
-
59
-
60
-
61
-
62
-
63
-
64
-
65
-
66
-
67
-
68
-
69
-
70
-
71
-
72
-
73
-
74
-
75
-
76
-
77
-
78
-
79
-
80
-
81
-
82
-
83
-
84
-
85
-
86
-
87
-
88
-
89
-
90
-
91
-
92
-
93
-
94
-
95
-
96
-
97
-
98
-
 99
99 -
 100
100 -
 101
101 -
 102
102 -
 103
103 -
 104
104 -
 105
105 -
 106
106 -
 107
107 -
 108
108 -
 109
109 -
110
-
111
-
112
-
113
-
114
-
115
-
116
-
117
-
118
-
119
-
120
-
121
-
122
-
123
-
124
-
125
-
126
-
127
-
128
-
129
-
130
-
131
-
132
-
133
-
134
-
135
-
136
-
137
-
138
-
139
-
140
-
141
-
142
-
143
-
144
-
145
-
146
-
147
-
148
-
149
-
150
-
151
-
152
-
153
-
154
-
155
-
156
-
157
-
158
-
159
-
160
-
161
-
162
-
163
-
164
-
165
-
166
-
167
-
168
-
169
-
170
-
171
-
172
-
173
-
174
-
175
-
176
-
177
-
178
-
179
-
180
-
181
-
182
-
183
-
184
-
185
-
186
-
187
-
188
-
189
-
190
-
191
-
192
-
193
-
194
-
195
-
196
-
197
-
198
-
199
-
200
-
201
-
202
-
203
-
204
-
205
-
206
-
207
-
208
-
209
-
210
-
211
-
212
-
213
-
214
-
215
-
216
-
217
-
218
-
219
-
220
-
221
-
222
-
223
-
224
-
225
-
226
-
227
-
228
-
229
-
230
-
231
-
232
-
233
-
234
-
235
-
236
-
237
-
238
-
239
-
240
-
241
-
242
-
243
-
244
-
245
-
246
-
247
-
248
-
249
-
250
-
251
-
252
-
253
-
254
-
255
-
256
-
257
-
258
-
259
-
260
-
261
-
262
-
263
-
264
-
265
-
266
-
267
-
268
-
269
-
270
-
271
-
272
-
273
-
274
-
275
-
276
-
277
-
278
-
279
-
280
-
281
-
282
-
283
-
284
-
285
-
286
-
287
-
288
-
289
-
290
-
291
-
292
-
293
-
294
-
295
-
296
-
297
-
298
-
299
-
300
-
301
-
302
-
303
-
304
-
305
 |
 |
