Dell 5330dn Workgroup User's Guide - Page 47
duplex unit, rear door
 |
View all Dell 5330dn Workgroup manuals
Add to My Manuals
Save this manual to your list of manuals |
Page 47 highlights
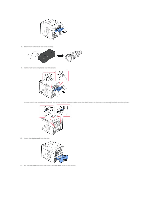
8. Remove the new Fuser unit from its bag. 9. Insert Fuser unit completely into the printer. If Fuser unit is not completely inserted, the printer will not operate. Make sure that both levers of the fuser are securely latched onto the printer. 10. Insert the duplex unit into the slot. 11. Put the rear door back on and insert the rear door strap to the printer.
-
 1
1 -
2
-
3
-
4
-
5
-
6
-
7
-
8
-
9
-
10
-
11
-
12
-
13
-
14
-
15
-
16
-
17
-
18
-
19
-
20
-
21
-
22
-
23
-
24
-
25
-
26
-
27
-
28
-
29
-
30
-
31
-
32
-
33
-
34
-
35
-
36
-
37
-
38
-
39
-
40
-
41
-
 42
42 -
 43
43 -
 44
44 -
 45
45 -
 46
46 -
 47
47 -
 48
48 -
 49
49 -
 50
50 -
 51
51 -
 52
52 -
53
-
54
-
55
-
56
-
57
-
58
-
59
-
60
-
61
-
62
-
63
-
64
-
65
-
66
-
67
-
68
-
69
-
70
-
71
-
72
-
73
-
74
-
75
-
76
-
77
-
78
-
79
-
80
-
81
-
82
-
83
-
84
-
85
-
86
-
87
-
88
-
89
-
90
-
91
-
92
-
93
-
94
-
95
-
96
-
97
-
98
-
99
-
100
-
101
-
102
-
103
-
104
-
105
-
106
-
107
-
108
-
109
-
110
-
111
-
112
-
113
-
114
-
115
-
116
-
117
-
118
-
119
-
120
-
121
-
122
-
123
-
124
-
125
-
126
-
127
 |
 |

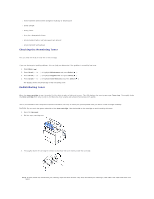
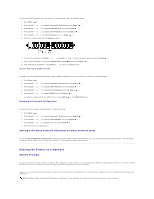
8.
Remove the new Fuser unit from its bag.
9.
Insert Fuser unit completely into the printer.
If Fuser unit is not completely inserted, the printer will not operate. Make sure that both levers of the fuser are securely latched onto the printer.
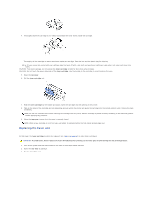
10.
Insert the
duplex unit
into the slot.
11.
Put the
rear door
back on and insert the
rear door
strap to the printer.