Dell 5330dn Workgroup User's Guide - Page 65
Setting the time and date, Setting Daylight Savings Time, Storing a job, Printing a stored job
 |
View all Dell 5330dn Workgroup manuals
Add to My Manuals
Save this manual to your list of manuals |
Page 65 highlights
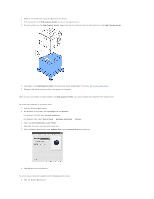
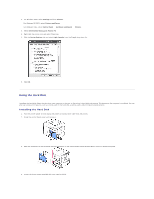
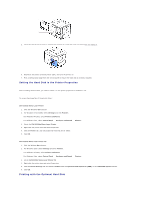
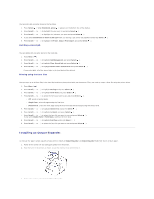
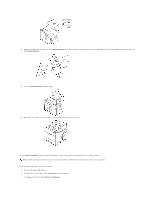
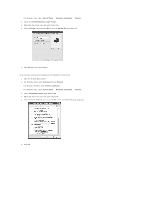
After installing the optional hard disk, you can use the advanced printing features, such as storing or spooling a print job to the hard disk, proofing a job, and specifying the printing of a private job in the printer properties window. Once you have stored files in the hard disk, you can easily print or delete the stored files using the control panel of your printer. Setting the time and date 1. Press Menu ( ). 2. Press Scroll ( to ) to highlight Settings and press Select ( ). 3. Press Scroll ( to ) to highlight Setup and press Select ( ). 4. Press Scroll ( to ) to highlight Date & Time and press Select ( ). 5. Enter the correct time and date using Scroll ( to ) or Scroll ( to ). Month = 01 to 12 Day = 01 to 31 Year = requires four digits Hour = 01 to 12 Minute = 00 to 59 and you can also select AM or PM. 6. Press Select ( ) to save the selection. 7. Press Cancel ( ) to return to Standby mode. Setting Daylight Savings Time If your country switches to Daylight Savings Time each year, use this procedure to automatically switch to Daylight Savings Time and to Standard time. 1. Press Menu ( ). 2. Press Scroll ( to ) to highlight Settings and press Select ( ). 3. Press Scroll ( to ) to highlight Setup and press Select ( ). 4. Press Scroll ( to ) to highlight Day Light Saving and press Select ( ). 5. Press Scroll ( to ) to highlight Manual and press Select ( ). 6. Enter the correct Start date using Scroll ( to ) or Scroll ( to ) and press Select ( ). 7. Enter the correct End date using Scroll ( to ) or Scroll ( to ) and press Select ( ). 8. Press Cancel ( ) to return to Standby mode. Storing a job You can store jobs in the installed hard disk. 1. Open the file you want to store. 2. Select Print from the File menu. The Print window displays. 3. Click Properties. 4. Click the Other Options tab and click Job type. 5. Select the Job type you want from the drop-down list. l Normal: prints in normal mode l Confidential: stores the files, securing them with a password. l Proof: prints the first file, and after a pause, prints the next file. l Store: stores the file to the hard disk. l Spool: spools the file into the hard disk and prints it from the hard disk queue. l Print Schedule: prints the file at a specified time. 6. Enter the User ID and Job Name. 7. Click OK until the print window is displayed. 8. Click OK or Print to start printing. Printing a stored job
-
 1
1 -
2
-
3
-
4
-
5
-
6
-
7
-
8
-
9
-
10
-
11
-
12
-
13
-
14
-
15
-
16
-
17
-
18
-
19
-
20
-
21
-
22
-
23
-
24
-
25
-
26
-
27
-
28
-
29
-
30
-
31
-
32
-
33
-
34
-
35
-
36
-
37
-
38
-
39
-
40
-
41
-
42
-
43
-
44
-
45
-
46
-
47
-
48
-
49
-
50
-
51
-
52
-
53
-
54
-
55
-
56
-
57
-
58
-
59
-
 60
60 -
 61
61 -
 62
62 -
 63
63 -
 64
64 -
 65
65 -
 66
66 -
 67
67 -
 68
68 -
 69
69 -
 70
70 -
71
-
72
-
73
-
74
-
75
-
76
-
77
-
78
-
79
-
80
-
81
-
82
-
83
-
84
-
85
-
86
-
87
-
88
-
89
-
90
-
91
-
92
-
93
-
94
-
95
-
96
-
97
-
98
-
99
-
100
-
101
-
102
-
103
-
104
-
105
-
106
-
107
-
108
-
109
-
110
-
111
-
112
-
113
-
114
-
115
-
116
-
117
-
118
-
119
-
120
-
121
-
122
-
123
-
124
-
125
-
126
-
127
 |
 |