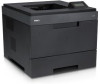
Dell 5330dn Workgroup User's Guide - Page 52
Sharing the Printer on a Network
 |
View all Dell 5330dn Workgroup manuals
Add to My Manuals
Save this manual to your list of manuals |
Page 52 highlights
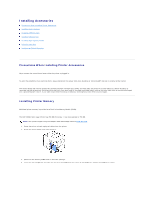
To enter the TCP/IP address from your printer's operator panel, take the following steps: 1. Press Menu ( ). 2. Press Scroll ( to ) to highlight Network I/O Ports and press Select ( ). 3. Press Scroll ( to ) to highlight TCP/IP(IPv4) and press Select ( ). 4. Press Scroll ( to ) to highlight Set IP Address and press Select ( ). 5. Press Scroll ( to ) to highlight Manual and press Select ( ). 6. The first available menu item, IP Address displays. 7. To enter the numbers, use Scroll ( to ) and Scroll ( to ) to move between octets and press Select ( ). 8. Enter other parameters, such as the Subnet Mask or GateWay, and press Select ( ). 9. After entering all parameters, press Cancel ( ) to return to Standby mode. Dynamic Addressing (BOOTP/DHCP) To assign the TCP/IP address automatically using a DHCP or BOOTP server on your network, perform the following steps: 1. Press Menu ( ). 2. Press Scroll ( to 3. Press Scroll ( to 4. Press Scroll ( to 5. Press Scroll ( to ) to highlight Network I/O Ports and press Select ( ). ) to highlight TCP/IP(IPv4) and press Select ( ). ) to highlight Set IP Address and press Select ( ). ) to highlight DHCP and press Select ( ). To assign the address from the BOOTP server, press Select ( ) when BOOTP displays. Restoring the Network Configuration You can return the network configuration to its default settings. 1. Press Menu ( ). 2. Press Scroll ( to ) to highlight Network I/O Ports and press Select ( ). 3. Press Scroll ( to ) to highlight Clear Settings and press Select ( ). 4. Press Scroll ( to ) to highlight Yes and press Select ( ). 5. Power the printer off and back on. Setting a Wireless network (Optional wireless network card) To use the Dell 5330dn Mono Laser Printer in both wired and wireless network environments, you can install an optional wireless network card. For details of Wireless setup, please refer to "Quick Install Guide" for the wireless network interface card. Sharing the Printer on a Network Shared Printing You can use Microsoft's Point and Print or Peer-to-Peer methods to share a printer on the network with a USB or parallel cable connection. To use one of these methods, you must first share the printer and then install the shared printer on client computers. However, if you use one of these Microsoft methods, you will not have all the Dell features, such as the Status Monitor, that are installed with the Drivers and Utilities CD. NOTE: Windows 2000, Windows XP Professional, Windows NT, and Windows Vista require administrative access to share a printer.
-
 1
1 -
2
-
3
-
4
-
5
-
6
-
7
-
8
-
9
-
10
-
11
-
12
-
13
-
14
-
15
-
16
-
17
-
18
-
19
-
20
-
21
-
22
-
23
-
24
-
25
-
26
-
27
-
28
-
29
-
30
-
31
-
32
-
33
-
34
-
35
-
36
-
37
-
38
-
39
-
40
-
41
-
42
-
43
-
44
-
45
-
46
-
 47
47 -
 48
48 -
 49
49 -
 50
50 -
 51
51 -
 52
52 -
 53
53 -
 54
54 -
 55
55 -
 56
56 -
 57
57 -
58
-
59
-
60
-
61
-
62
-
63
-
64
-
65
-
66
-
67
-
68
-
69
-
70
-
71
-
72
-
73
-
74
-
75
-
76
-
77
-
78
-
79
-
80
-
81
-
82
-
83
-
84
-
85
-
86
-
87
-
88
-
89
-
90
-
91
-
92
-
93
-
94
-
95
-
96
-
97
-
98
-
99
-
100
-
101
-
102
-
103
-
104
-
105
-
106
-
107
-
108
-
109
-
110
-
111
-
112
-
113
-
114
-
115
-
116
-
117
-
118
-
119
-
120
-
121
-
122
-
123
-
124
-
125
-
126
-
127
 |
 |
