Dell PowerEdge R910 Hardware Owner's Manual - Page 111
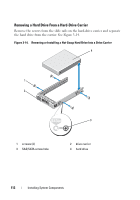
Insert the hard-drive carrier into the drive bay until the carrier contacts
 |
View all Dell PowerEdge R910 manuals
Add to My Manuals
Save this manual to your list of manuals |
Page 111 highlights
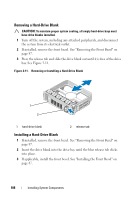
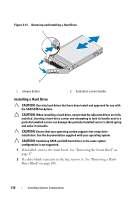
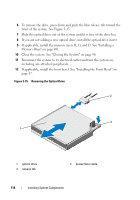
NOTE: If you are upgrading your system to a 16-hard-drive configuration, turn off the system and remove all the chassis blanks. To remove the chassis blank, press down and push the blue release tab toward the front of the system. See Figure 3-13. 3 Press the button on the front of the drive carrier and open the handle. 4 Insert the hard-drive carrier into the drive bay until the carrier contacts the backplane. 5 Close the handle to lock the drive in place. Figure 3-13. Removing a Chassis Blank 2 1 1 chassis blank 2 release tab Installing System Components 111
-
 1
1 -
2
-
3
-
4
-
5
-
6
-
7
-
8
-
9
-
10
-
11
-
12
-
13
-
14
-
15
-
16
-
17
-
18
-
19
-
20
-
21
-
22
-
23
-
24
-
25
-
26
-
27
-
28
-
29
-
30
-
31
-
32
-
33
-
34
-
35
-
36
-
37
-
38
-
39
-
40
-
41
-
42
-
43
-
44
-
45
-
46
-
47
-
48
-
49
-
50
-
51
-
52
-
53
-
54
-
55
-
56
-
57
-
58
-
59
-
60
-
61
-
62
-
63
-
64
-
65
-
66
-
67
-
68
-
69
-
70
-
71
-
72
-
73
-
74
-
75
-
76
-
77
-
78
-
79
-
80
-
81
-
82
-
83
-
84
-
85
-
86
-
87
-
88
-
89
-
90
-
91
-
92
-
93
-
94
-
95
-
96
-
97
-
98
-
99
-
100
-
101
-
102
-
103
-
104
-
105
-
 106
106 -
 107
107 -
 108
108 -
 109
109 -
 110
110 -
 111
111 -
 112
112 -
 113
113 -
 114
114 -
 115
115 -
 116
116 -
117
-
118
-
119
-
120
-
121
-
122
-
123
-
124
-
125
-
126
-
127
-
128
-
129
-
130
-
131
-
132
-
133
-
134
-
135
-
136
-
137
-
138
-
139
-
140
-
141
-
142
-
143
-
144
-
145
-
146
-
147
-
148
-
149
-
150
-
151
-
152
-
153
-
154
-
155
-
156
-
157
-
158
-
159
-
160
-
161
-
162
-
163
-
164
-
165
-
166
-
167
-
168
-
169
-
170
-
171
-
172
-
173
-
174
-
175
-
176
-
177
-
178
-
179
-
180
-
181
-
182
-
183
-
184
-
185
-
186
-
187
-
188
-
189
-
190
-
191
-
192
-
193
-
194
-
195
-
196
-
197
-
198
-
199
-
200
-
201
-
202
-
203
-
204
-
205
-
206
-
207
-
208
-
209
-
210
 |
 |

Installing System Components
111
NOTE:
If you are upgrading your system to a 16
–
hard-drive configuration, turn
off the system and remove all the chassis blanks. To remove the chassis blank,
press down and push the blue release tab toward the front of the system. See
Figure 3-13.
3
Press the button on the front of the drive carrier and open the handle.
4
Insert the hard-drive carrier into the drive bay until the carrier contacts
the backplane.
5
Close the handle to lock the drive in place.
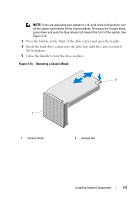
Figure 3-13.
Removing a Chassis Blank
1
chassis blank
2
release tab
1
2