Epson LQ 1050 User Manual - Page 31
The parallel interface, connector of the printer.
 |
View all Epson LQ 1050 manuals
Add to My Manuals
Save this manual to your list of manuals |
Page 31 highlights
Connecting the Printer to Your Computer The parallel interface When connecting your computer to the parallel interface, follow these steps: 1. Make sure both the printer and your computer are turned off. 2. Plug the cable connector into the printer as shown below. Next squeeze the wire clips together until they lock onto either side of the connector. If your cable has a ground wire, attach this wire to the ground connector of the printer. 3. Plug the other end of the interface cable into the computer. (If there is a ground wire at the computer end of the cable, attach it to the ground connector at the back of the computer.) 1-19
-
 1
1 -
2
-
3
-
4
-
5
-
6
-
7
-
8
-
9
-
10
-
11
-
12
-
13
-
14
-
15
-
16
-
17
-
18
-
19
-
20
-
21
-
22
-
23
-
24
-
25
-
 26
26 -
 27
27 -
 28
28 -
 29
29 -
 30
30 -
 31
31 -
 32
32 -
 33
33 -
 34
34 -
 35
35 -
 36
36 -
37
-
38
-
39
-
40
-
41
-
42
-
43
-
44
-
45
-
46
-
47
-
48
-
49
-
50
-
51
-
52
-
53
-
54
-
55
-
56
-
57
-
58
-
59
-
60
-
61
-
62
-
63
-
64
-
65
-
66
-
67
-
68
-
69
-
70
-
71
-
72
-
73
-
74
-
75
-
76
-
77
-
78
-
79
-
80
-
81
-
82
-
83
-
84
-
85
-
86
-
87
-
88
-
89
-
90
-
91
-
92
-
93
-
94
-
95
-
96
-
97
-
98
-
99
-
100
-
101
-
102
-
103
-
104
-
105
-
106
-
107
-
108
-
109
-
110
-
111
-
112
-
113
-
114
-
115
-
116
-
117
-
118
-
119
-
120
-
121
-
122
-
123
-
124
-
125
-
126
-
127
-
128
-
129
-
130
-
131
-
132
-
133
-
134
-
135
-
136
-
137
-
138
-
139
-
140
-
141
-
142
-
143
-
144
-
145
-
146
-
147
-
148
-
149
-
150
-
151
-
152
-
153
-
154
-
155
-
156
-
157
-
158
-
159
-
160
-
161
-
162
-
163
-
164
-
165
-
166
-
167
-
168
-
169
-
170
-
171
-
172
-
173
-
174
-
175
-
176
-
177
-
178
-
179
-
180
-
181
-
182
-
183
-
184
-
185
-
186
-
187
-
188
-
189
-
190
-
191
-
192
-
193
-
194
-
195
-
196
-
197
-
198
-
199
-
200
-
201
-
202
-
203
-
204
-
205
-
206
-
207
-
208
-
209
-
210
-
211
-
212
-
213
-
214
-
215
-
216
-
217
-
218
-
219
-
220
-
221
-
222
 |
 |
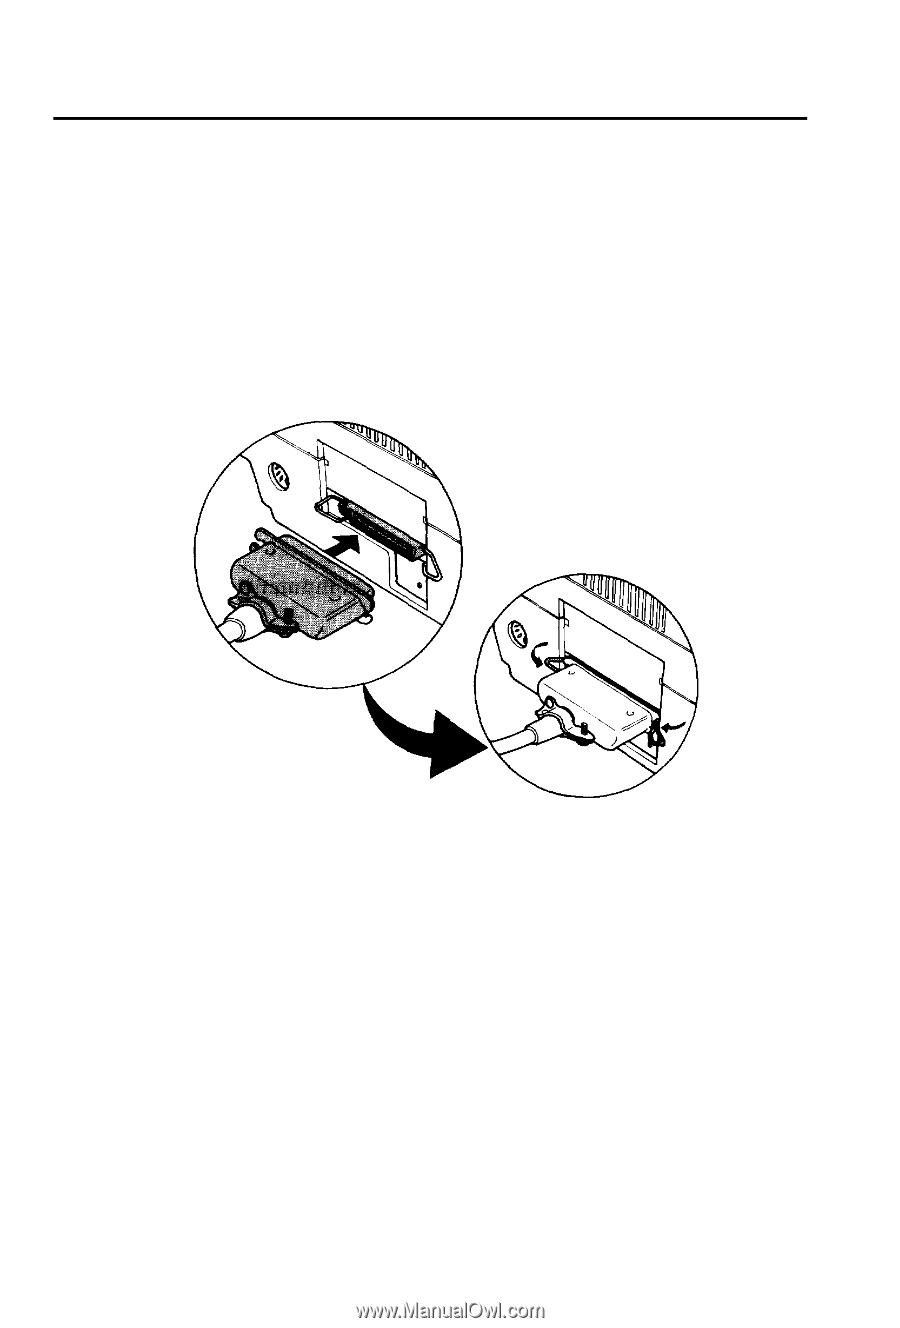
Connecting the Printer to Your Computer
The parallel interface
When connecting your computer to the parallel interface, follow
these steps:
1.
Make sure both the printer and your computer are turned off.
2. Plug the cable connector into the printer as shown below. Next
squeeze the wire clips together until they lock onto either side of
the connector.
If your cable has a ground wire, attach this wire to the ground
connector of the printer.
3.
Plug the other end of the interface cable into the computer. (If
there is a ground wire at the computer end of the cable, attach
it to the ground connector at the back of the computer.)
1-19