Epson LQ 1050 User Manual - Page 59
Setting, Switch 1, the factory.
 |
View all Epson LQ 1050 manuals
Add to My Manuals
Save this manual to your list of manuals |
Page 59 highlights
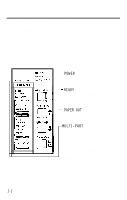
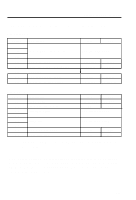
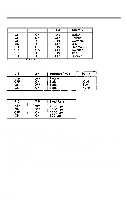
Setting the DIP Switches The tables below describe the functions of the DIP switches. DIP Switch 1 Switch Description 1-1 1-2 International character set 1-3 1-4 Character table 1-5 Print direction for graphics I 1-6 1 Not used 1-7 Cut sheet feeder mode 1-8 6 Kbytes receive buffer ON OFF See the table below. Graphics Unidir. Italics Bidir. I I I Valid Invalid 0 bytes 6 Kbytes DIP Switch 2 Switch Description 2-1 Page length 2-2 Skip over perforation 2-3 Interface/Parity 2-4 2-5 Baud rate 2-6 2-7 Short tear-off mode 2-8 Auto line feed ON OFF 12 inches 11 inches ON OFF See the table below. See the table below. ON OFF ON OFF represents the DIP switch settings that have been preset at the factory. The factory settings for International character sets (DIP switches 1-1 to 1-3), the Character table (DIP switch 1-4), and Page length (DIP switch 2-1) vary depending on the country, and are not shown in the tables above. 3-7
-
 1
1 -
2
-
3
-
4
-
5
-
6
-
7
-
8
-
9
-
10
-
11
-
12
-
13
-
14
-
15
-
16
-
17
-
18
-
19
-
20
-
21
-
22
-
23
-
24
-
25
-
26
-
27
-
28
-
29
-
30
-
31
-
32
-
33
-
34
-
35
-
36
-
37
-
38
-
39
-
40
-
41
-
42
-
43
-
44
-
45
-
46
-
47
-
48
-
49
-
50
-
51
-
52
-
53
-
 54
54 -
 55
55 -
 56
56 -
 57
57 -
 58
58 -
 59
59 -
 60
60 -
 61
61 -
 62
62 -
 63
63 -
 64
64 -
65
-
66
-
67
-
68
-
69
-
70
-
71
-
72
-
73
-
74
-
75
-
76
-
77
-
78
-
79
-
80
-
81
-
82
-
83
-
84
-
85
-
86
-
87
-
88
-
89
-
90
-
91
-
92
-
93
-
94
-
95
-
96
-
97
-
98
-
99
-
100
-
101
-
102
-
103
-
104
-
105
-
106
-
107
-
108
-
109
-
110
-
111
-
112
-
113
-
114
-
115
-
116
-
117
-
118
-
119
-
120
-
121
-
122
-
123
-
124
-
125
-
126
-
127
-
128
-
129
-
130
-
131
-
132
-
133
-
134
-
135
-
136
-
137
-
138
-
139
-
140
-
141
-
142
-
143
-
144
-
145
-
146
-
147
-
148
-
149
-
150
-
151
-
152
-
153
-
154
-
155
-
156
-
157
-
158
-
159
-
160
-
161
-
162
-
163
-
164
-
165
-
166
-
167
-
168
-
169
-
170
-
171
-
172
-
173
-
174
-
175
-
176
-
177
-
178
-
179
-
180
-
181
-
182
-
183
-
184
-
185
-
186
-
187
-
188
-
189
-
190
-
191
-
192
-
193
-
194
-
195
-
196
-
197
-
198
-
199
-
200
-
201
-
202
-
203
-
204
-
205
-
206
-
207
-
208
-
209
-
210
-
211
-
212
-
213
-
214
-
215
-
216
-
217
-
218
-
219
-
220
-
221
-
222
 |
 |
