Epson LQ 1050 User Manual - Page 50
Multi-part forms, Labels, system, labels on a shiny base sheet almost always slip a little.
 |
View all Epson LQ 1050 manuals
Add to My Manuals
Save this manual to your list of manuals |
Page 50 highlights
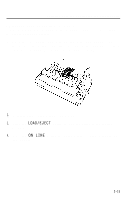
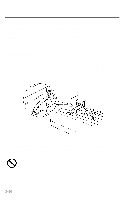
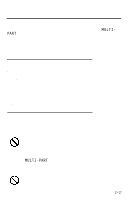
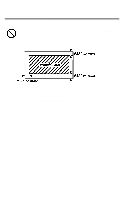
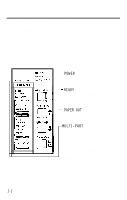
Printing on Special Paper When you print on anything thicker than normal paper, such as envelopes or multi-part forms, be absolutely sure that your printing stays within the printable area of the paper. See pages 2-20 and 8-3 for more about printable area. Multi-part forms Your printer can also use continuous multi-part forms. These multiple forms should have no more than four parts including the original. Multi-part forms should not be used with the single-sheet feeding system or the cut sheet feeder. You load continuous multi-part paper the same way that you load continuous paper. See the section on loading continuous paper in this chapter for details. The only difference is that you need to adjust the paper thickness lever to suit the thickness of your paper before loading. When you set the paper thickness lever to position 4 or above, the MULTI-PART light comes on and the printing speed is reduced. See the table on the previous page for the correct paper thickness setting. Labels If you need to print labels, always choose the type mounted on a continuous base sheet provided with sprocket holes for use with the tractor. If you attempt to print labels using the single-sheet feeding system, labels on a shiny base sheet almost always slip a little. You load labels the same way that you load continuous paper. See the section on loading continuous paper in this chapter for details. The only difference is that you need to adjust the paper thickness lever to match the thickness of your labels. See the table on page 2-17 for the correct paper thickness setting. To remove labels, tear off at a perforation behind the push tractor. Then, set the printer off line and use the FORM FEED button to eject the labels. 2-18
-
 1
1 -
2
-
3
-
4
-
5
-
6
-
7
-
8
-
9
-
10
-
11
-
12
-
13
-
14
-
15
-
16
-
17
-
18
-
19
-
20
-
21
-
22
-
23
-
24
-
25
-
26
-
27
-
28
-
29
-
30
-
31
-
32
-
33
-
34
-
35
-
36
-
37
-
38
-
39
-
40
-
41
-
42
-
43
-
44
-
 45
45 -
 46
46 -
 47
47 -
 48
48 -
 49
49 -
 50
50 -
 51
51 -
 52
52 -
 53
53 -
 54
54 -
 55
55 -
56
-
57
-
58
-
59
-
60
-
61
-
62
-
63
-
64
-
65
-
66
-
67
-
68
-
69
-
70
-
71
-
72
-
73
-
74
-
75
-
76
-
77
-
78
-
79
-
80
-
81
-
82
-
83
-
84
-
85
-
86
-
87
-
88
-
89
-
90
-
91
-
92
-
93
-
94
-
95
-
96
-
97
-
98
-
99
-
100
-
101
-
102
-
103
-
104
-
105
-
106
-
107
-
108
-
109
-
110
-
111
-
112
-
113
-
114
-
115
-
116
-
117
-
118
-
119
-
120
-
121
-
122
-
123
-
124
-
125
-
126
-
127
-
128
-
129
-
130
-
131
-
132
-
133
-
134
-
135
-
136
-
137
-
138
-
139
-
140
-
141
-
142
-
143
-
144
-
145
-
146
-
147
-
148
-
149
-
150
-
151
-
152
-
153
-
154
-
155
-
156
-
157
-
158
-
159
-
160
-
161
-
162
-
163
-
164
-
165
-
166
-
167
-
168
-
169
-
170
-
171
-
172
-
173
-
174
-
175
-
176
-
177
-
178
-
179
-
180
-
181
-
182
-
183
-
184
-
185
-
186
-
187
-
188
-
189
-
190
-
191
-
192
-
193
-
194
-
195
-
196
-
197
-
198
-
199
-
200
-
201
-
202
-
203
-
204
-
205
-
206
-
207
-
208
-
209
-
210
-
211
-
212
-
213
-
214
-
215
-
216
-
217
-
218
-
219
-
220
-
221
-
222
 |
 |