HP Designjet 2000/3000cp HP DesignJet 3000/3500 CP Printer User’s Gui - Page 262
Checking Ink Systems, Checking the Printheads
 |
View all HP Designjet 2000/3000cp manuals
Add to My Manuals
Save this manual to your list of manuals |
Page 262 highlights
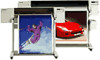
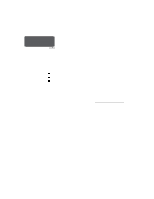
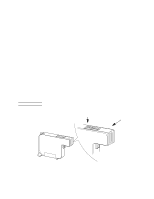
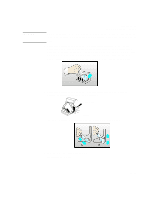
Troubleshooting Solving Ink System Problems Checking Ink Systems Check ink system -> Ignore If you see the message "Check ink system / Ignore" you can either proceed with the steps detailed in this section (press the ↑ key) or you can choose to C4704034 continue printing (press the ↓ key). If you select "Check ink system" (↑), you will only be asked to check those components for which the printer has detected an error. If you select "Ignore" (↓), you can continue printing, but the quality of the images produced by the printer may be impaired. NOTE: If an ink system replacement was cancelled, or the printer lost power during a replacement procedure, the machine may indicate that all four ink systems need to be replaced. Removal and reseating the components of each ink system may be all that is required. See 11-41, If You Have Problems Reseating a Printhead. You should only replace the ink systems for which errors are shown on the front panel. If more than one ink system shows an error, follow this procedure for each failing system. Do not remove and reseat printheads too many times, as this can lead to excessive wear on the electrical contacts, causing failures. If problems persist, see 11-40, Persistent Ink-System Problems. CAUTION If the problem occurred while changing ink system types (from Imaging to UV Pigmented, or vice versa), be extra careful to verify that all ink cartridges match the printheads in type. Installing the incorrect ink cartridge type can result in contamination of both of the ink systems. n Press the ↑ key for "Check ink system", if that message is present on the front panel. Open the window when indicated. Checking the Printheads o Check printhead nn n Abort -> C4704034 Check the printhead if there is a printhead error reported. The message "Check printhead / Abort" is displayed. The flashing squares indicate which printheads require checking. If you are unable to fix the errors now, press ↓ to cancel (abort) the procedure. n Remove the printhead completely from the printer carriage. You should ensure that all four printheads are of the same type-Imaging (part numbers C1806A to C1809A) or UV Pigmented (C1892A to C1895A). 11-38
-
 1
1 -
2
-
3
-
4
-
5
-
6
-
7
-
8
-
9
-
10
-
11
-
12
-
13
-
14
-
15
-
16
-
17
-
18
-
19
-
20
-
21
-
22
-
23
-
24
-
25
-
26
-
27
-
28
-
29
-
30
-
31
-
32
-
33
-
34
-
35
-
36
-
37
-
38
-
39
-
40
-
41
-
42
-
43
-
44
-
45
-
46
-
47
-
48
-
49
-
50
-
51
-
52
-
53
-
54
-
55
-
56
-
57
-
58
-
59
-
60
-
61
-
62
-
63
-
64
-
65
-
66
-
67
-
68
-
69
-
70
-
71
-
72
-
73
-
74
-
75
-
76
-
77
-
78
-
79
-
80
-
81
-
82
-
83
-
84
-
85
-
86
-
87
-
88
-
89
-
90
-
91
-
92
-
93
-
94
-
95
-
96
-
97
-
98
-
99
-
100
-
101
-
102
-
103
-
104
-
105
-
106
-
107
-
108
-
109
-
110
-
111
-
112
-
113
-
114
-
115
-
116
-
117
-
118
-
119
-
120
-
121
-
122
-
123
-
124
-
125
-
126
-
127
-
128
-
129
-
130
-
131
-
132
-
133
-
134
-
135
-
136
-
137
-
138
-
139
-
140
-
141
-
142
-
143
-
144
-
145
-
146
-
147
-
148
-
149
-
150
-
151
-
152
-
153
-
154
-
155
-
156
-
157
-
158
-
159
-
160
-
161
-
162
-
163
-
164
-
165
-
166
-
167
-
168
-
169
-
170
-
171
-
172
-
173
-
174
-
175
-
176
-
177
-
178
-
179
-
180
-
181
-
182
-
183
-
184
-
185
-
186
-
187
-
188
-
189
-
190
-
191
-
192
-
193
-
194
-
195
-
196
-
197
-
198
-
199
-
200
-
201
-
202
-
203
-
204
-
205
-
206
-
207
-
208
-
209
-
210
-
211
-
212
-
213
-
214
-
215
-
216
-
217
-
218
-
219
-
220
-
221
-
222
-
223
-
224
-
225
-
226
-
227
-
228
-
229
-
230
-
231
-
232
-
233
-
234
-
235
-
236
-
237
-
238
-
239
-
240
-
241
-
242
-
243
-
244
-
245
-
246
-
247
-
248
-
249
-
250
-
251
-
252
-
253
-
254
-
255
-
256
-
 257
257 -
 258
258 -
 259
259 -
 260
260 -
 261
261 -
 262
262 -
 263
263 -
 264
264 -
 265
265 -
 266
266 -
 267
267 -
268
-
269
-
270
-
271
-
272
-
273
-
274
-
275
-
276
-
277
-
278
-
279
-
280
-
281
-
282
-
283
-
284
-
285
-
286
-
287
-
288
-
289
-
290
-
291
-
292
-
293
-
294
-
295
-
296
-
297
-
298
-
299
-
300
-
301
-
302
-
303
-
304
-
305
-
306
-
307
-
308
-
309
-
310
-
311
-
312
-
313
-
314
-
315
-
316
-
317
-
318
-
319
-
320
-
321
-
322
-
323
-
324
-
325
-
326
-
327
-
328
-
329
-
330
-
331
-
332
-
333
-
334
-
335
-
336
-
337
-
338
-
339
-
340
-
341
-
342
 |
 |