HP Designjet 2000/3000cp HP DesignJet 3000/3500 CP Printer User’s Gui - Page 263
Checking the Printhead Cleaners, UV Pigmented Ink Systems they are C1892A to C1895A.
 |
View all HP Designjet 2000/3000cp manuals
Add to My Manuals
Save this manual to your list of manuals |
Page 263 highlights
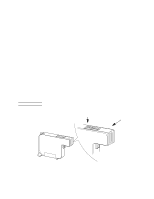
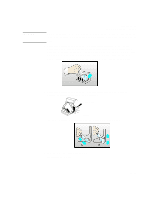
CAUTION Troubleshooting Solving Ink System Problems Do not touch, wipe, or attempt to clean the printhead nozzles. This can damage the printhead. Handle the ink systems with care. (See the diagram on page 11-42.) n Make sure that the protective blue tape and green cardboard have been removed from the printhead. n Next, look at the electrical contacts on the side of the printhead and on the carriage. If they are dirty, they should be cleaned (see page 11-42, Cleaning Electrical Contacts). n Reinsert the printhead. In some cases, if you repeatedly get an error, with the squares continuing to flash, you may need to remove and reinstall all printheads to clear it. See If You Have Problems Reseating a Printhead on page 11-41. Repeat these steps for any other printheads that need replacing. Close the window. Checking the Printhead Cleaners Check nn*n Close right door If prompted, open the right door to access the printhead cleaners. The message "Check / Close right door" is displayed. The stars in the message indicate which printhead cleaners must be checked. C4704034 n For each printhead cleaner, make sure that it is not overflowing (liquid all the way to the top of the large rectangular hole). n Check that the part number on the printhead cleaner matches the type of ink system you are using. (The printhead, cleaner and ink cartridge must all be of the same type.) For Imaging Ink Systems the part numbers are C1806A to C1809A, and for UV Pigmented Ink Systems they are C1892A to C1895A. n Check that the black and white label next to the large rectangular hole has not been completely obscured by ink spray (some spray is normal). If it is, the printer may not be able to detect the printhead cleaner and will report a Head Cleaner Removed message. You will need to replace the entire ink system (printhead, printhead cleaner and the ink cartridge) if this is the case. n Reinsert the printhead cleaner. Make sure it snaps into place properly. Repeat these steps for any other printhead cleaners that need replacing. Close the right door. 11-39
-
 1
1 -
2
-
3
-
4
-
5
-
6
-
7
-
8
-
9
-
10
-
11
-
12
-
13
-
14
-
15
-
16
-
17
-
18
-
19
-
20
-
21
-
22
-
23
-
24
-
25
-
26
-
27
-
28
-
29
-
30
-
31
-
32
-
33
-
34
-
35
-
36
-
37
-
38
-
39
-
40
-
41
-
42
-
43
-
44
-
45
-
46
-
47
-
48
-
49
-
50
-
51
-
52
-
53
-
54
-
55
-
56
-
57
-
58
-
59
-
60
-
61
-
62
-
63
-
64
-
65
-
66
-
67
-
68
-
69
-
70
-
71
-
72
-
73
-
74
-
75
-
76
-
77
-
78
-
79
-
80
-
81
-
82
-
83
-
84
-
85
-
86
-
87
-
88
-
89
-
90
-
91
-
92
-
93
-
94
-
95
-
96
-
97
-
98
-
99
-
100
-
101
-
102
-
103
-
104
-
105
-
106
-
107
-
108
-
109
-
110
-
111
-
112
-
113
-
114
-
115
-
116
-
117
-
118
-
119
-
120
-
121
-
122
-
123
-
124
-
125
-
126
-
127
-
128
-
129
-
130
-
131
-
132
-
133
-
134
-
135
-
136
-
137
-
138
-
139
-
140
-
141
-
142
-
143
-
144
-
145
-
146
-
147
-
148
-
149
-
150
-
151
-
152
-
153
-
154
-
155
-
156
-
157
-
158
-
159
-
160
-
161
-
162
-
163
-
164
-
165
-
166
-
167
-
168
-
169
-
170
-
171
-
172
-
173
-
174
-
175
-
176
-
177
-
178
-
179
-
180
-
181
-
182
-
183
-
184
-
185
-
186
-
187
-
188
-
189
-
190
-
191
-
192
-
193
-
194
-
195
-
196
-
197
-
198
-
199
-
200
-
201
-
202
-
203
-
204
-
205
-
206
-
207
-
208
-
209
-
210
-
211
-
212
-
213
-
214
-
215
-
216
-
217
-
218
-
219
-
220
-
221
-
222
-
223
-
224
-
225
-
226
-
227
-
228
-
229
-
230
-
231
-
232
-
233
-
234
-
235
-
236
-
237
-
238
-
239
-
240
-
241
-
242
-
243
-
244
-
245
-
246
-
247
-
248
-
249
-
250
-
251
-
252
-
253
-
254
-
255
-
256
-
257
-
 258
258 -
 259
259 -
 260
260 -
 261
261 -
 262
262 -
 263
263 -
 264
264 -
 265
265 -
 266
266 -
 267
267 -
 268
268 -
269
-
270
-
271
-
272
-
273
-
274
-
275
-
276
-
277
-
278
-
279
-
280
-
281
-
282
-
283
-
284
-
285
-
286
-
287
-
288
-
289
-
290
-
291
-
292
-
293
-
294
-
295
-
296
-
297
-
298
-
299
-
300
-
301
-
302
-
303
-
304
-
305
-
306
-
307
-
308
-
309
-
310
-
311
-
312
-
313
-
314
-
315
-
316
-
317
-
318
-
319
-
320
-
321
-
322
-
323
-
324
-
325
-
326
-
327
-
328
-
329
-
330
-
331
-
332
-
333
-
334
-
335
-
336
-
337
-
338
-
339
-
340
-
341
-
342
 |
 |
