HP Designjet 4500mfp HP Designjet 45XX mfp/45XX HD Scanner series - Quick Refe - Page 25
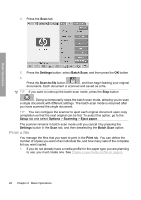
Setup, Options, Scanning, Eject paper, Settings, Batch scan, Color, B&W
 |
View all HP Designjet 4500mfp manuals
Add to My Manuals
Save this manual to your list of manuals |
Page 25 highlights
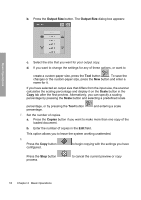
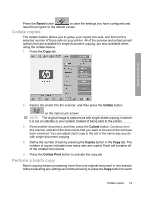
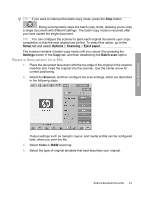
Basic Operations TIP: If you want to interrupt the batch-copy mode, press the Stop button . Doing so temporarily stops the batch-copy mode, allowing you to copy a single document with different settings. The batch-copy mode is resumed after you have copied the single document. TIP: You can configure the scanner to eject each original document upon copy completion so that the next original can be fed. To select this option, go to the Setup tab and select Options > Scanning > Eject paper. The scanner remains in batch-copy mode until you cancel it by pressing the Settings button in the Copy tab, and then deselecting the Batch scan option. Scan a document to a file 1. Place the document face down with the top edge of the original in the scanner insertion slot. Feed the original into the scanner. Use the center arrow for correct positioning. 2. Select the Scan tab, and then configure the scan settings, which are described in the following steps. Output settings such as margins, layout, and media profile can be configured later, when you print the file. 3. Select Color or B&W scanning. 4. Select the type-of-original template that best describes your original. Scan a document to a file 21
-
 1
1 -
2
-
3
-
4
-
5
-
6
-
7
-
8
-
9
-
10
-
11
-
12
-
13
-
14
-
15
-
16
-
17
-
18
-
19
-
 20
20 -
 21
21 -
 22
22 -
 23
23 -
 24
24 -
 25
25 -
 26
26 -
 27
27 -
 28
28 -
 29
29 -
 30
30 -
31
-
32
-
33
-
34
-
35
-
36
-
37
-
38
-
39
-
40
-
41
-
42
-
43
-
44
-
45
-
46
-
47
-
48
-
49
-
50
-
51
-
52
-
53
-
54
-
55
-
56
-
57
-
58
-
59
-
60
-
61
-
62
-
63
-
64
 |
 |