HP Designjet 4500mfp HP Designjet 45XX mfp/45XX HD Scanner series - Quick Refe - Page 27
Add a network connection
 |
View all HP Designjet 4500mfp manuals
Add to My Manuals
Save this manual to your list of manuals |
Page 27 highlights
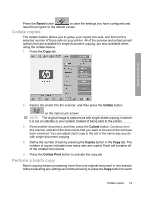
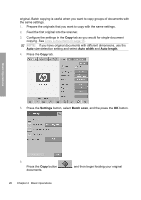
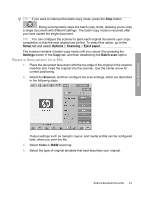
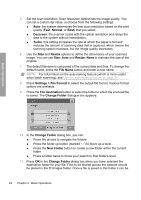
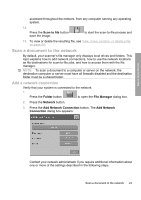
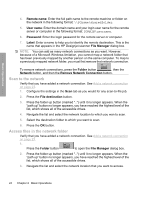
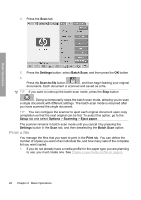
Basic Operations accessed throughout the network, from any computer running any operating system. 12. Press the Scan to file button save the image. to start the scan-to-file process and 13. To view or delete the resulting file, see View, move, rename, or delete a file on page 28. Scan a document to the network By default, your scanner's file manager only displays local drives and folders. This topic explains how to add network connections, how to use the network locations as file destinations for scan-to-file jobs, and how to access them with the file manager. NOTE: To scan a document to a computer or server on the network, the destination computer or server must have all firewalls disabled and the destination folder must be a shared folder. Add a network connection Verify that your system is connected to the network. 1. Press the Folder button to open the File Manager dialog box. 2. Press the Network button. 3. Press the Add Network Connection button. The Add Network Connection dialog box appears: Contact your network administrator if you require additional information about one or more of the settings described in the following steps. Scan a document to the network 23
-
 1
1 -
2
-
3
-
4
-
5
-
6
-
7
-
8
-
9
-
10
-
11
-
12
-
13
-
14
-
15
-
16
-
17
-
18
-
19
-
20
-
21
-
 22
22 -
 23
23 -
 24
24 -
 25
25 -
 26
26 -
 27
27 -
 28
28 -
 29
29 -
 30
30 -
 31
31 -
 32
32 -
33
-
34
-
35
-
36
-
37
-
38
-
39
-
40
-
41
-
42
-
43
-
44
-
45
-
46
-
47
-
48
-
49
-
50
-
51
-
52
-
53
-
54
-
55
-
56
-
57
-
58
-
59
-
60
-
61
-
62
-
63
-
64
 |
 |