HP Designjet 4500mfp HP Designjet 45XX mfp/45XX HD Scanner series - Quick Refe - Page 51
Clean the glass plate and the scanning area, Calibrate the scanner - scanner maintenance kit
 |
View all HP Designjet 4500mfp manuals
Add to My Manuals
Save this manual to your list of manuals |
Page 51 highlights
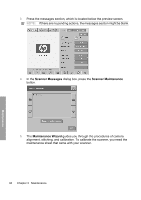
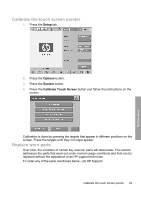
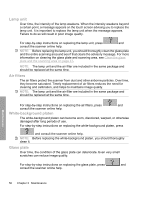
3 Maintenance ● Clean the glass plate and the scanning area ● Calibrate the scanner ● Calibrate the touch screen pointer ● Replace worn parts Clean the glass plate and the scanning area 1. Turn off the scanner and disconnect the scanner power cable. 2. Push down on the two lever buttons found near the insertion slot on each side of the scanning area lid. The scanning area lid-locking mechanism disengages. 3. Holding both lever buttons down, place your free fingers in the insertion slot and flip open the scanning area lid. The scanning area is exposed for cleaning. 4. Gently wipe the glass plate and the entire scanning area, including the main cover and the roller, with a lint-free cloth dampened with a mild, streak-free, glass cleaner. CAUTION: Do not use abrasives, acetone, benzene, or fluids that contain these chemicals. Do not spray liquids directly onto the scanner's glass plate or anywhere else in the scanner. The lifespan of the glass plate depends on the paper types that pass across it. Abrasive papers such as mylar may cause premature deterioration. 5. Dry the glass completely using a separate clean, dry, lint-free cloth like the one provided with the maintenance kit. Calibrate the scanner HP recommends that you calibrate the scanner once a month to maintain optimum scan quality. NOTE: It is important that you clean the glass and the scanning area before calibrating the scanner. 1. Before calibrating, read the scanner's online guide on how to clean the scan area. Then turn off the scanner and clean the scan area. Calibration does not work well if the scan area is not clean. 2. When you have finished cleaning the scan area, turn on the scanner and leave it on for at least an hour before proceeding to the next step. Clean the glass plate and the scanning area 47 Maintenance
-
 1
1 -
2
-
3
-
4
-
5
-
6
-
7
-
8
-
9
-
10
-
11
-
12
-
13
-
14
-
15
-
16
-
17
-
18
-
19
-
20
-
21
-
22
-
23
-
24
-
25
-
26
-
27
-
28
-
29
-
30
-
31
-
32
-
33
-
34
-
35
-
36
-
37
-
38
-
39
-
40
-
41
-
42
-
43
-
44
-
45
-
 46
46 -
 47
47 -
 48
48 -
 49
49 -
 50
50 -
 51
51 -
 52
52 -
 53
53 -
 54
54 -
 55
55 -
 56
56 -
57
-
58
-
59
-
60
-
61
-
62
-
63
-
64
 |
 |