HP StorageWorks MSA 2/8 HP StorageWorks Fabric Watch V3.1.x/4.1.x User Guide ( - Page 111
Profiles, Profile Descriptions, Table 17: Fabric Watch Profile Descriptions
 |
View all HP StorageWorks MSA 2/8 manuals
Add to My Manuals
Save this manual to your list of manuals |
Page 111 highlights
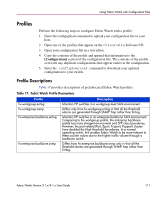
Using Fabric Watch with Configuration Files Profiles Perform the following steps to configure Fabric Watch with a profile: 1. Enter the configupload command to upload your configuration file to your host. 2. Open one of the profiles that appear on the v3.1.x or v4.1.x Software CD. 3. Open your configuration file in a text editor. 4. Copy the contents of the profile and append that information to the [Configuration] section of the configuration file. The contents of the profile overwrite any duplicate configurations that appear earlier in the configuration. 5. Enter the configdownload command to download your updated configuration to your switch. Profile Descriptions Table 17 provides descriptions of prefabricated Fabric Watch profiles. Table 17: Fabric Watch Profile Descriptions Profile fw.workgroup.errlog fw.workgroup.snmp fw.enterprise.backbone.errlog fw.enterprise.backbone.snmp Description Monitors HP switches in a workgroup-level SAN environment. Differs only from fw.workgroup.errlog in that all the threshold alarms are generated through SNMP Trap rather than Errlog. Monitors HP switches in an enterprise backbone SAN environment. Comparing to the workgroup profile, the enterprise backbone profile has more stringent environment and SFP class boundaries. However, the port related (Port, Eport, Fcuport, Fopport) classes have doubled the High threshold boundaries. In a normal operating switch, this enables Fabric Watch to be more tolerant to these counter values due to the higher traffic volume through a backbone switch. Differs from fw.enterprise.backbone.snmp only in that all the threshold alarms are generated through SNMP trap rather than Errlog. Fabric Watch Version 3.1.x/4.1.x User Guide 111
-
 1
1 -
2
-
3
-
4
-
5
-
6
-
7
-
8
-
9
-
10
-
11
-
12
-
13
-
14
-
15
-
16
-
17
-
18
-
19
-
20
-
21
-
22
-
23
-
24
-
25
-
26
-
27
-
28
-
29
-
30
-
31
-
32
-
33
-
34
-
35
-
36
-
37
-
38
-
39
-
40
-
41
-
42
-
43
-
44
-
45
-
46
-
47
-
48
-
49
-
50
-
51
-
52
-
53
-
54
-
55
-
56
-
57
-
58
-
59
-
60
-
61
-
62
-
63
-
64
-
65
-
66
-
67
-
68
-
69
-
70
-
71
-
72
-
73
-
74
-
75
-
76
-
77
-
78
-
79
-
80
-
81
-
82
-
83
-
84
-
85
-
86
-
87
-
88
-
89
-
90
-
91
-
92
-
93
-
94
-
95
-
96
-
97
-
98
-
99
-
100
-
101
-
102
-
103
-
104
-
105
-
 106
106 -
 107
107 -
 108
108 -
 109
109 -
 110
110 -
 111
111 -
 112
112 -
 113
113 -
 114
114 -
 115
115 -
 116
116 -
117
-
118
-
119
-
120
-
121
-
122
-
123
-
124
-
125
-
126
-
127
-
128
-
129
-
130
-
131
-
132
-
133
-
134
-
135
-
136
-
137
-
138
-
139
-
140
-
141
-
142
-
143
-
144
-
145
-
146
-
147
-
148
-
149
-
150
-
151
-
152
-
153
-
154
-
155
-
156
-
157
-
158
-
159
-
160
-
161
-
162
-
163
-
164
-
165
-
166
-
167
-
168
-
169
-
170
-
171
-
172
-
173
-
174
-
175
-
176
-
177
-
178
-
179
-
180
-
181
-
182
-
183
-
184
-
185
-
186
-
187
-
188
-
189
-
190
-
191
-
192
-
193
-
194
-
195
-
196
-
197
-
198
-
199
-
200
-
201
-
202
-
203
-
204
-
205
-
206
-
207
-
208
-
209
-
210
-
211
-
212
-
213
-
214
-
215
-
216
-
217
-
218
-
219
-
220
-
221
-
222
-
223
-
224
-
225
-
226
-
227
-
228
-
229
-
230
-
231
-
232
-
233
-
234
-
235
-
236
-
237
-
238
-
239
-
240
-
241
-
242
-
243
-
244
-
245
-
246
-
247
-
248
-
249
-
250
-
251
-
252
-
253
-
254
-
255
-
256
-
257
-
258
-
259
-
260
-
261
-
262
-
263
-
264
-
265
-
266
-
267
 |
 |