JVC GY-HM100U Instructions
JVC GY-HM100U - Camcorder - 1080p Manual
 |
UPC - 046838039522
View all JVC GY-HM100U manuals
Add to My Manuals
Save this manual to your list of manuals |
JVC GY-HM100U manual content summary:
- JVC GY-HM100U | Instructions - Page 1
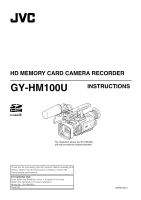
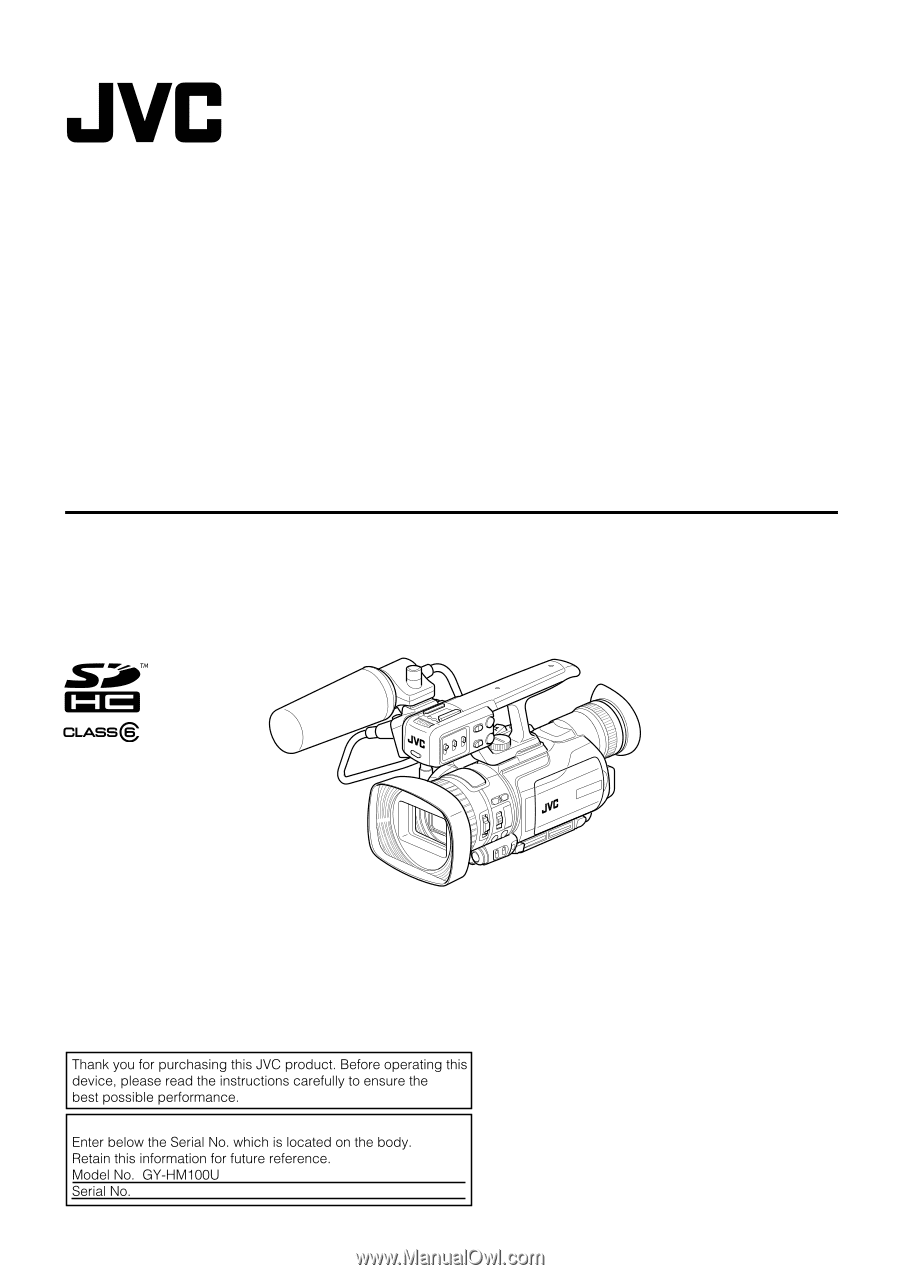
HD MEMORY CARD CAMERA RECORDER GY-HM100U INSTRUCTIONS GY-HM100 The illustration shows the GY-HM100U with the provided microphone attached. 4HANK - JVC GY-HM100U | Instructions - Page 2
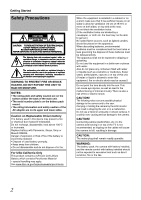
SHOCK, DO NOT REMOVE COVER (OR BACK). NO USER-SERVICEABLE PARTS INSIDE. REFER SERVICING TO QUALIFIED SERVICE PERSONNEL. The lightning flash naked flame sources, such as lighted candles, should be placed on the apparatus. When discarding batteries, environmental problems must be considered and the - JVC GY-HM100U | Instructions - Page 3
norme NMB-003 du Canada. Declaration of Conformity Model Number : GY-HM100U Trade Name : JVC Responsible party : JVC AMERICAS CORP. Address : 1700 Valley Road Wayne, N. J. 07470 Telephone Number : 973-317-5000 This device complies with Part 15 of FCC Rules. Operation is subject to the following two - JVC GY-HM100U | Instructions - Page 4
QuickTime file format used by Apple Inc.'s Final Cut Pro. The recorded clips can be edited directly using Final Cut Pro. In addition, the support for MP4 file format enables the video files to be used widely in different environments. Ⅵ SD card recording This camcorder comes with two SD card slots - JVC GY-HM100U | Instructions - Page 5
the Camcorder in the Video Shooting Mode . . . . . 26 Setting the Video Format 26 Displaying the Remaining Space on the SD Card . . . . 27 Shooting Videos 27 Capturing Still Pictures in the Video Shooting Mode 28 Recording Multiple Clips as a Continuous File . . . . . .28 Using the Camcorder in - JVC GY-HM100U | Instructions - Page 6
of HDMI Licensing, LLC. • We recommend using the Category 2 HDMI cable (High Speed cable) for viewing in higher image quality. • QuickTime and Final Cut Pro are trademarks of Apple Inc. • Other product and company names included in this instruction manual are trademarks and/or registered trademarks - JVC GY-HM100U | Instructions - Page 7
Battery BN-VF823U Battery Charger Remote AA-VF8KR Control Unit Component Cable AV Cord Power Cord ן2 USB Cable Audio Unit Clamp Screw Shoe Cable Open the cover AUDIO IN Terminal SD Cards CD-ROM Audio Unit Microphone The CD-ROM provided with this camcorder comes with [JVC ProHD Clip - JVC GY-HM100U | Instructions - Page 8
file stored on the SD card is loaded ● Rebooting when the [SYSTEM SELECT] menu is changed with the default value settings Ⅵ Use the supplied AC adapter as the power supply. Do not use the supplied AC adapter on other devices. Ⅵ When the connectors that come with connector covers are not in use - JVC GY-HM100U | Instructions - Page 9
, or by physically destroying the SD card with a hammer, etc. When formatting or erasing data using the camera, only the file administration information is changed. The data is not completely erased from the SD card. Rechargeable Battery Ⅵ Be sure to use only JVC batteries. We do not guarantee the - JVC GY-HM100U | Instructions - Page 10
Getting Started Names of Parts and Functions Front 2 Top E DC B; SNAP SHOT W T AWB 34 5 6 Front A Tally lamp (A Page 56) B Tally lamp (A Page 56) C Remote control sensor (A Page 18) D [AWB] Auto White Balance button (A Page 35) For adjusting the white balance. E Lens/Lens cover (A Page 20) - JVC GY-HM100U | Instructions - Page 11
WHT.BAL A / B L- B- M- A- H- PRST- A B H G F E D C 4 5 678 9 : ; B A Built-in microphone (A Page 40) B Lens cover switch (A Page 20) C Manual ring (A Page 30) D [ND FILTER] switch (A Page 32) Reduces the amount of incident light to 1/10. E [GAIN] switch (A Page 37) For selecting one of - JVC GY-HM100U | Instructions - Page 12
button displays the file information. (A Page 46) J [REC] Video recording button (A Page 27) Button for starting or stopping video recording. K LCD screen (A Page 22) L [INDEX] Index button Displays the remaining space on the SD card (A Page 27) and the remaining battery power (A Page 20). When - JVC GY-HM100U | Instructions - Page 13
speed manually. C [AE±] Exposure button (A Page 33) Press this button to set the exposure manually. battery is charging. (Light goes out when charging is complete.) Grip Belt Side N [POWER/MODE] Power/Operating mode switch POWER : Turns the power On/Off. (A Page 20) MODE : Switches between the video - JVC GY-HM100U | Instructions - Page 14
beginning of the file during playback. F [PLAYLIST] button This function is not available on this camcorder. G [DISP] DISPLAY button For switching the displays on the LCD screen and viewfinder. H [INDEX] button Displays the remaining space on the SD card and the remaining battery power. When in the - JVC GY-HM100U | Instructions - Page 15
camera shooting ±0 F5.6 1/4000 18dB A [1h56m] B [1h56m] 00:00:00:00 Ⅵ When in the video playback or still picture playback mode Select the details to display using the file information. ● To display this screen on the monitor that is connected to the video output terminal of this camcorder, set - JVC GY-HM100U | Instructions - Page 16
the SD Card I Video Picture Quality SP : Standard HQ : High J Frame Rate K Vertical Resolution L Horizontal Resolution The color of the icons in I, J, K and L changes according to the settings in the [FILE FORMAT] menu. When set to [QuickTime file format] : Displays in blue. When set to [MP4 file - JVC GY-HM100U | Instructions - Page 17
F Remaining Number of Shots on the SD Card G Still Picture Quality FINE : High STD : Standard H Still Picture Size Items Displayed During Video Playback D C B ;:9 8 2 +1 A 005/600 7 00:00:00:00 6 5 4 4:50 PM N OV. 1.2 0 0 9 3 A Video Mode B Date/Time C Battery Blinks in red when - JVC GY-HM100U | Instructions - Page 18
[REMOTE] in the [CAMERA SETTINGS] menu to [ON]. ● Point the front end of the remote control toward the sensor. Use the remote control within a distance of 5 meters from the camcorder. The camcorder may not respond to the remote control operations at some angles. Ⅵ Replacing batteries 1 . Press the - JVC GY-HM100U | Instructions - Page 19
mm and below), teleconverter or wide converter to the front of the lens. Ⅵ Turn the hood in an anti-clockwise direction to remove it. Hood Charging the Battery with this Camcorder 1. Turn off the power of the camcorder. 2 . Attach the supplied battery. With the battery mark (D) on the left, insert - JVC GY-HM100U | Instructions - Page 20
set to [ON], the power turns off automatically when it is not operated for 5 minutes or longer. Lens Cover Before shooting, open the lens cover. When this camcorder is not in use, close the lens cover to protect the lens. Ⅵ Use the lens cover switch to open or close the lens cover. Memo : ● Do not - JVC GY-HM100U | Instructions - Page 21
USER Buttons This camcorder comes with three MIC MIC+48V INPUT1 INPUT2 AUTO MANUAL CH-1 AUDIO SELECT CH-2 AUTO MANUAL 0 1 23 2 3 45 REVIEW MENU COMPONENT OUT A / V OUT B USER3 USER3 CAM / MEDIA DISPLAY Q.REVIEW MENU To do so, make use of [USER1], [USER2], and [USER3] in the [CAMERA - JVC GY-HM100U | Instructions - Page 22
Screen You can monitor video images on this camcorder using the viewfinder, LCD screen 1 . Open the LCD cover. 2 . Incline the LCD cover to a position that enables easy viewing VF and LCD T1 In accordance with [PRIORITY SETTING] in the [CAMERA SETTINGS] menu. (A Page 66) T2 When [PRIORITY SETTING] - JVC GY-HM100U | Instructions - Page 23
Inserting an SD Card This camcorder comes with two SD card slots. (Slot A and Slot B) Ⅵ SD cards to use ● See ASD CardsB on Page 7. ● SDXC cards are not supported. Automatic Slot Switch Display of selected slot with an SD card icon during shooting mode A [5h36m] B [5h36m] A/B Door Notched Corner - JVC GY-HM100U | Instructions - Page 24
_9999_99.extension *** : Unique number (last 3 digits of the camcorder's serial number) T Up to 600 folders/files for videos in QuickTime(MOV) or MP4 format can be recorded on the SD card. Ⅵ Still Image Folder number : 100JVCSO to 999JVCSO File number : PIC0001.JPG to PIC0999.JPG 3 . Push the Set - JVC GY-HM100U | Instructions - Page 25
Indicating Lamp E OGRAM A INDEX T PR W REC CAM / MEDIA USERS DISPLAY Q.REVIEW MENU IRIS OPEN SHUTTER AE ± CLOSE ADJ./ VOL. PUSH ACCESS REC DC CAM/MEDIA POWER/MODE Switch When in the video mode ● The video indicating lamp lights up. ● A video icon appears at the top of the screen. When in - JVC GY-HM100U | Instructions - Page 26
the Video Format Ⅵ Setting the video file format Specify the format of the video file to be recorded on the SD card. (QuickTime or MP4) Setting Set the [FILE FORMAT] menu. (A Page 61) Ⅵ Setting the video system Specify the video system (vertical resolution and frame rate) for this camcorder. Example - JVC GY-HM100U | Instructions - Page 27
format : Blue MP4 file format : Orange Vertical Resolution Icon (1080 or 720) Displays the selection made in the [SYSTEM SELECT] menu. SD Card Slot MAX RECORDING TIME SD A 1h30m 1h20m 2h10m 1h40m FREE USED INDEX SORT Displays the icon of the recording mode that is determined by the video - JVC GY-HM100U | Instructions - Page 28
not function. To play back using quick review, close the file. ● Do not remove the SD card. To remove the SD card, end the file first. ● When the [POWER] switch is turned off or when power is low due to low battery power, recording stops and power is cut off after the file is ended. ● Do not turn - JVC GY-HM100U | Instructions - Page 29
Using the Camcorder in the Still Picture Shooting Mode Setting the Picture Quality, Recording Size, and Sensitivity Preparation: A still picture is recorded. APHOTOB appears on the monitor screen during the recording process. Remaining Number of Shots A [0010] B [9999] Recording SNAPSHOT MIC 29 - JVC GY-HM100U | Instructions - Page 30
: Set to the video shooting or still picture shooting mode. Adjusts the angle of view. Zoom ratio: 1x to 10x (optical zoom only) Zooming can be operated using any of the four levers/rings below. A Camcorder's zoom lever on the top surface B Camcorder's manual ring: This can be used as a zoom ring - JVC GY-HM100U | Instructions - Page 31
video shooting or still picture shooting mode. Ⅵ Setting to the Manual Focus mode Press AF/MF to display the Manual Focus icon (MF). AF/MF A [0h57m] B [5h12m] 00:00:00:01 18dB MaNnDual Focus Mode 1 . Set the [FOCUS/ZOOM] ring switch to FOCUS. Doing so enables you to use the manual ring of the lens - JVC GY-HM100U | Instructions - Page 32
secure the camcorder using a tripod as camera shakes may blur the image. ● Shutter speed and gain cannot be adjusted when setting Lolux in the video mode. Using the Built-in ND Filter Applicable to: Full Auto shooting mode A, Manual shooting mode M Adjust the amount of light from the lens by turning - JVC GY-HM100U | Instructions - Page 33
Manual shooting mode M Generally, the brightness of the subject that is being shot is automatically adjusted according to the reference values of the camera and its setting becomes invalid.) Using the Tele Macro Feature Applicable to: Full Auto shooting mode A, Manual shooting mode M Shortens the - JVC GY-HM100U | Instructions - Page 34
Pattern Applicable to: Video shooting mode A Full Auto Shooting Mode M Manual Shooting Mode During video shooting, diagonal lines is set to the range of 70 % to 80 % by default. Ⅵ Set [ZEBRA] in the [CAMERA PROCESS] menu to [THRESHOLD]. ● A slide bar for setting the upper limit appears. 0% - 80% - JVC GY-HM100U | Instructions - Page 35
in [PRESET TEMP.] of the [CAMERA PROCESS] menu. (A Page 60) Use another white object and adjust the white balance again. ● ERROR:LOW LIGHT Displayed when the light is too dim. Increase the intensity of the lighting, and adjust the white balance again. ● ERROR:OVER LIGHT Displayed when the light - JVC GY-HM100U | Instructions - Page 36
when you have no time to adjust the white balance or when the camcorder is moved frequently in and out of places with different lighting conditions. Ⅵ Set to the Manual shooting mode. 1 . Set using [FAW] in the [CAMERA PROCESS] menu. Assign the FAW function to one of three WHT.BAL. switches - JVC GY-HM100U | Instructions - Page 37
Video shooting mode Manual shooting mode M Ⅵ Set to the Manual shooting mode. The light sensitivity can be electrically boosted using position can be specified using [GAIN L], [GAIN M], and [GAIN H] in the [CAMERA PROCESS] menu. Memo Manual shooting mode M The aperture value (F-number) of the lens - JVC GY-HM100U | Instructions - Page 38
manual mode. (The A.PR display flashes for about 5 seconds on the screen and its setting becomes invalid.) Ⅵ Setting values F1.8 - F8.0 (14 steps) The open F-number of the aperture varies according to the zoom position. Wide the screen. Set using [PHOTOMETRY AREA] in the [CAMERA PROCESS] menu. When - JVC GY-HM100U | Instructions - Page 39
output of HDMI terminal Applicable to: Full Auto shooting mode A, Manual shooting mode M The picture quality of the camera can be set using the [CAMERA PROCESS] menu. Adjustment screens are displayed for the following items in the [CAMERA PROCESS] menu. As the adjustments are shown on the screen - JVC GY-HM100U | Instructions - Page 40
a +48 V power supply, make sure that it is not set to the MIC+48V position. Ⅵ Adjusting the audio recording level Select a method for adjusting the audio recording level. Configure the CH-1/CH-2 audio select switch. Select whether to set each channel to the AUTO or MANUAL mode. AUTO : Use this - JVC GY-HM100U | Instructions - Page 41
Using a Headphone Time Code Recording Setting Applicable to: Video shooting mode, video Code Recording the Time Code The time code of the camcorder's built-in time code generator as well as user ]. Memo : ● When recording is stopped and the SD card is removed, the time code will be displayed as - JVC GY-HM100U | Instructions - Page 42
/UB] menu. There are two ways to display the [TC/UB] menu. Ⅵ Display the menu screen using the MENU button, then select the [TC/UB] menu. (A Page 64) Ⅵ Set [USER1], [USER2], or [USER3] in the [CAMERA SETTINGS] menu to [TC SETTING], then press the corresponding USER button. Assignment of USER buttons - JVC GY-HM100U | Instructions - Page 43
to [720-**], switching between the video/still picture mode reboots the camcorder. Preparation: Insert an SD card, and select the card slot. Ⅵ Changing the video format to play back Menu settings (A Page 61) [FILE FORMAT] : For selecting the format of the recorded file. [SYSTEM SELECT] : For - JVC GY-HM100U | Instructions - Page 44
E Push downward Switches to the still mode at the beginning of the next file Press center Still Memo : ● Files on the SD cards in slots A, B are played back continuously when [SLOT AUTO SWITCHING] in the [CAMERA SETTINGS] menu is set to [ON]. ● When frame-by-frame reverse playback is performed - JVC GY-HM100U | Instructions - Page 45
06. 2009 SELECT SET 1/1 INDEX SORT Cursor (Date of the selected file) 1 . Select a date. Push the Set Lever up or down. 4 . Play the file. Press the center of the Set Lever or (T) of the zoom lever. ● The selected video file is played back. Ⅵ Returning to the playback index screen Press the INDEX - JVC GY-HM100U | Instructions - Page 46
still picture is captured and saved to the SD card. (Still picture file) You can confirm the capture operation by the shutter sound generated when the SNAPSHOT button is pressed if you set [OPERATION SOUND] in the [CAMERA SETTINGS] menu to [ON]. SNAP SHOT Memo : ● It takes about 3 seconds to capture - JVC GY-HM100U | Instructions - Page 47
of the remote control. Memo : ● This function is not available on the camcorder unit. ● To use the remote control, set [REMOTE] in the [CAMERA SETTINGS] menu to [ON]. 1 . Set to the still mode during the video playback mode. When in the still picture playback mode, display the still picture on the - JVC GY-HM100U | Instructions - Page 48
control. 3 . Play the file. Press the center of the Set Lever or (T) of the zoom lever. ● The selected video file is played back. Ⅵ Displaying still picture. Memo : ● Files on the SD cards in slots A, B are played back continuously when [SLOT AUTO SWITCHING] in the [CAMERA SETTINGS] menu is set to - JVC GY-HM100U | Instructions - Page 49
enlarge the display of a still picture using the zoom buttons on the remote control. AEnlarging a Still ImageB(A Page 47) Viewing Videos on a Monitor Applicable to: Video shooting mode, video playback mode There are three video output terminals on this camcorder. Choose the most suitable terminal - JVC GY-HM100U | Instructions - Page 50
: "Delete OK mark" There are four ways to append/delete the OK mark. ● Specify files individually ● Specify selected files ● Append to all files ● Delete from all files Preparation Ⅵ Insert an SD card. Ⅵ Set to the video or still picture playback mode. Set the OK mark in the [OK MARK] menu. [OK - JVC GY-HM100U | Instructions - Page 51
unwanted video and still picture files. ● Delete files individually ● Delete selected files ● Delete all files Preparation Ⅵ Insert an SD card. Ⅵ Set to the video or still picture playback mode. Delete files using the [DELETE] menu. Set [USER1], [USER2], or [USER3] in the [CAMERA SETTINGS] menu - JVC GY-HM100U | Instructions - Page 52
Slot B. Insert an SD card containing the file to copy/move, and an SD card where the file is to be copied/moved to. Ⅵ Select a playback mode. ● To copy a file, set to the video playback or still picture playback mode according to the format of the file to be copied. ● To move a file, set to the - JVC GY-HM100U | Instructions - Page 53
FILE UNIT] is set to [SCENE] (for videos) or [FILE] (for still pictures) Press the center of the Set Lever to display the screen for selecting the files to copy. (See below) Ⅵ When [FILE COPY MEDIA FILE UNIT NO. OF FILES SD AɨSD B FILE 0059 EXECUTE CANCEL SELECT SET MENU QUIT Copy files by - JVC GY-HM100U | Instructions - Page 54
/still picture shooting modes, video/still picture playback modes Files stored on the SD card can be retrieved to a PC by connecting this camcorder to the PC using a USB cable. Memo : ● However, files cannot be written to the SD card from the PC. 1 . Connect to a computer. Power of PC must be on - JVC GY-HM100U | Instructions - Page 55
. ● Returns to the [STORE FILE] screen. Loading Settings from an SD Card Settings saved on an SD card can be loaded on the camcorder. Select a file from EXT1 to EXT4. Preparation Insert an SD card. Stop recording if it is in progress. 1 . Select [LOAD FILE] in the [CAMERA SETTINGS] menu, and press - JVC GY-HM100U | Instructions - Page 56
and headphone. Tally lamp Set using [TALLY] in the [CAMERA SETTINGS] menu. (A Page 66) When this is set to [ON], the tally lamp lights up in the recording mode. Displaying the Hour Meter The hour meter displays the total time during which the power of the camcorder is turned on. 1 . Select [HOUR - JVC GY-HM100U | Instructions - Page 57
. Set to the operation mode you want to configure. (Video shooting/still picture shooting/video playback/still picture playback modes) 2 . Press [MENU]. ● The menu screen appears. MENU No display: A next layer is available MENU CAMERA PROCESS FILE FORMAT SYSTEM SELECT 1080 60/30 REC MODE 1920 - JVC GY-HM100U | Instructions - Page 58
BAR TELE MACRO FILE FORMAT SYSTEM SELECT REC MODE CLIP CONTINUOUS REC IMAGE QUALITY IMAGE SIZE GAIN UP CONNECTION SETTINGS DISPLAY ON TV VIDEO OUTPUT COMPONENT OUTPUT HDMI OUTPUT HDMI COLOR SETTING HDMI ENHANCE SETTING MEDIA SETTINGS FORMAT VIDEO NO. RESET IMAGE NO. RESET WIND CUT INPUT1 INPUT2 MIC - JVC GY-HM100U | Instructions - Page 59
Video Shooting Mode Item Description Items that are shaded ( ) are common to all modes. Settings with the R mark are default values. For setting the camera is displayed. (A Page 39) Use this item to adjust the point (starting point of compression) manually. R AUTO : Adjusts automatically - JVC GY-HM100U | Instructions - Page 60
Menu Screens Menu Screens of the Video Shooting Mode (continued) CAMERA PROCESS Item Description Items that are temperature to 3200K. (Use for light sources with a low color temperature, such as halogen lamps.) 5600K : Sets the basic color temperature to 5600K. (Use for light sources with a high - JVC GY-HM100U | Instructions - Page 61
of the zoom lens. R OFF : Enables closeup shots up to about 1 m. ON : Enables closeup shots up to about 80 cm. FILE FORMAT For setting the video file format. R QuickTime file format : Records in the QuickTime(MOV) format. MP4 file format : Records in the MP4 file format. Memo : ● The display - JVC GY-HM100U | Instructions - Page 62
Menu Screens Menu Screens of the Video Shooting Mode (continued) Item FILE FORMAT] menu is set to [MP4 file format], [1440/60i(HQ)] and [1440/50i(HQ)] are not displayed. CLIP CONTINUOUS REC For selecting whether to record multiple clips as a continuous file. R OFF : Disables continuous clip - JVC GY-HM100U | Instructions - Page 63
When connected to a PC monitor For setting processes related to the SD card. FORMAT A separate screen is displayed. (A Page 24) Erases all data. VIDEO NO. RESET A separate screen is displayed. (A Page 24) Resets the video file number. IMAGE NO. RESET A separate screen is displayed. (A Page 24 - JVC GY-HM100U | Instructions - Page 64
Menu Screens Menu Screens of the Video Shooting Mode (continued) TC/UB Item Description Items that are mode. The time code on the SD card is read, and time code is recorded in continuation of this value. A separate screen is displayed. (A Page 42) Use this item to preset the user's - JVC GY-HM100U | Instructions - Page 65
time during which the power of the camcorder is turned on. For setting the operation of this camcorder. LOAD FILE A separate screen is displayed. (A Page 55) Use this item to load setting files saved on an SD card on the camcorder. Select one of the four setting files from EXT1 to EXT4. STORE - JVC GY-HM100U | Instructions - Page 66
Screens of the Video Shooting Mode (continued) CAMERA SETTINGS Item Description Items that are shaded ( ) are common to all modes. Settings with the R mark are default values. RESET ALL MENU A separate screen is displayed. (A Page 56) Use this item to reset the menu and camcorder settings to - JVC GY-HM100U | Instructions - Page 67
default values. For setting the camera operation and image quality during Use for light sources with a low color temperature, such as halogen lamps.) : Sets the basic color temperature to 5600K. (Use for light zoom lens. R OFF : Enables closeup shots up to about 1 m. ON : Enables closeup shots up - JVC GY-HM100U | Instructions - Page 68
shots/second) BRACKETING : Performs three types of continuous shots starting from still pictures at the brightness level that is automatically or manually function is used continuously. DISPLAY SETTINGS Same as in video shooting mode. (A Page 65) CAMERA SETTINGS Same as in video shooting mode. - JVC GY-HM100U | Instructions - Page 69
files. MOVE (Supports only still A separate screen is displayed. (A Page 53) pictures) For moving still picture files to another SD card. ALL : Moves all still picture files. FILE : Moves selected still picture files. DISPLAY SETTINGS Same as in video shooting mode. (A Page 65) CAMERA - JVC GY-HM100U | Instructions - Page 70
the SD card (DELETE, FORMAT) ● Clean any dirt or water droplets from the lens. ● If you are shooting at a dark place or shooting a subject that has no contrast between dark and light, adjust the focus manually. ● Use [Lolux]. ● Set exposure to the [+] side. ● For videos, set to the manual shooting - JVC GY-HM100U | Instructions - Page 71
from the SD card. (If there are - when switching between video and still picture modes or when many still pictures (more than 1000 files) on the SD card, it takes time for the camcorder to process the files.) turning the power on or off. The remote control does not ● Replace the battery. 18 - JVC GY-HM100U | Instructions - Page 72
CANCELLED ● Open the lens cover. ● Set the date and time. Action ● Using an AC adapter, charge the camcorder for over 24 hours, then set the date and time. ● Attach the battery again. ● Replace the SD card. (Make use of an SDHC card (Class 6 or higher) when shooting videos.) ● You have pressed - JVC GY-HM100U | Instructions - Page 73
Number The estimated recording time and estimated number of still picture shots are only a guide. Changes may occur depending on the shooting environment, SD card in use, and the battery condition. Estimated Video Recording Time QuickTime/MP4 Quality HQ(1080i/720p) SP(1080i) SP(720P) 4GB 12 m 17 - JVC GY-HM100U | Instructions - Page 74
pixels, polysilicon liquid crystal Viewfinder : 0.44", 235,000 pixels, polysilicon liquid crystal Ⅵ Video/Audio Video recording format Video format Video signals Audio signals : QuickTime File Format (for Final Cut Pro) MP4 file format Instruction manual 1 Warranty card 1 AC Adapter Power - JVC GY-HM100U | Instructions - Page 75
battery CR2025) : Approx. 1 year (varies according to frequency of use) battery) Dimensional Outline Drawing (Unit: mm) SNAP SHOT 100 114 135 W T 138 102 154 179 2 3 45 CH-2 INPUT AUDIO INPUT INPUT1 INPUT2 - LINE - MIC MIC+48V INPUT1 INPUT2 AUTO MANUAL CH-1 AUDIO SELECT CH-2 AUTO MANUAL - JVC GY-HM100U | Instructions - Page 76
© 2009 Victor Company of Japan, Limited US 0409MNH-SW-VP GY-HM100U HD MEMORY CARD CAMERA RECORDER
-
 1
1 -
 2
2 -
 3
3 -
 4
4 -
 5
5 -
 6
6 -
 7
7 -
8
-
9
-
10
-
11
-
12
-
13
-
14
-
15
-
16
-
17
-
18
-
19
-
20
-
21
-
22
-
23
-
24
-
25
-
26
-
27
-
28
-
29
-
30
-
31
-
32
-
33
-
34
-
35
-
36
-
37
-
38
-
39
-
40
-
41
-
42
-
43
-
44
-
45
-
46
-
47
-
48
-
49
-
50
-
51
-
52
-
53
-
54
-
55
-
56
-
57
-
58
-
59
-
60
-
61
-
62
-
63
-
64
-
65
-
66
-
67
-
68
-
69
-
70
-
71
-
72
-
73
-
74
-
75
-
76
 |
 |
For Customer Use:
HD MEMORY CARD CAMERA RECORDER
GY-HM100U
INSTRUCTIONS
The illustration shows the GY-HM100U
with the provided microphone attached.
LYT2089-001C