JVC GY-HM100U Instructions - Page 65
JVC GY-HM100U - Camcorder - 1080p Manual
 |
UPC - 046838039522
View all JVC GY-HM100U manuals
Add to My Manuals
Save this manual to your list of manuals |
Page 65 highlights
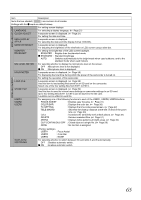
DISPLAY SETTINGS CAMERA SETTINGS Item Description Items that are shaded ( ) are common to all modes. Settings with the R mark are default values. For setting screen displays. LANGUAGE For selecting a display language. (A Page 21) CLOCK ADJUST A separate screen is displayed. (A Page 21) For setting the date and time. DATE DISPLAY STYLE A separate screen is displayed. For selecting the date and time display format (12h/24h). MONITOR BRIGHT A separate screen is displayed. For adjusting the brightness of the viewfinder or LCD screen using a slide bar. MONITOR BACKLIGHT For setting the brightness of the LCD screen backlight. BRIGHTER : Brighter than the standard mode R STANDARD : Standard brightness AUTO : Switches automatically to the bright mode when used outdoors, and to the standard mode when used indoors. MIC LEVEL METER For selecting whether to display the microphone level on the screen. OFF : Microphone level is not displayed. R ON : Microphone level is displayed. HOUR METER A separate screen is displayed. (A Page 56) For displaying the total time during which the power of the camcorder is turned on. For setting the operation of this camcorder. LOAD FILE A separate screen is displayed. (A Page 55) Use this item to load setting files saved on an SD card on the camcorder. Select one of the four setting files from EXT1 to EXT4. STORE FILE A separate screen is displayed. (A Page 54) Use this item to save the current menu settings or camcorder settings to an SD card. Up to four setting files (EXT1 to EXT4) can be saved to the SD card. A subtitle can be added to each file. USER1 USER2 USER3 For assigning one of the following functions to each of the USER1, USER2, USER3 buttons. FOCUS ASSIST : Enables easy focusing. (A Page 31) COLOR BAR : Displays the color bar. (A Page 39) TC SETTING : Displays the time code preset screen. (A Page 42) TELE MACRO : Shortens the closeup distance at the tele (T) end of the zoom lens. (A Page 33) Lolux : Increases the sensitivity level at dark places. (A Page 32) DELETE : Deletes unwanted files. (A Page 51) ZEBRA : Displays zebra patterns at bright areas. (A Page 34) CLIP CONTINUOUS OFF : Closes clips as a single file. (A Page 28) NONE : No function is assigned. SLOT AUTO SWITCHING USER1 USER2 : Focus Assist : Color Bar USER3 : NONE For selecting whether to switch between SD card slots A and B automatically. OFF : Disables automatic switch. R ON : Enables automatic switch. 65
-
 1
1 -
2
-
3
-
4
-
5
-
6
-
7
-
8
-
9
-
10
-
11
-
12
-
13
-
14
-
15
-
16
-
17
-
18
-
19
-
20
-
21
-
22
-
23
-
24
-
25
-
26
-
27
-
28
-
29
-
30
-
31
-
32
-
33
-
34
-
35
-
36
-
37
-
38
-
39
-
40
-
41
-
42
-
43
-
44
-
45
-
46
-
47
-
48
-
49
-
50
-
51
-
52
-
53
-
54
-
55
-
56
-
57
-
58
-
59
-
 60
60 -
 61
61 -
 62
62 -
 63
63 -
 64
64 -
 65
65 -
 66
66 -
 67
67 -
 68
68 -
 69
69 -
 70
70 -
71
-
72
-
73
-
74
-
75
-
76
 |
 |
