JVC GY-HM100U Instructions - Page 26
Shooting, Selecting a Focu, ing Mode, Setting the Video Format - mp4 files
 |
UPC - 046838039522
View all JVC GY-HM100U manuals
Add to My Manuals
Save this manual to your list of manuals |
Page 26 highlights
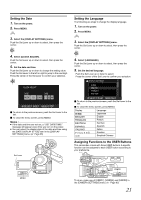
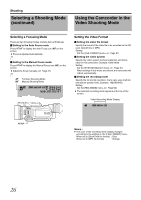
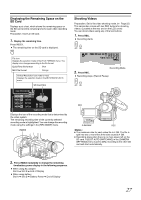
Shooting Selecting a Shooting Mode (continued) Using the Camcorder in the Video Shooting Mode Selecting a Focusing Mode There are two focusing modes, namely Auto and Manual. Ⅵ Setting to the Auto Focus mode Press AF/MF to display the Auto Focus icon (AF) on the screen. ● Focus is adjusted automatically. AF/MF Ⅵ Setting to the Manual Focus mode Press AF/MF to display the Manual Focus icon (MF) on the screen. ● Adjust the focus manually. (A Page 31) AF/MF AF Full Auto Shooting Mode MF Manual Shooting Mode A [0h57m] B [5h12m] 00:00:00:01 18dB ND ND FILTER ON OFF USER1 USER2 FOCUS ZOOM AF/MF FULL AUTO GAIN WHT.BAL A / B L- B- M- A- H- PRST- A B AF/MF Setting the Video Format Ⅵ Setting the video file format Specify the format of the video file to be recorded on the SD card. (QuickTime or MP4) Setting Set the [FILE FORMAT] menu. (A Page 61) Ⅵ Setting the video system Specify the video system (vertical resolution and frame rate) for this camcorder. Example: 1080-60/30 Setting Set the [SYSTEM SELECT] menu. (A Page 61) When settings in this menu are altered, the camcorder will reboot automatically. Ⅵ Setting the recording mode Specify the horizontal resolution, frame rate, scan method, and picture quality mode. Example: 1920/60i(HQ) Setting Set the [REC MODE] menu. (A Page 62) ● The selected recording mode appears at the top of the screen. Video Recording Mode Display Memo : ● The color of the recording mode display changes according to the settings in the [FILE FORMAT] menu. When set to [QuickTime file format] : Blue When set to [MP4 file format] : Orange 26
-
 1
1 -
2
-
3
-
4
-
5
-
6
-
7
-
8
-
9
-
10
-
11
-
12
-
13
-
14
-
15
-
16
-
17
-
18
-
19
-
20
-
 21
21 -
 22
22 -
 23
23 -
 24
24 -
 25
25 -
 26
26 -
 27
27 -
 28
28 -
 29
29 -
 30
30 -
 31
31 -
32
-
33
-
34
-
35
-
36
-
37
-
38
-
39
-
40
-
41
-
42
-
43
-
44
-
45
-
46
-
47
-
48
-
49
-
50
-
51
-
52
-
53
-
54
-
55
-
56
-
57
-
58
-
59
-
60
-
61
-
62
-
63
-
64
-
65
-
66
-
67
-
68
-
69
-
70
-
71
-
72
-
73
-
74
-
75
-
76
 |
 |
