JVC GY-HM100U Instructions - Page 21
Turn on the power., MENU., Select the [DISPLAY SETTINGS] menu., Select [CLOCK ADJUST]., Set the date - used
 |
UPC - 046838039522
View all JVC GY-HM100U manuals
Add to My Manuals
Save this manual to your list of manuals |
Page 21 highlights
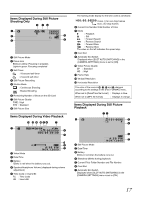
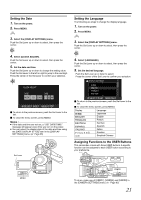
Setting the Date 1 . Turn on the power. 2 . Press MENU. MENU 3 . Select the [DISPLAY SETTINGS] menu. Push the Set Lever up or down to select, then press the center. 4 . Select [CLOCK ADJUST]. Push the Set Lever up or down to select, then press the center. 5 . Set the date and time. Push the Set Lever up or down to change the setting value. Push the Set Lever to the left or right to jump to the next digit. Press the center of the Set Lever to confirm your selection. CLOCK ADJUST DATE TIME NOV 10 2009 11 35 AM SELECT SET MENU STOP Ⅵ To return to the previous screen, push the Set Lever to the left. Ⅵ To close the menu screen, press MENU. Memo : ● If the date and time are not set, a ASET DATE/TIME!B message will appear every time you turn on the power. ● You can select the display style of the date and time using the [DATE DISPLAY STYLE] item in the [DISPLAY SETTINGS] menu. (A Page 65) E OGRAM A Set Lever INDEX T PR W REC CAM / MEDIA USERS DISPLAY Q.REVIEW MENU MENU IRIS SHUTTER AE ʶ ADJ./ VOL. PUSH REC DC Setting the Language The following are steps to change the display language. 1 . Turn on the power. 2 . Press MENU. MENU 3 . Select the [DISPLAY SETTINGS] menu. Push the Set Lever up or down to select, then press the center. 4 . Select [LANGUAGE]. Push the Set Lever up or down to select, then press the center. 5 . Set the desired language. Push the Set Lever up or down to select. Press the center of the Set Lever to confirm your selection. DISPLAY SETTINGS ENGLISH FRANÇAIS DEUTSCH SELECT SET MENU QUIT Ⅵ To return to the previous screen, push the Set Lever to the left. Ⅵ To close the menu screen, press MENU. Display Language Japanese English French German Spanish Italian Russian Simplied Chinese Assigning Functions to the USER Buttons This camcorder comes with three USER buttons. A specific function can be assigned to each USER button according to your preference. CH-2 INPUT AUDIO INPUT INPUT1 INPUT2 - LINE - MIC MIC+48V INPUT1 INPUT2 AUTO MANUAL CH-1 AUDIO SELECT CH-2 AUTO MANUAL 0 1 23 2 3 45 USER1 USER2 ND FILTER ON OFF USER1 USER2 FOCUS ZOOM AF/MF FULL AUTO GAIN WHT.BAL A / B L- B- M- A- H- PRST- A CAM / MEDIA USERS DISPLAY Q.REVIEW MENU COMPONENT OUT A / V OUT B USER3 USER3 CAM / MEDIA DISPLAY Q.REVIEW MENU To do so, make use of [USER1], [USER2], and [USER3] in the [CAMERA SETTINGS] menu. (A Page 65) 21
-
 1
1 -
2
-
3
-
4
-
5
-
6
-
7
-
8
-
9
-
10
-
11
-
12
-
13
-
14
-
15
-
 16
16 -
 17
17 -
 18
18 -
 19
19 -
 20
20 -
 21
21 -
 22
22 -
 23
23 -
 24
24 -
 25
25 -
 26
26 -
27
-
28
-
29
-
30
-
31
-
32
-
33
-
34
-
35
-
36
-
37
-
38
-
39
-
40
-
41
-
42
-
43
-
44
-
45
-
46
-
47
-
48
-
49
-
50
-
51
-
52
-
53
-
54
-
55
-
56
-
57
-
58
-
59
-
60
-
61
-
62
-
63
-
64
-
65
-
66
-
67
-
68
-
69
-
70
-
71
-
72
-
73
-
74
-
75
-
76
 |
 |
