JVC GY-HM100U Instructions - Page 19
Removing the Hood, Charging the Battery
 |
UPC - 046838039522
View all JVC GY-HM100U manuals
Add to My Manuals
Save this manual to your list of manuals |
Page 19 highlights
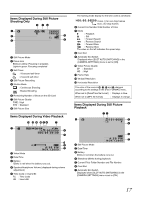
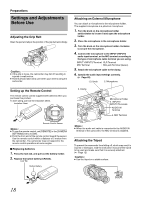
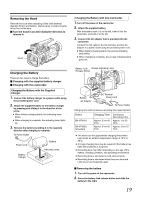
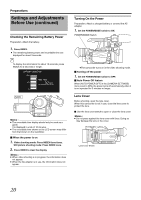
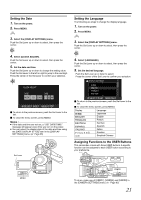
Removing the Hood Remove the hood when attaching a filter (with external diameter 50 mm and below), teleconverter or wide converter to the front of the lens. Ⅵ Turn the hood in an anti-clockwise direction to remove it. Hood Charging the Battery with this Camcorder 1. Turn off the power of the camcorder. 2 . Attach the supplied battery. With the battery mark (D) on the left, insert it into the camcorder, and slide it to the left. 3 . Connect the AC adapter that is provided with the camcorder. Connect the DC cable to the DC terminal, and the AC adapter to a power outlet using the provided power cord. ● When battery charging starts, the access indicating lamp blinks. ● When charging is complete, the access indicating lamp goes out. Charging the Battery There are two ways to charge the battery. Ⅵ Charging with the supplied battery charger. Ⅵ Charging with this camcorder. Charging the Battery with the Supplied Charger 1 . Connect the battery charger to a power outlet using the provided power cord. 2 . Attach the supplied battery to the battery charger by pressing and sliding it in the direction of the arrow. ● When battery charging starts, the indicating lamp blinks. ● When charging is complete, the indicating lamp lights up. 3 . Remove the battery by sliding it in the opposite direction after charging is complete. To Power Outlet Power Cord Battery Charger Battery Indicating Lamp Battery Lock Access Indicating Lamp Release Button AUDOIOPEINN MIC Battery AC Adapter DC Terminal Power Cord To Power Outlet Charging time and continuous recording time (approximate) Battery BN-VF815U BN-VF823U (Provided) Charging Time Approx. 2 hrs 40 mins Approx. 3 hrs 40 mins Continuous Recording Time Approx. 1 hr 25 mins Approx. 2 hrs 10 mins ● The above are the approximate charging times when used under an ambient temperature range of 10°C to 35°C. ● A longer charging time may be required if the battery has been left unused for a long time. ● Recording time may differ depending on the age of the battery, charging condition, and operating environment. ● Recording time is shortened in cold environments. ● Recording time is shortened when the zoom lens and LCD screen are frequently used. Ⅵ Removing the battery 1 . Turn off the power of the camcorder. 2 . Press the battery lock release button and slide the battery to the right. 19
-
 1
1 -
2
-
3
-
4
-
5
-
6
-
7
-
8
-
9
-
10
-
11
-
12
-
13
-
 14
14 -
 15
15 -
 16
16 -
 17
17 -
 18
18 -
 19
19 -
 20
20 -
 21
21 -
 22
22 -
 23
23 -
 24
24 -
25
-
26
-
27
-
28
-
29
-
30
-
31
-
32
-
33
-
34
-
35
-
36
-
37
-
38
-
39
-
40
-
41
-
42
-
43
-
44
-
45
-
46
-
47
-
48
-
49
-
50
-
51
-
52
-
53
-
54
-
55
-
56
-
57
-
58
-
59
-
60
-
61
-
62
-
63
-
64
-
65
-
66
-
67
-
68
-
69
-
70
-
71
-
72
-
73
-
74
-
75
-
76
 |
 |
