JVC GY-HM100U Instructions - Page 40
Audio Recording - audio unit
 |
UPC - 046838039522
View all JVC GY-HM100U manuals
Add to My Manuals
Save this manual to your list of manuals |
Page 40 highlights
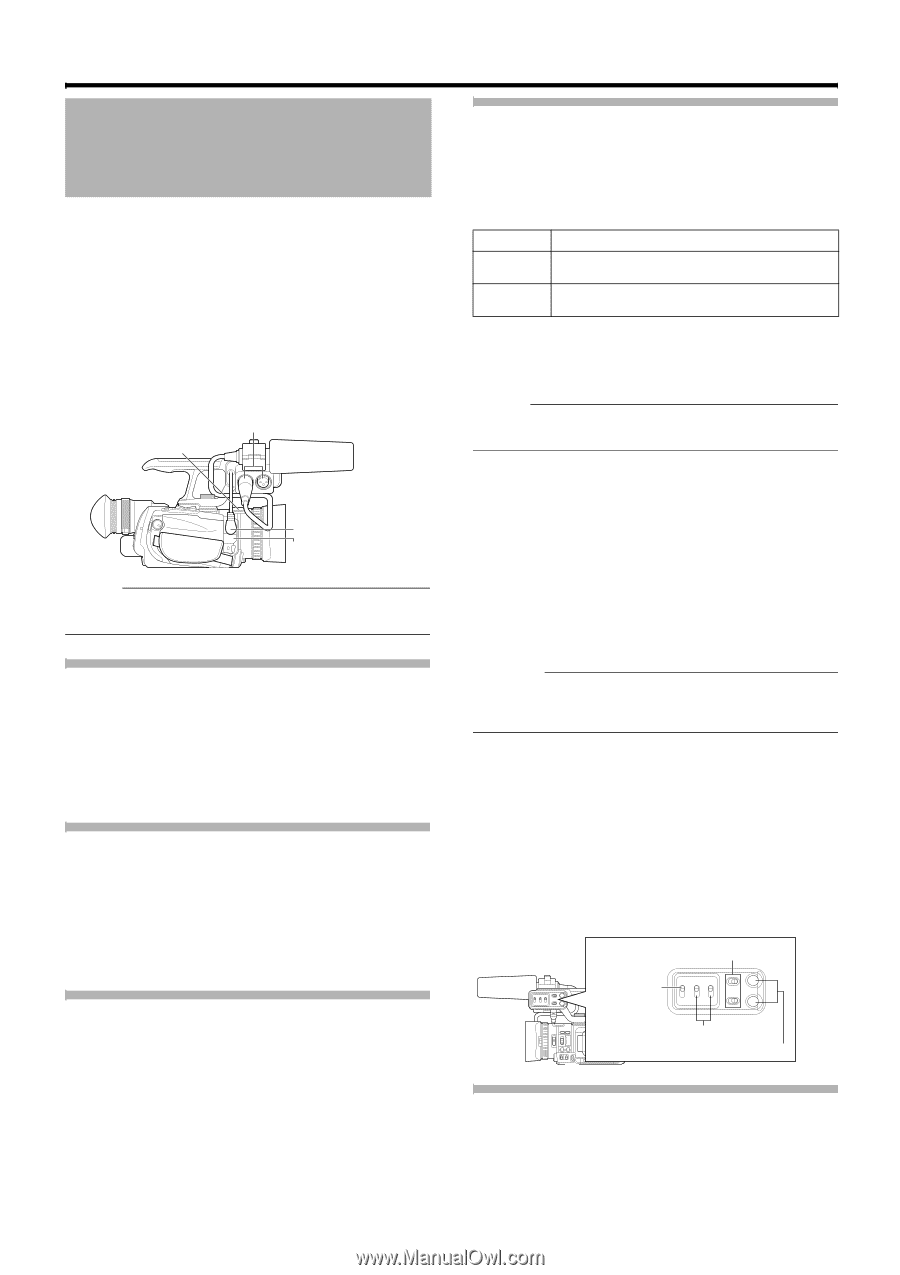
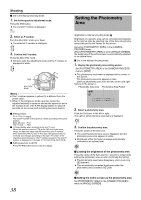
Shooting Audio Recording Applicable to: Video shooting mode There are three ways to input audio sound. A Built-in microphone B MIC terminal C INPUT1 terminal / INPUT2 terminal The priority order of the input is in the sequence of C > B > A. TWhen the built-in microphone or MIC terminal is in use, remove the audio unit cable from the AUDIO IN terminal. C INPUT1/INPUT2 Terminals A Built-in Microphone Audio Unit Cable MIC B MIC Terminal Memo : ● Audio sound is not recorded when in the still picture shooting mode. Setting the Reference Audio Recording Level Applicable to: Full Auto shooting mode A, Manual shooting mode M Menu settings Set the [AUDIO REF. LEVEL] menu. (-20 dB/-12 dB) (A Page 64) Using the Built-in Microphone Applicable to: Full Auto shooting mode A, Manual shooting mode M Ⅵ Setting the input level. Menu settings Set the [INTERNAL MIC LEVEL] menu. (A Page 64) Using an External Microphone Connected to the MIC Terminal Applicable to: Full Auto shooting mode A, Manual shooting mode M Preparation: Connect a microphone to the MIC terminal. (A Page 18) Ⅵ Setting the input level. Menu settings Set the [MIC LEVEL SETTING] menu. (A Page 64) 40 Using an External Microphone Connected to the INPUT1/INPUT2 Terminal Applicable to: Full Auto shooting mode A, Manual shooting mode M Preparation: Connect a microphone to the INPUT1/INPUT2 terminal. (A Page 18) Terminal Audio Input INPUT1 Input to CH-1(L) at all times. Input to CH-2(R) can be enabled using the CH-2 INPUT switch. INPUT2 Input to CH-2(R) can be enabled using the CH-2 INPUT switch. Ⅵ Selecting CH-2 audio Configure the CH-2 INPUT switch INPUT1: Inputs the audio from the INPUT1 terminal to CH-2. INPUT2: Inputs the audio from the INPUT2 terminal to CH-2. Memo : ● The audio from the INPUT1 terminal is input to CH-1 regardless of the setting. Ⅵ Selecting the audio input to the INPUT1 or INPUT2 terminal Configure the INPUT1/INPUT2 AUDIO INPUT switch. LINE : Use this setting when connecting to an audio device or other equipment. MIC : Use this setting when connecting to a dynamic microphone. MIC+48V : Use this setting when connecting to a microphone that requires a +48 V power supply (phantom microphone), or when using the supplied microphone. Caution : ● When connecting a device that does not require a +48 V power supply, make sure that it is not set to the MIC+48V position. Ⅵ Adjusting the audio recording level Select a method for adjusting the audio recording level. Configure the CH-1/CH-2 audio select switch. Select whether to set each channel to the AUTO or MANUAL mode. AUTO : Use this setting to enable the auto adjustment mode. MANUAL : Use this setting to enable the manual adjustment mode. Adjust the audio recording level using the CH-1/CH-2 AUDIO LEVEL knob. CH-1/CH-2 Audio Selection Switch CH-2 INPUT Switch INPUT1/INPUT2 AUDIO INPUT Switch CH-1/CH-2 AUDIO LEVEL Knob Reducing Wind Noise Wind noise for each microphone can be reduced. Menu settings Set the [WIND CUT] menu. (A Page 63)
-
 1
1 -
2
-
3
-
4
-
5
-
6
-
7
-
8
-
9
-
10
-
11
-
12
-
13
-
14
-
15
-
16
-
17
-
18
-
19
-
20
-
21
-
22
-
23
-
24
-
25
-
26
-
27
-
28
-
29
-
30
-
31
-
32
-
33
-
34
-
 35
35 -
 36
36 -
 37
37 -
 38
38 -
 39
39 -
 40
40 -
 41
41 -
 42
42 -
 43
43 -
 44
44 -
 45
45 -
46
-
47
-
48
-
49
-
50
-
51
-
52
-
53
-
54
-
55
-
56
-
57
-
58
-
59
-
60
-
61
-
62
-
63
-
64
-
65
-
66
-
67
-
68
-
69
-
70
-
71
-
72
-
73
-
74
-
75
-
76
 |
 |