JVC GY-HM100U Instructions - Page 51
Deleting File
 |
UPC - 046838039522
View all JVC GY-HM100U manuals
Add to My Manuals
Save this manual to your list of manuals |
Page 51 highlights
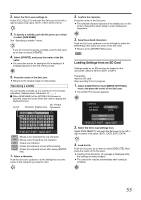
Appending To or Deleting From All Files 1 . Select [MARK ALL] or [DELETE ALL] in the [OK MARK] menu, and press the center of the Set Lever. ● A confirmation screen appears. 2 . Select [YES] to execute. Push the Set Lever up or down to select [YES]. Press the center of the Set Lever. ● Execution starts. A message appears at the end of the process. 3 . Press the center of the Set Lever. ● Returns to the [OK MARK] menu screen. Deleting Files Applicable to: Video playback mode, still picture playback mode There are three ways to delete unwanted video and still picture files. ● Delete files individually ● Delete selected files ● Delete all files Preparation Ⅵ Insert an SD card. Ⅵ Set to the video or still picture playback mode. Delete files using the [DELETE] menu. Set [USER1], [USER2], or [USER3] in the [CAMERA SETTINGS] menu to [DELETE], then press the corresponding USER button. [DELETE]: (A Page 69) Memo : ● Files appended with the OK mark and files in the Other group cannot be deleted. Deleting Files Individually 1 . Select the file to delete from the index screen. Alternatively, set to the still mode during video playback. When in still picture playback, set to the full display of a single image. (End slideshow) 2 . Select [CURRENT] in the [DELETE] menu, and press the center of the Set Lever. Alternatively, press the USER button that is set as [DELETE]. ● A screen to confirm deletion appears. DELETE? (REMAINING SCENES: 0009) YES NO SELECT SET MENU QUIT T Push the Set Lever to the left or right to move to the next or previous file. 3 . Select [YES] to execute. Push the Set Lever up or down to select [YES]. Press the center of the Set Lever. ● The file is deleted. Ⅵ Returns to the index screen if there are no remaining files. Ⅵ The screen to confirm deletion appears if there are remaining files. To delete the file that is displayed, select [YES]. To return to the menu screen, select [NO]. To return to the index screen or full screen display, press the [MENU] button. Deleting Selected Files 1 . Select [FILE SELECT] in the [DELETE] menu, and press the center of the Set Lever. ● A screen for selecting files to delete appears. Deletion Icon VIDEO DELETE 1/10 OK SELECT SET MENU QUIT 2 . Select the files to delete. Push the Set Lever up/down or to the left/right to select a file. Press the center of the Set Lever, or the USER button that is set as [DELETE]. ● The selected file is indicated with a deletion icon. You can repeat the above steps to select multiple files. 51
-
 1
1 -
2
-
3
-
4
-
5
-
6
-
7
-
8
-
9
-
10
-
11
-
12
-
13
-
14
-
15
-
16
-
17
-
18
-
19
-
20
-
21
-
22
-
23
-
24
-
25
-
26
-
27
-
28
-
29
-
30
-
31
-
32
-
33
-
34
-
35
-
36
-
37
-
38
-
39
-
40
-
41
-
42
-
43
-
44
-
45
-
 46
46 -
 47
47 -
 48
48 -
 49
49 -
 50
50 -
 51
51 -
 52
52 -
 53
53 -
 54
54 -
 55
55 -
 56
56 -
57
-
58
-
59
-
60
-
61
-
62
-
63
-
64
-
65
-
66
-
67
-
68
-
69
-
70
-
71
-
72
-
73
-
74
-
75
-
76
 |
 |
