JVC GY-HM100U Instructions - Page 25
Selecting a Shooting Mode - user manual
 |
UPC - 046838039522
View all JVC GY-HM100U manuals
Add to My Manuals
Save this manual to your list of manuals |
Page 25 highlights
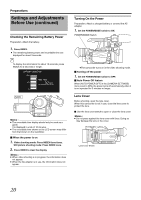
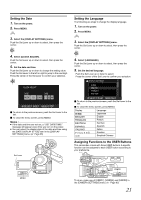
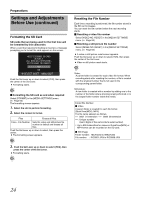
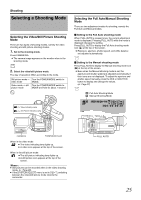
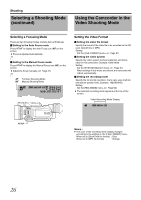
Shooting Selecting a Shooting Mode Selecting the Video/Still Picture Shooting Mode There are two types of shooting modes, namely the video shooting and still picture shooting modes. 1 . Set to the shooting mode. Press CAM/MEDIA. ● The camera image appears on the monitor when in the shooting mode. CAM / MEDIA 2 . Select the video/still picture mode. The way of operation differs according to the mode. Still picture mode h Turn the POWER/MODE switch to video mode MODE. Video mode h still Turn the POWER/MODE switch to picture mode MODE and hold for about 1 second. Video Indicating Lamp Still Picture Indicating Lamp E OGRAM A INDEX T PR W REC CAM / MEDIA USERS DISPLAY Q.REVIEW MENU IRIS OPEN SHUTTER AE ± CLOSE ADJ./ VOL. PUSH ACCESS REC DC CAM/MEDIA POWER/MODE Switch When in the video mode ● The video indicating lamp lights up. ● A video icon appears at the top of the screen. When in the still picture mode ● The still picture indicating lamp lights up. ● A still picture icon appears at the top of the screen. Memo : ● Still pictures can be recorded when in the video shooting mode. (A Page 28) ● If the [SYSTEM SELECT] menu is set to [720-**], switching between the video/still picture mode reboots the camcorder. Selecting the Full Auto/Manual Shooting Mode There are two adjustment modes for shooting, namely the Full Auto and Manual modes. Ⅵ Setting to the Full Auto shooting mode When FULL AUTO is pressed once, the current adjustment mode is displayed. Pressing FULL AUTO while the mode is displayed changes the setting. Press FULL AUTO to display the Full Auto shooting mode icon (A) at the top of the screen. ● Exposure, aperture, shutter speed, and white balance are adjusted automatically. FULL AUTO Ⅵ Setting to the Manual shooting mode Press FULL AUTO to display the Manual shooting mode icon (M) at the top of the screen. ● Even when the Manual shooting mode is set, the aperture and shutter speed are adjusted automatically if their icons are not displayed. To adjust the aperture and shutter speed manually, press the IRIS or SHUTTER button to display and change the values. (A Page 37) FULL AUTO Full Auto Shooting Mode Manual Shooting Mode A [0h57m] B [5h12m] 00:00:00:01 18dB ND ND FILTER ON OFF USER1 USER2 FOCUS ZOOM AF/MF FULL AUTO GAIN WHT.BAL A / B L- B- M- A- H- PRST- A B FULL AUTO 25
-
 1
1 -
2
-
3
-
4
-
5
-
6
-
7
-
8
-
9
-
10
-
11
-
12
-
13
-
14
-
15
-
16
-
17
-
18
-
19
-
 20
20 -
 21
21 -
 22
22 -
 23
23 -
 24
24 -
 25
25 -
 26
26 -
 27
27 -
 28
28 -
 29
29 -
 30
30 -
31
-
32
-
33
-
34
-
35
-
36
-
37
-
38
-
39
-
40
-
41
-
42
-
43
-
44
-
45
-
46
-
47
-
48
-
49
-
50
-
51
-
52
-
53
-
54
-
55
-
56
-
57
-
58
-
59
-
60
-
61
-
62
-
63
-
64
-
65
-
66
-
67
-
68
-
69
-
70
-
71
-
72
-
73
-
74
-
75
-
76
 |
 |
