JVC GY-HM100U Instructions - Page 27
playing the Remaining Space on the, SD Card, Shooting Video - color space
 |
UPC - 046838039522
View all JVC GY-HM100U manuals
Add to My Manuals
Save this manual to your list of manuals |
Page 27 highlights
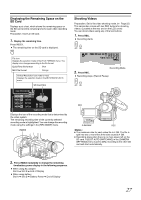
Displaying the Remaining Space on the SD Card Displays a pie chart, which shows the remaining space on the SD card and the remaining time for each video recording mode. Preparation: Insert an SD card. 1 . Display the remaining time. Press INDEX. ● The remaining time on the SD card is displayed. INDEX File Icon Displays the selection made in the [FILE FORMAT] menu. The display color changes according to the file format. QuickTime file format : Blue MP4 file format : Orange Vertical Resolution Icon (1080 or 720) Displays the selection made in the [SYSTEM SELECT] menu. SD Card Slot MAX RECORDING TIME SD A 1h30m 1h20m 2h10m 1h40m FREE USED INDEX SORT Displays the icon of the recording mode that is determined by the video system. The remaining recording time of the currently selected recording mode is hightlighted. You can change the recording mode using the settings in the [REC MODE] menu. INDEX Shooting Videos Preparation: Set to the video shooting mode. (A Page 25) This camcorder comes with two REC buttons for shooting videos. (Located at the rear and on the LCD cover) You can shoot videos using any of the two buttons. 1 . Press REC. ● Recording starts. REC REC [0h57m] B [5h12m] 00:00:00:01 Recording Mode 2 . Press REC. ● Recording stops. (Record Pause) REC REC E OGRAM A REC INDEX T PR W REC CAM / MEDIA USERS DISPLAY Q.REVIEW MENU IRIS SHUTTER AE ʶ ADJ./VOL. PUSH REC DC Q.REVIEW REC Memo : ● The maximum size for each video file is 4 GB. The file is split into two or more files if the size exceeds 4 GB. ● Recording stops when there is no more space left on the SD card. If [SLOT AUTO SWITCHING] in the [CAMERA SETTINGS] menu is set to [ON], recording to the other SD card will start automatically. 2 . Press INDEX repeatedly to change the remaining time/battery power display in the following sequence. ● When using AC adapter Slot A B Slot B B End of Display ● When using battery Slot A B Slot B B Battery Power B End of Display 27
-
 1
1 -
2
-
3
-
4
-
5
-
6
-
7
-
8
-
9
-
10
-
11
-
12
-
13
-
14
-
15
-
16
-
17
-
18
-
19
-
20
-
21
-
 22
22 -
 23
23 -
 24
24 -
 25
25 -
 26
26 -
 27
27 -
 28
28 -
 29
29 -
 30
30 -
 31
31 -
 32
32 -
33
-
34
-
35
-
36
-
37
-
38
-
39
-
40
-
41
-
42
-
43
-
44
-
45
-
46
-
47
-
48
-
49
-
50
-
51
-
52
-
53
-
54
-
55
-
56
-
57
-
58
-
59
-
60
-
61
-
62
-
63
-
64
-
65
-
66
-
67
-
68
-
69
-
70
-
71
-
72
-
73
-
74
-
75
-
76
 |
 |
