JVC GY-HM100U Instructions - Page 57
Setting Menu Screen - memory card
 |
UPC - 046838039522
View all JVC GY-HM100U manuals
Add to My Manuals
Save this manual to your list of manuals |
Page 57 highlights
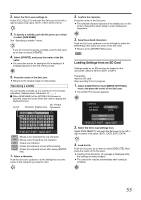
Menu Screens Setting Menu Screens The settings are saved in the memory of the camcorder, and will not be deleted even when the power of the camcorder is turned off. Menu settings vary according to the operation mode. 1 . Set to the operation mode you want to configure. (Video shooting/still picture shooting/video playback/still picture playback modes) 2 . Press [MENU]. ● The menu screen appears. MENU No display: A next layer is available MENU CAMERA PROCESS FILE FORMAT SYSTEM SELECT 1080 60/30 REC MODE 1920 CAMERA SETTINGS FOR REC SET MENU QUIT With display: A next layer is not available Some menu items may come in two layers. The current setting values are displayed on the right for items with only one layer. 3 . Select an item. Push the Set Lever up or down to move the focus to the item you want to select. 5 . Change the parameter. Push the Set Lever up or down to select. Next, press the center of the Set Lever. ● The settings are changed. Ⅵ The menu screens in the second layer can also be altered using the same procedure. Select a parameter from the second layer's menu, then press the center of the Set Lever to return to the first layer's menu. Ⅵ To return to the first layer's menu without changing settings in the second layer's menu, push the Set Lever to the left. 6 . Exit the menu setting screen. Press [MENU]. MENU Memo : ● The settings can be saved to an SD card. (A Page 54) Set Lever MENU 4 . Display the parameters or the second layer's menu. Press the center or right side of the Set Lever. Parameter CAMERA PROCESS FOCUS AOSFSFIST FOCUS AOSNSIST COLOR ZEBRA DETAIL LEVEL FOR EASY FOCUSING RETURN SET MENU QUIT Memo : ● A separate setting screen may appear for some menu items. 57
-
 1
1 -
2
-
3
-
4
-
5
-
6
-
7
-
8
-
9
-
10
-
11
-
12
-
13
-
14
-
15
-
16
-
17
-
18
-
19
-
20
-
21
-
22
-
23
-
24
-
25
-
26
-
27
-
28
-
29
-
30
-
31
-
32
-
33
-
34
-
35
-
36
-
37
-
38
-
39
-
40
-
41
-
42
-
43
-
44
-
45
-
46
-
47
-
48
-
49
-
50
-
51
-
 52
52 -
 53
53 -
 54
54 -
 55
55 -
 56
56 -
 57
57 -
 58
58 -
 59
59 -
 60
60 -
 61
61 -
 62
62 -
63
-
64
-
65
-
66
-
67
-
68
-
69
-
70
-
71
-
72
-
73
-
74
-
75
-
76
 |
 |
