JVC GY-HM100U Instructions - Page 42
Time Code Recording, Setting continued
 |
UPC - 046838039522
View all JVC GY-HM100U manuals
Add to My Manuals
Save this manual to your list of manuals |
Page 42 highlights
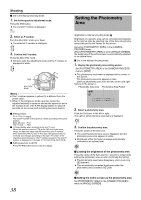
Shooting Time Code Recording Setting (continued) 1 . Select the [TC PRESET] menu, and press the center of the Set Lever. ● The time code preset screen appears. Presetting the Time Code/User's Bit The time code and user's bit can be set in the [TC/UB] menu. There are two ways to display the [TC/UB] menu. Ⅵ Display the menu screen using the MENU button, then select the [TC/UB] menu. (A Page 64) Ⅵ Set [USER1], [USER2], or [USER3] in the [CAMERA SETTINGS] menu to [TC SETTING], then press the corresponding USER button. Assignment of USER buttons: (A Page 21, 65) Setting the time code Use the method above to display the [TC/UB] menu. Ⅵ Setting the run mode of the time code generator. Set the [TC GENE.] menu to [FREE] or [REC]. FREE REC : The time code operates in the run mode at all times. : The time code operates in the run mode only during recording. Ⅵ Setting the framing mode of the time code generator. Set [DROP FRAME] to [DROP] or [NON DROP]. DROP : The time code generator operates in the drop frame mode. Use this setting when placing emphasis on the recording time. NON DROP : The time code generator operates in the non-drop frame mode. Use this setting when placing emphasis on the number of frames. Memo : ● [DROP FRAME] cannot be set when the frame rate is set to 50, 25, or 24. ● Even when the [DROP FRAME] menu is set to [DROP], the targeted drop frames are not skipped automatically in the [TC PRESET] menu. They will be skipped automatically during recording. TC PRESET Sets all digits to "0". 00 : 00 : 00 : 00 RESET SELECT SET MENU STOP Displayed as "." when in the drop frame mode. Displayed as ":" when in the non-drop frame mode. 2 . Set the time code (hour, minute, second, frame). Push the Set Lever up or down to change the setting value. Push the Set Lever to the left or right to jump to the next digit. 3 . Confirm the time code setting. Press the center of the Set Lever. ● Returns to the [TC/UB] menu. Ⅵ Closing the menu screen Press MENU. ● The normal screen is displayed. MENU Presetting the user's bit Select [UB PRESET] in the [TC/UB] menu. The method for setting the user's bit is the same as the method for setting the time code. An alphanumeric character between 0 to 9 and A to F can be specified for each digit. 42
-
 1
1 -
2
-
3
-
4
-
5
-
6
-
7
-
8
-
9
-
10
-
11
-
12
-
13
-
14
-
15
-
16
-
17
-
18
-
19
-
20
-
21
-
22
-
23
-
24
-
25
-
26
-
27
-
28
-
29
-
30
-
31
-
32
-
33
-
34
-
35
-
36
-
 37
37 -
 38
38 -
 39
39 -
 40
40 -
 41
41 -
 42
42 -
 43
43 -
 44
44 -
 45
45 -
 46
46 -
 47
47 -
48
-
49
-
50
-
51
-
52
-
53
-
54
-
55
-
56
-
57
-
58
-
59
-
60
-
61
-
62
-
63
-
64
-
65
-
66
-
67
-
68
-
69
-
70
-
71
-
72
-
73
-
74
-
75
-
76
 |
 |
