JVC GY-HM100U Instructions - Page 18
Setting, and Adju, tment, Before U
 |
UPC - 046838039522
View all JVC GY-HM100U manuals
Add to My Manuals
Save this manual to your list of manuals |
Page 18 highlights
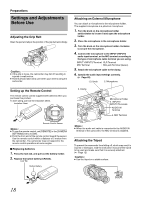
Preparations Settings and Adjustments Before Use Adjusting the Grip Belt Open the pad and adjust the position of the grip belt accordingly. Caution : ● If the grip is loose, the camcorder may fall off resulting in injuries or malfunction. ● Parents should take extra care when your child is using the camcorder. Setting up the Remote Control The remote control comes supplied with batteries when you purchase this product. To start using, pull out the insulation sheet. Insulation Sheet AWB Remote Control Sensor Memo : ● To use the remote control, set [REMOTE] in the [CAMERA SETTINGS] menu to [ON]. ● Point the front end of the remote control toward the sensor. Use the remote control within a distance of 5 meters from the camcorder. The camcorder may not respond to the remote control operations at some angles. Ⅵ Replacing batteries 1 . Press the lock tab, and pull out the battery holder. 2 . Replace the button battery (CR2025). Lock Tab Button Battery Attaching an External Microphone You can attach a microphone to the microphone holder. The supplied microphone is a phantom microphone. 1 . Turn the knob on the microphone holder anticlockwise to loosen it and open the microphone holder. 2 . Place the microphone in the microphone holder. 3 . Turn the knob on the microphone holder clockwise to secure the microphone. 4 . Connect the microphone to the INPUT1/INPUT2 audio input terminal, or the MIC terminal according to the type of microphone cable terminal you are using. INPUT1/INPUT2 Terminal: XLR Terminal MIC Terminal : Mini-jack Terminal (stereo) 5 . Attach the microphone cable to the clamp. 6 . Specify the audio input settings correctly. (A Page 40) 1.3. Knob 2. Microphone 5. Clamp Microphone Holder 4. INPUT1/ INPUT2 Terminals AUDIO IN AUDOIOPEINN Terminal 4. MIC Terminal Memo : ● When the audio unit cable is connected to the AUDIO IN terminal of the camcorder, the MIC terminal is disabled. Attaching the Tripod To prevent the camcorder from falling off, which may result in injuries or damages, read the instruction manual of the tripod to be used and make sure that it is securely attached. (A Page 12) Caution : ● Use the tripod on a stable surface. 18
-
 1
1 -
2
-
3
-
4
-
5
-
6
-
7
-
8
-
9
-
10
-
11
-
12
-
 13
13 -
 14
14 -
 15
15 -
 16
16 -
 17
17 -
 18
18 -
 19
19 -
 20
20 -
 21
21 -
 22
22 -
 23
23 -
24
-
25
-
26
-
27
-
28
-
29
-
30
-
31
-
32
-
33
-
34
-
35
-
36
-
37
-
38
-
39
-
40
-
41
-
42
-
43
-
44
-
45
-
46
-
47
-
48
-
49
-
50
-
51
-
52
-
53
-
54
-
55
-
56
-
57
-
58
-
59
-
60
-
61
-
62
-
63
-
64
-
65
-
66
-
67
-
68
-
69
-
70
-
71
-
72
-
73
-
74
-
75
-
76
 |
 |
