JVC GY-HM100U Instructions - Page 30
Shooting - reviews
 |
UPC - 046838039522
View all JVC GY-HM100U manuals
Add to My Manuals
Save this manual to your list of manuals |
Page 30 highlights
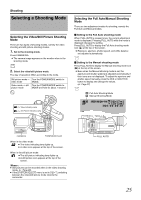
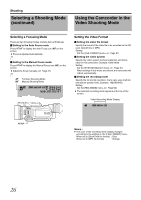
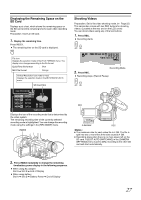
Shooting Using the Camcorder in the Still Picture Shooting Mode (continued) Checking the most recently captured still picture 1 . Press Q.REVIEW. ● The most recently captured still picture is displayed. Q.REVIEW 2 . Press Q.REVIEW again to return to the camera image. Ⅵ Deleting the most recently recorded image During quick review of still pictures, press the USER button that is set as [DELETE]. Assigning functions to the USER buttons:(A Page 21, 65) 2 3 45 CH-2 INPUT AUDIO INPUT INPUT1 INPUT2 - LINE - MIC MIC+48V INPUT1 INPUT2 AUTO MANUAL CH-1 AUDIO SELECT CH-2 AUTO MANUAL 0 1 23 ND FILTER ON OFF USER1 USER2 FOCUS ZOOM AF/MF FULL AUTO GAIN WHT.BAL A / B L- B- M- A- H- PRST- A CAM / MEDIA USERS DISPLAY Q.REVIEW MENU COMPONENT OUT A / V OUT B CAM / MEDIA USERS DISPLAY Q.REVIEW MENU Q.REVIEW Continuous shooting Still pictures are captured continuously while [SNAPSHOT] is pressed down. Set the [SHUTTER MODE] menu to [CONTINUOUS SHOOTING]. (A Page 68) Bracket shooting Three shots with different brightness levels are captured continuously. Set the [SHUTTER MODE] menu to [BRACKETING]. (A Page 68) Using the self-timer You can make use of the 2 or 10-second self-timer. Set the [SELF-TIMER] menu to [2SEC] or [10SEC]. (A Page 68) Memo : ● Continuous shooting is disabled when using the self-timer. Continuous Shooting Mode Bracket Shooting Mode A [0010] B [9999] 10 Self-Timer Zoom Operation Preparation: Set to the video shooting or still picture shooting mode. Adjusts the angle of view. Zoom ratio: 1x to 10x (optical zoom only) Zooming can be operated using any of the four levers/rings below. A Camcorder's zoom lever on the top surface B Camcorder's manual ring: This can be used as a zoom ring when the [FOCUS/ ZOOM] ring switch at the side of the camcorder is set to ZOOM. C Sub zoom lever on the LCD cover D Zoom lever on the remote control The priority order of these levers/rings is in the sequence A > B > C > D. A Zoom Lever B Manual Ring W T OGRAM A E INDEX T PR W REC C Sub Zoom Lever Ring switch set to ZOOM Ⅵ A zoom bar appears during zoom operation. 2x 8x W T 30
-
 1
1 -
2
-
3
-
4
-
5
-
6
-
7
-
8
-
9
-
10
-
11
-
12
-
13
-
14
-
15
-
16
-
17
-
18
-
19
-
20
-
21
-
22
-
23
-
24
-
 25
25 -
 26
26 -
 27
27 -
 28
28 -
 29
29 -
 30
30 -
 31
31 -
 32
32 -
 33
33 -
 34
34 -
 35
35 -
36
-
37
-
38
-
39
-
40
-
41
-
42
-
43
-
44
-
45
-
46
-
47
-
48
-
49
-
50
-
51
-
52
-
53
-
54
-
55
-
56
-
57
-
58
-
59
-
60
-
61
-
62
-
63
-
64
-
65
-
66
-
67
-
68
-
69
-
70
-
71
-
72
-
73
-
74
-
75
-
76
 |
 |
