Kyocera C270N Operation Guide - Page 138
RS-232C Cable Connection (EP C270N only), Connecting the Printer to the Computer, With Windows XP
 |
UPC - 632983011935
View all Kyocera C270N manuals
Add to My Manuals
Save this manual to your list of manuals |
Page 138 highlights
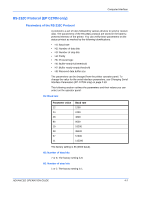
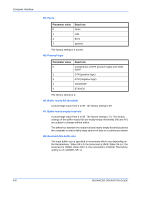
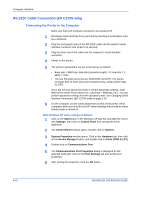
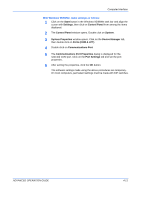
Computer Interface RS-232C Cable Connection (EP C270N only) Connecting the Printer to the Computer Make sure that both computer and printer are powered off. 1 Discharge static electricity from your body by touching a metal object such as a doorknob. 2 Plug the end (printer side) of the RS-232C cable into the printer's serial interface connector and screw it on securely. 3 Plug the other end of the cable into the computer's serial interface connector. 4 Power on the printer. 5 The printer's parameters are set at the factory as follows: • Baud rate = 9600 bps, data bits (character length) = 8, stop bits = 1, parity = none • The two RS-232C protocols are XON/XOFF and DTR. The printer executes both of these protocols simultaneously, using positive logic for DTR. If you are not sure about the printer's current parameter settings, reset them to the values shown above (i.e., baud rate = 9600 bps, etc.). You can perform parameter settings from the operation panel. See Changing Serial Interface Parameters (EP C270N only) on page 2-30. 6 On the computer, set the same parameters as that of the printer. Most computers allow you to do this by DIP switch settings that should be made before power is turned on. With Windows XP, make settings as follows: 1 Click on the Start button in the Windows XP task bar and align the cursor with Settings, then click on Control Panel from among the items displayed. 2 The Control Panel window opens. Double click on System. 3 System Properties window opens. Click on the Hardware tab, then click on the Device Manager button, and double click on Ports (COM & LPT). 4 Double click on Communications Port. 5 The Communications Port Properties dialog is displayed for the selected COM port. Click on the Port Settings tab and set the port properties. 6 After setting the properties, click the OK button. 4-10 ADVANCED OPERATION GUIDE
-
 1
1 -
2
-
3
-
4
-
5
-
6
-
7
-
8
-
9
-
10
-
11
-
12
-
13
-
14
-
15
-
16
-
17
-
18
-
19
-
20
-
21
-
22
-
23
-
24
-
25
-
26
-
27
-
28
-
29
-
30
-
31
-
32
-
33
-
34
-
35
-
36
-
37
-
38
-
39
-
40
-
41
-
42
-
43
-
44
-
45
-
46
-
47
-
48
-
49
-
50
-
51
-
52
-
53
-
54
-
55
-
56
-
57
-
58
-
59
-
60
-
61
-
62
-
63
-
64
-
65
-
66
-
67
-
68
-
69
-
70
-
71
-
72
-
73
-
74
-
75
-
76
-
77
-
78
-
79
-
80
-
81
-
82
-
83
-
84
-
85
-
86
-
87
-
88
-
89
-
90
-
91
-
92
-
93
-
94
-
95
-
96
-
97
-
98
-
99
-
100
-
101
-
102
-
103
-
104
-
105
-
106
-
107
-
108
-
109
-
110
-
111
-
112
-
113
-
114
-
115
-
116
-
117
-
118
-
119
-
120
-
121
-
122
-
123
-
124
-
125
-
126
-
127
-
128
-
129
-
130
-
131
-
132
-
 133
133 -
 134
134 -
 135
135 -
 136
136 -
 137
137 -
 138
138 -
 139
139 -
 140
140 -
 141
141 -
 142
142 -
 143
143 -
144
-
145
-
146
-
147
-
148
-
149
-
150
 |
 |